Advertisement
If you have a new account but are having problems posting or verifying your account, please email us on hello@boards.ie for help. Thanks :)
Hello all! Please ensure that you are posting a new thread or question in the appropriate forum. The Feedback forum is overwhelmed with questions that are having to be moved elsewhere. If you need help to verify your account contact hello@boards.ie
Hi there,
There is an issue with role permissions that is being worked on at the moment.
If you are having trouble with access or permissions on regional forums please post here to get access: https://www.boards.ie/discussion/2058365403/you-do-not-have-permission-for-that#latest

DBOYS M4, Changing front RIS Information

  • 28-12-2007 12:51pm
    #1
    Registered Users, Registered Users 2 Posts: 3,341 ✭✭✭


    Since a few people have requested this here is the way to replace the front set on a DBOYS m4. The particular one i am changing and detailing here is the M4 CQB/R metal version. The differences between this and any other DBOYS should be minimal as they all use the same basic structure. I am replacing the front with this:
    kit_0010.JPG

    Now you may ask why i am replacing a RIS with a RIS, well other then me answering GFY, the real answer in, the RIS on dboys is a 2 piece kit using a delta or D ring like this:
    kit_0056.jpg

    these delta rings are spring loaded and made really for the plastic fore grip on an m4a1. they lower metal ris is supported by the front assembly (a metal circular disk to you and me) and this spring mounted rear delta ring. IF you want to use lasers, lights, front grips these are fine, but putting a m203 on it will lead to problems, particularly if you give it a thump as you are prone to doing running in a wet field in ireland with 5000 bb's chasing your ass.

    what you need to do this
    a pin vice and rubber mallet but anything will do
    a set of allen keys from very small to large
    patience
    a plan (this post for example)
    no fear
    more patience
    oil or grease (preferably grease). To save me typing this again and again, grease all threads before putting new items on.

    Removing the old ris
    to remove the old RIS involves a series or simple steps

    1. removing the lower RIS
    Remove the RIS rails covers if you have them on.. at the front of the rail covers should be a metal spring, depress this and slide the rails forward. Now i never cease to curse here, A LOT. the Dboys ones are actually quite good quality and tight. So you may have to use a bit of force. You dont have to remove them but it easies taking them off on an aeg then off, trust me, i have the cuts to prove it. ITs all hands on deck here. one depressing the metal spring at the front of the cover then forcing the rail forward. WATCH YOUR FINGERS! Its easy to loose patience here and get a wee bit thick with it, but perseverance and bad language help, well they help me anyways. You should now have 2 rails covers off.

    Now to the meat.Pull the D ring which is spring loaded. This is the rear mount for the RIS. Push it back, grab the lower RIS and pull down and back..SLOWLY! you will see the front assembly might hold it. So try not bend this too much as you will need it later (well thats a choice, we will cover later).
    you should now have your aeg in one hand a lower RIS in another. Put it aside.

    2. Removing the Upper Ris
    this is easier, it is the same as the Lower Ris, except it is heavier and has a small hex bolt screwing it on. This hex nut is at the rear top of the Upper ris rail. remove this carefully. As an aside, if your RIS on a Dboys is loose, tighten this, but gently. Now with the nut removed, repeat as the lower RIS. Push back the Delta ring and pull up and back. The upper RIS is much heavier.

    you now have 3 pieces, the upper RIS and nut, the lower RIS and your AEG (okay 4 pieces for the anal retentive people out there).

    3. Removing the front sight and fake gas tube
    Firstly remove the flash hider. To do this you need to loosen a small grub screw on the underside of the flash hider. then unscrew it, not all the way out or you will loose it. There are typically 3 parts to a flash hider. a metal spring washer, a cover and the hider. care fully put these aside.

    So now you should have a flash hider, a cover, a washer, 2 pins.

    Now onto the front sight.
    This does not require brute force and patience BUT IT DOES require patience and then brute force-- there is a difference.

    On the underside of the front sight is a tiny grub screw. loosen this. then with a pin vice knock out the 2 pins on the underside of the sight. you really cant miss them. when these are out, place them aside, you will need them later.

    now to the force...give the rear of the sight a thump with something solid. if you have a rubber mallet, you wont loose paint, if you dont you will. You should see the front sight move forward. This is a case of measured force here. Dont hit at the side although gentle rocking is okay other wise you will bend the silver fake gas tube or worse twist the barrel completely screwing it up and possibly twisting the hopup unit etc etc etc. The silver tube or gas tube is a strenghtener for the barrel and keeping the front sight aligned. a series of small thumps are better then one big one. after much knashing of teeth and sack cloth and ashes like screaming, it will begin to moveeventually coming off.. Sometimes they move quite easily, you might be lucky. the silver tube will stay attached. take it all out. Lay it aside you will need it later.


    3. Removing the delta ring
    For this you need to be really careful, slow and measured or you will strip the threads and as we say in the business, you are truly ****ed. So you need an armourers wrench, a good one. I have a guarder one and it works well. The wrench has 3 nuts sticking out on one side and a series of grips on the other, you will need both. use the side with the 3 nuts and place it in the base of the delta ring, holding the spring mounted part back. use this gently to loose it, then swap over to the other side of the wrench. gently unscrew it. SLOW is the word of choice her, DO NOT RUSH IT. eventually it will come right off. You should now see the outer barrel at the base. I am not replacing the outer barrel as i dont want to, if anyone want steps on that i will do it in a later thread, just ask.

    Replacing the new RIS
    okay this is a few steps. . if you take the outer ribbed cover off by unscrewing it, place that on the barrel. Inside it is a collar that will require the armourers wrench to tighten it. It is very very very important you have this tight and one of the holes aligned exactly straight for the gas tube. you may need to use some of the washers in the kit to do this. TAKE YOUR TIME here. too much force and you will strip a thread , too little and it will be loose. Trust me you will know when to stop. the outer collar should still move. Now take the one piece ris and screw it into the rear collar. Now this is where most people go wrong. Despite what you hear about RIS systems, there is a difference between the lower and upper part. The upper is higher. Scream and shout all you like -- THERE IS A DIFFERENCE. make sure you have the upper part -- well, on the top. To do this requires several attempts and time.

    some tips: screw the lower sleeve onto the ris, holding the RIS straight and not the other way around. For the final alignment have the RIS about 1CM off set allowing you to get it very tight for the last turn, which you do with the RIS and twisting the collar the other way.

    Make sure the RIS is aligned, if it isnt all cool extras you add later will be all offset, and obviously so, guaranteeing the opposite sex (or same sex if you like fn FALs) will never be attracted to you.

    you are nearly there....

    now the RIS system from Rsov is called a free floating version, but since we didnt change the outer barrel we have choices to make now. I chose to put the front sight back on. to do this requires an extra step to above.

    IF YOU DONT WANT THE FRONT SIGHT DONT READ THIS...

    if you choose to do this you need to do 4 things at once. put the collar on as above, tighten the new delta piece, getting one of the holes for the gas tube dead straight. put the RIS on, put the front assembly on, put the gas tube and front sight on and place in the hole. THis will require you fit this twice correctly because The bad news is the gas tube is too long, by about 1cm on mine, BUT you need to check your own one. when you measure, use a dremel or hacksaw to cut the right amount off it. now tighten the RIS as before aligning it. when its fully in place the front sight should sit flush with the front assembly. you can decide if you want the front assembly TBH, i did, but decide yourself because you may need to remove some more from the gas tube.

    I dont want no stenking front sight!
    Firstly you wimp, pulled the chicken switch didnt you?, Well now you can put the flash hider back on or the silencer.

    Bingo...you are done. a Full RIS, and as it happens the way this real world rifle is supposed to look.

    all of this takes about 40 minutes to an hours, or 4 weeks if you include shipping and christmas break.

    if you need piccies, FOR you i will unstrip it and photo it for you, assuming i can convince a 2 year old that pooh bear is really interesting for the 4th time...

    good luck, its a lot easier then it sounds...and is much stronger then the original.

    edit: there is an inner RIS piece you can get that will support the barrel, at the moment i cant remember what it called.

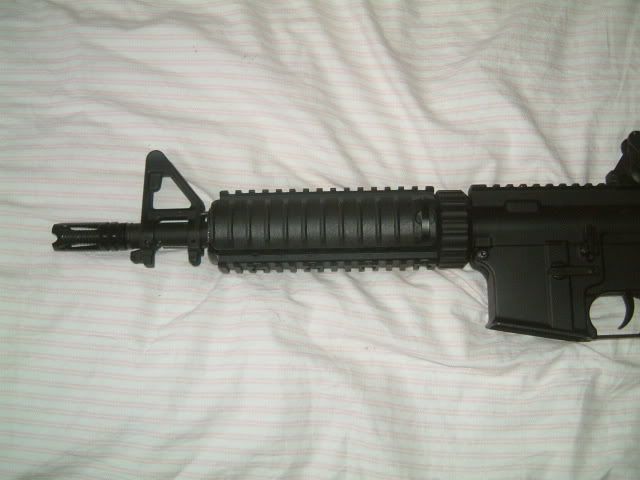
    edit 2 : pic just before completion of the front sight

    DSCF0108.jpg


Comments

  • Registered Users, Registered Users 2 Posts: 2,213 ✭✭✭peter-pantslez


    cheers man thats just what i needed..........


  • Closed Accounts Posts: 94 ✭✭chopper j


    i have the dboys cqb with no frunt sight just the big ass silncer on it and id like the put a difret frunt end on there

    http://www.arairsoft.net/reviews/images/cam15a41.jpg

    if i could dose any one no were i could buy the parts that wold fit it and give it this look im not a fan of the look of the silenced cqb and would like the more tradihionl look and the shother look if i could


Advertisement