Advertisement
If you have a new account but are having problems posting or verifying your account, please email us on hello@boards.ie for help. Thanks :)
Hello all! Please ensure that you are posting a new thread or question in the appropriate forum. The Feedback forum is overwhelmed with questions that are having to be moved elsewhere. If you need help to verify your account contact hello@boards.ie
Hi there,
There is an issue with role permissions that is being worked on at the moment.
If you are having trouble with access or permissions on regional forums please post here to get access: https://www.boards.ie/discussion/2058365403/you-do-not-have-permission-for-that#latest

Curves

  • 04-12-2006 5:39pm
    #1
    Registered Users, Registered Users 2 Posts: 16,624 ✭✭✭✭


    Curves.
    What are they and how do I use them?


    I really should have given my first tutorial a long time ago...but, better late than never eh?

    Right.

    The Curves Box.
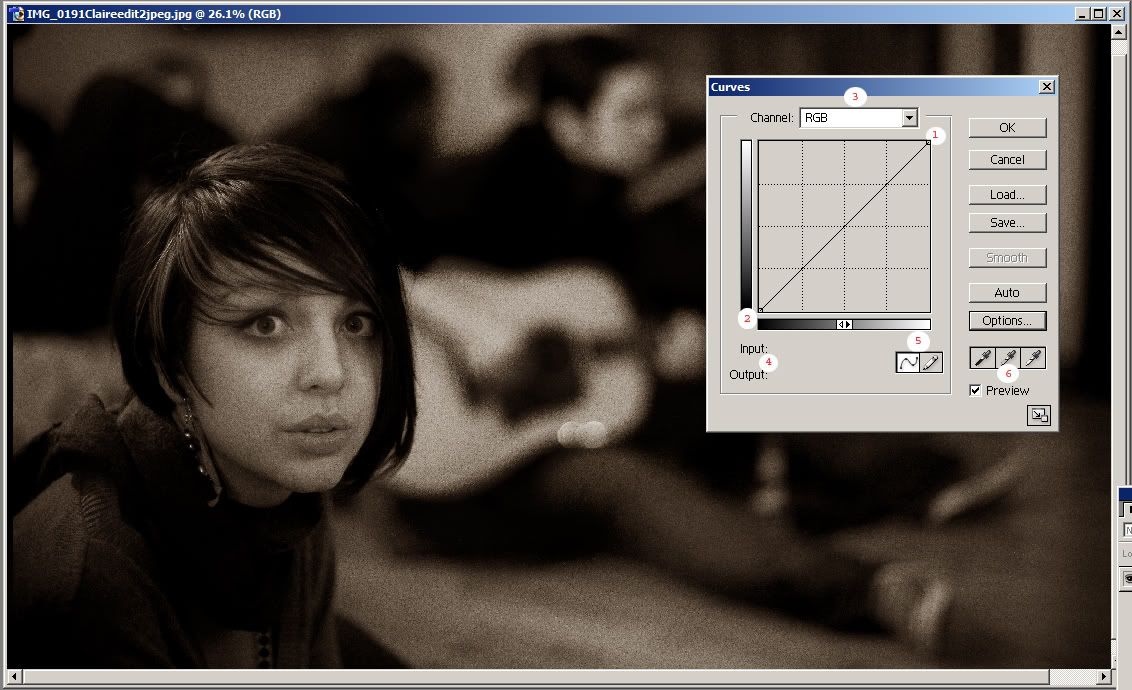
    Tutorial.jpg
    1: The top of the curve. This is your light output. Ie, how much light/brightness you want coming through the image. This will start at the highlights, and run through to the shadows. Holding the left button down on the upper part of the curve and raising it will increase the brightness, lowering it will do the opposite.

    2: The bottom of the curve, and your contrast (blacks) output. Altering this will either darken your darks, or lighten your darks, which you'll see by playing about with it.

    Useful tip with this is...if you totally underexpose a crucial photograph, by using this, carefully, you can rescue the photograph at the cost of grain. Similar to the Shadow/Highlight tools.

    3: Your Channels. As you might know, photographs we take are made up (usually) of red, green and blue... or RGB. When you open photoshop, the curves will alter all of this together... But sometimes it's worth while applying the contrast through each colour individually, rather than all together.

    Reds, will effect the reds in the photo, green; the greens, and suprisingly enough, blue will effect the blues. This works exactly the same as when you are working in RGB, except with more control. Remember that by raising/lowering the curves of one colour, you're neglecting the others. This can lead to creative effects such as cross processing though. It's also quite handy if you shoot jpeg and get a white balance, or a generally nasty colour cast.

    It also helps greatly with red lights, which can't be white balanced.

    4: This are your input/output numbers. Tbh, unless you're a real techie, there's not much too interesting here. It relates to the placement of the mouse on the curves panel...so if you wanted an exact imput of 169 and output of 209...then it may be of some use ;)

    5: Your method of Curving. You can either modify the current curve, which is probably the easiest way of using curves, which is the default (The squigly line). The other method is the pencil, where you draw your own lines. As fun as it may be, unless you have a steady hand, and an intense knowledge of how a curve can affect an image... I'd be sticking with the current curve method.

    6: This is handy in a rush. Basically, you select the dark dropper tool, and select what you think would be the darkest point of the image, ie, what should be black. This will tell photoshop what black looks like. Similar with the light dropper. This tells photoshop what the highlights should look like, and set the 'white point' automatically. Then you have your grey point tool, which is your most neutral colour. You'll probably still have to do some playing around to get the image perfect, but as I said, handy in a rush.


    That's pretty much it. The rest is all down to testing, and playing. :)

    Hope it's of some use.


Comments

Advertisement