Advertisement
If you have a new account but are having problems posting or verifying your account, please email us on hello@boards.ie for help. Thanks :)
Hello all! Please ensure that you are posting a new thread or question in the appropriate forum. The Feedback forum is overwhelmed with questions that are having to be moved elsewhere. If you need help to verify your account contact hello@boards.ie
Hi all! We have been experiencing an issue on site where threads have been missing the latest postings. The platform host Vanilla are working on this issue. A workaround that has been used by some is to navigate back from 1 to 10+ pages to re-sync the thread and this will then show the latest posts. Thanks, Mike.
Hi there,
There is an issue with role permissions that is being worked on at the moment.
If you are having trouble with access or permissions on regional forums please post here to get access: https://www.boards.ie/discussion/2058365403/you-do-not-have-permission-for-that#latest

Classic wooden speedboat build , sink, search for, recovery and rebuild.

2456721

Comments

  • Moderators, Motoring & Transport Moderators, Sports Moderators Posts: 6,337 Mod ✭✭✭✭fergal.b


    breghall wrote: »
    great work fergal, what brand of paint are you using on it if you don't mind me asking

    Thanks, it's "TOPLAC" by international


  • Registered Users, Registered Users 2 Posts: 605 ✭✭✭breghall


    when you rolled and tipped did you find that the toplac did not level out smooth and that you could see light brush strokes when set?

    Only asking as I am currently finding this problem and even thinning it 5-7% won't get rid of brush marks. I have tried changing several brushes and still no difference.

    I'd leave them there if I knew that 1500 or 2000 grit and compound would remove them. Can you get a good gloss looking shine after compounding TOPLAC ?


  • Moderators, Motoring & Transport Moderators, Sports Moderators Posts: 6,337 Mod ✭✭✭✭fergal.b


    I use a roller first and as I go along I just give it a very light rub "tip" with one of these foam brushes thats gets rid of any dimples and lines from the roller I don't thin the paint.

    foam_brush.jpg

    As with my last boat I will end up with a mirror finish :D

    004.jpg


  • Registered Users, Registered Users 2 Posts: 605 ✭✭✭breghall


    foam brush ! i'll definetely give it a go, am not too pleased with results from the regular bristle ones.

    thanks Fergal,


  • Closed Accounts Posts: 80 ✭✭muracan


    Wow!
    Great to see an expert at work!
    Well done!Super stuff, can't wait to see the finished article!


  • Moderators, Motoring & Transport Moderators, Sports Moderators Posts: 6,337 Mod ✭✭✭✭fergal.b


    muracan wrote: »
    Wow!
    Great to see an expert at work!
    Well done!Super stuff, can't wait to see the finished article!

    Thanks, I hope to start work stripping down the trailer next week and getting ready to flip the boat.:)


  • Closed Accounts Posts: 80 ✭✭muracan


    One question....how will the fiberglass "gloss coat" gel so well to the timber considering that you coated her outside with moisture in the air?Surely it will separate over time?


  • Moderators, Motoring & Transport Moderators, Sports Moderators Posts: 6,337 Mod ✭✭✭✭fergal.b


    When I wet out the fiberglass cloth the resin also seeps into the wood blending the two together, I also turn on a 500w light under the boat that warms the hull up to help it cure the resin also heats up as it sets with the chemical reaction so no problem with moisture.


  • Closed Accounts Posts: 236 ✭✭davlacey


    what type off filler are you using on top off the fiberglass i need to cover a patch on the hull?


  • Advertisement
  • Moderators, Motoring & Transport Moderators, Sports Moderators Posts: 6,337 Mod ✭✭✭✭fergal.b


    davlacey wrote: »
    what type off filler are you using on top off the fiberglass i need to cover a patch on the hull?

    Hi davlacey any filling I do I use west system 405 micro balloons mixed with epoxy resin, if you are not painting your hull you can also get a white filler to mix in or you can buy a gelcoat repair kit.


  • Moderators, Motoring & Transport Moderators, Sports Moderators Posts: 6,337 Mod ✭✭✭✭fergal.b


    These crackerboxes sure look like fun :D :eek:


  • Registered Users, Registered Users 2 Posts: 1,217 ✭✭✭moonshadow


    Ok Fergal.......at your last launch we had photograpers,self inspired safety officials and the national press..............
    If this is your proposed crackerbox launch we need a wee bit more help!!


  • Moderators, Motoring & Transport Moderators, Sports Moderators Posts: 6,337 Mod ✭✭✭✭fergal.b


    moonshadow wrote: »
    Ok Fergal.......at your last launch we had photograpers,self inspired safety officials and the national press..............
    If this is your proposed crackerbox launch we need a wee bit more help!!

    Maybe just an ambulance and a rescue helicopter :D


    .


  • Moderators, Motoring & Transport Moderators, Sports Moderators Posts: 6,337 Mod ✭✭✭✭fergal.b


    Drilled out the hole for the prop shaft today, I had been putting it off a bit as there is no room for a mistake here.The angle was worked out from the engine setup and then marked on a bit of scrap wood where I drilled out a hole to take the extension bar holding the 2" bit, I also put a block of wood on the keel inside and out the same angle as the bit to give the tip a starting point and so it would not start walking when it came through.
    2011-12-05111738.jpg

    All in all it went well except for the sawdust and smoke under the boat from drilling a 10" x 2" hole in mahogany while lying on your back, in the end it came out spot on target :D I now have to epoxy in a fiberglass tube to seal it up and then cut it down to size.
    2011-12-09162351.jpg


  • Registered Users Posts: 132 ✭✭cmac


    Well done. Definitely not a job you want to rework if at all possible.


  • Advertisement
  • Closed Accounts Posts: 236 ✭✭davlacey


    im doing the opposite i have a prop shaft coming out and i want to blank it any idea whats best leave the pipe out and blank it or cut it out completly?


  • Moderators, Motoring & Transport Moderators, Sports Moderators Posts: 6,337 Mod ✭✭✭✭fergal.b


    davlacey wrote: »
    im doing the opposite i have a prop shaft coming out and i want to blank it any idea whats best leave the pipe out and blank it or cut it out completly?

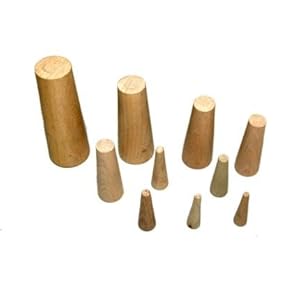
    If you can get a wooden plug a bit bigger than the diameter of the hole on the outside of the hull, coat it in silicone or thickened epoxy and tap it in tight then cut off whats left and sand flush if it's a wooden boat and if it's fiberglass tap it in another 1/2" and fill the rest of the hole with thickened epoxy and sand.
    You can buy bags of plugs from marine shops or just make one.31t42wPuK7L._SL500_AA300_.jpg


  • Closed Accounts Posts: 236 ✭✭davlacey


    its a brass pipe thats threaded at both ends would i be better putting a nut on the inside of the boat and cuttting it flush with the hull or leave the pipe the way it is and just put 2 nuts each end? im afraid if i leave it sticking out it might ger damaged launching. it originally had a lister inboard but i took it out also have the rudder pipe to do something with heres a pic


  • Moderators, Motoring & Transport Moderators, Sports Moderators Posts: 6,337 Mod ✭✭✭✭fergal.b


    davlacey wrote: »
    its a brass pipe thats threaded at both ends would i be better putting a nut on the inside of the boat and cuttting it flush with the hull or leave the pipe the way it is and just put 2 nuts each end? im afraid if i leave it sticking out it might ger damaged launching. it originally had a lister inboard but i took it out also have the rudder pipe to do something with heres a pic

    I would cut it off flush same with the rudder shaft or take them out all together if your never going back to an inboard, you should start your own post on what you are doing I would like to see how you get on :D


  • Closed Accounts Posts: 236 ✭✭davlacey


    yea i think thats my plan ill cut them both flush. i probably will start my own post after christmas all im doing at the moment is scraping all the old paint off and sanding it back to bare fiberglass taking forever by hand


  • Advertisement
  • Moderators, Motoring & Transport Moderators, Sports Moderators Posts: 6,337 Mod ✭✭✭✭fergal.b


    davlacey wrote: »
    yea i think thats my plan ill cut them both flush. i probably will start my own post after christmas all im doing at the moment is scraping all the old paint off and sanding it back to bare fiberglass taking forever by hand

    I know how you feel I hate sanding :D


  • Closed Accounts Posts: 236 ✭✭davlacey


    what way are u sealing the stearntube on it fergal mine was a grease system or are you using bearings


  • Moderators, Motoring & Transport Moderators, Sports Moderators Posts: 6,337 Mod ✭✭✭✭fergal.b


    davlacey wrote: »
    what way are u sealing the stearntube on it fergal mine was a grease system or are you using bearings

    I'm using a grease filled one like this.

    109654.jpg


  • Registered Users Posts: 46 orion50


    Beautiful work - lovely to see the progress you have made!


  • Closed Accounts Posts: 236 ✭✭davlacey


    what kind of rudder is this boat going to have any pics of what a finished boat will look like?


  • Moderators, Motoring & Transport Moderators, Sports Moderators Posts: 6,337 Mod ✭✭✭✭fergal.b


    Hi davlacey I have two choices here and it will depend on how much room I have behind the prop, this is the one I have and hope to use.

    2012-01-27161644.jpg

    And if I end up tight for room I will make one like this.
    164847_196801890333976_133952219952277_832353_5941816_n.jpg

    When she is finished she should look like this :D

    pic517i2.jpg

    pic517i3.jpg


    .


  • Closed Accounts Posts: 236 ✭✭davlacey


    i see think the first one might be a bit tight.. do you have a prop shaft and propeller i traded an inboard with prop shaft looks like it was the same size as the boat in the pic shaft and propeller where solid brass


  • Moderators, Motoring & Transport Moderators, Sports Moderators Posts: 6,337 Mod ✭✭✭✭fergal.b


    I have a 13x13 4 blade prop that should do I have to make a new strut to bring down the angle and may have to shave the prop to 12" so it's not too close to the hull, it will all be fun and games to get everything right :D


    2011-11-09160255.jpg


  • Moderators, Motoring & Transport Moderators, Sports Moderators Posts: 6,337 Mod ✭✭✭✭fergal.b


    I have made up a new strut now and it seems to be a better fit
    2011-12-07112720.jpg

    2012-02-081127331.jpg

    2012-02-081204251.jpg

    I still have to sink it down a bit and fiberglass up the holes but I think it will be fine giving me the 2" gap from the prop to the hull.

    2012-02-13112902.jpg
    Next job is to fit the rudder "it will be tight" and then sand the boat down and do 3-4 more coats of paint.
    2012-02-13112921.jpg

    Just drilled another hole for the rudder "I think it will work out ok" :D

    2012-02-13165310.jpg


    .


  • Closed Accounts Posts: 236 ✭✭davlacey


    your doing great work when do you think it will be finished? the new rudder looks the part alright


  • Advertisement
  • Moderators, Motoring & Transport Moderators, Sports Moderators Posts: 6,337 Mod ✭✭✭✭fergal.b


    davlacey wrote: »
    your doing great work when do you think it will be finished? the new rudder looks the part alright

    Cheers, I hope to finnish this summer if everything goes to plan but then again nothing to do with boats goes to plan. :D


    .


  • Closed Accounts Posts: 236 ✭✭davlacey


    fergal where did u get the brass fin im looking for one a bit bigger though


  • Moderators, Motoring & Transport Moderators, Sports Moderators Posts: 6,337 Mod ✭✭✭✭fergal.b


    davlacey wrote: »
    fergal where did u get the brass fin im looking for one a bit bigger though

    I got them off the donor ski boat, they were a bit bigger and I cut them down to size, If you had asked me two weeks ago I could have given you two of them as I left them sitting on the boat when I sold it.
    They would be easy to make out of stainless steal.


  • Closed Accounts Posts: 236 ✭✭davlacey


    yea plan to make one just wanted a picture to copy the design,there is a boat like your building on adverts for 50k


  • Moderators, Motoring & Transport Moderators, Sports Moderators Posts: 6,337 Mod ✭✭✭✭fergal.b


    davlacey wrote: »
    yea plan to make one just wanted a picture to copy the design,there is a boat like your building on adverts for 50k

    There are a few here that might give you an idea. http://www.boatdesigns.com/Fins/products/61/

    He has been selling that boat for a few years now it's a bit much for a real Chris craft let alone a Glen-l :D


    .


  • Registered Users Posts: 46 orion50


    Fergal,
    You are putting together a lovely job there. I just noticed your post 80 above where you show the shortened strut holding the prop shaft to the keel. I am sure you are fully taking into account the need to have the end face of the prop shaft mating fairly with the rotating face from the engine transmission ( pardon my terminology) - you can not afford to have any play in that at all. Anyway you are going so well i have no doubt you have that covered.

    Good luck


  • Moderators, Motoring & Transport Moderators, Sports Moderators Posts: 6,337 Mod ✭✭✭✭fergal.b


    orion50 wrote: »
    Fergal,
    You are putting together a lovely job there. I just noticed your post 80 above where you show the shortened strut holding the prop shaft to the keel. I am sure you are fully taking into account the need to have the end face of the prop shaft mating fairly with the rotating face from the engine transmission ( pardon my terminology) - you can not afford to have any play in that at all. Anyway you are going so well i have no doubt you have that covered.

    Good luck

    Cheers I think I have it sorted "I hope":D the strut won't be fixed in place till after the engine is in, there has never been one built with a gearbox before as they were all direct drive so a lot of figuring out to do with the added weight and trying to keep the center of gravity. Time will tell whether it's :eek: or :D


  • Moderators, Motoring & Transport Moderators, Sports Moderators Posts: 6,337 Mod ✭✭✭✭fergal.b


    A bit of fine weather today so out with the varnish :) this is more for UV protection to stop the wood from fading with the sun light. I will be doing another 6 coats when she is turned over and I have the deck done just incase it gets any dings or scratches along the way.

    2012-03-23150646.jpg

    2012-03-23150616.jpg


  • Registered Users Posts: 219 ✭✭ScabbyLeg


    Looks lovely. Do you have much work left to do before you flip her over?


  • Advertisement
  • Moderators, Motoring & Transport Moderators, Sports Moderators Posts: 6,337 Mod ✭✭✭✭fergal.b


    Cheers, I'm just going to 1500 wet sand the red paint and polish it up and then flip it over onto the trailer " that's going to be fun " Next step then is to fit the engine and hardware and have a little test run to the delight of the neighbours :D


  • Moderators, Motoring & Transport Moderators, Sports Moderators Posts: 6,337 Mod ✭✭✭✭fergal.b


    I moved the boat forward by putting a few bits of pipe under the building frame and just rolled it out, next I added two 8 foot lengths of 4x2 to the boat to use as handles and to keep it off the ground.

    2012-03-30170312.jpg

    It was a bit tight on one side :D

    2012-03-30170348.jpg

    Sorry no photo of the turn as my hands were full, but with the help of 3 mates and a few beers we got her on her side then lifted it up from the bottom and over she went.

    2012-03-30200211.jpg
    2012-03-30200127.jpg

    For the first time she is looking like a boat :D

    2012-03-30200056.jpg


  • Registered Users, Registered Users 2 Posts: 545 ✭✭✭Daibheid


    Looks superb although I struggle with the idea of it holding that big V without twisting or splintering - particularly on the trailer on a bumpy road. I know plywood and GRP are a formidable combination but ....:)


  • Moderators, Motoring & Transport Moderators, Sports Moderators Posts: 6,337 Mod ✭✭✭✭fergal.b


    The V8 can do a bit of twisting alright, I'll just have to hang on tight like these guys:D

    DA%20P-9r.JPG


    P-9.JPG

    P-9%20boat.JPG


  • Registered Users, Registered Users 2 Posts: 545 ✭✭✭Daibheid


    Neat barrel roll! The important thing is their engine didn't go under!


  • Moderators, Motoring & Transport Moderators, Sports Moderators Posts: 6,337 Mod ✭✭✭✭fergal.b


    The first coat of epoxy on the inside I will give it one more then sand and varnish.

    2012-04-20142650.jpg
    2012-04-20142716.jpg


  • Advertisement
  • Moderators, Motoring & Transport Moderators, Sports Moderators Posts: 6,337 Mod ✭✭✭✭fergal.b


    Two coats of epoxy and two of varnish and boy was it a pain to sand in between each coat.

    2012-05-05121517.jpg

    Hopefully I will have the engine sitting here in the next week or so :D

    2012-05-05121418.jpg


  • Registered Users, Registered Users 2 Posts: 120 ✭✭colliemcc


    Looking very well Fergal


  • Moderators, Motoring & Transport Moderators, Sports Moderators Posts: 6,337 Mod ✭✭✭✭fergal.b


    Back to a proper engine:D I'm just doing a dry fit to make sure everything lines up.

    Don't drop please don't drop :eek:

    2012-05-14160921.jpg

    Went in fine and spot on with the shaft, boy it looks big when your sitting behind it :eek: The risers are a bit higher than the deck beams that were in the plans so I will have to make up new ones with a bigger curve, I did price some nice low risers but they are silly money.

    2012-05-15164759.jpg

    Brummmm Brummmmm :D

    2012-05-15171258.jpg


  • Registered Users, Registered Users 2 Posts: 545 ✭✭✭Daibheid


    Yum that looks sweet!


  • Registered Users, Registered Users 2 Posts: 120 ✭✭colliemcc


    beautiful Fergal


  • Advertisement
Advertisement