Advertisement
If you have a new account but are having problems posting or verifying your account, please email us on hello@boards.ie for help. Thanks :)
Hello all! Please ensure that you are posting a new thread or question in the appropriate forum. The Feedback forum is overwhelmed with questions that are having to be moved elsewhere. If you need help to verify your account contact hello@boards.ie

What did you do to prepare today?

Options
1181921232442

Comments

  • Registered Users Posts: 211 ✭✭nuub


    I got a lead ball mold last week, makes 8 12mm balls per pour. Though I do have an absolute **** load of old lead colleroes from jobs over the last few months. Spent two and a half hours the other night melting lead and making shot. Made about 200 balls then came to my sences, unless we get invaded now, like right now, I'll not run out. And still have a load of old lead left too!!

    You weren't making more than you needed you were just "honing your skills" :D


  • Registered Users Posts: 622 ✭✭✭Deise Musashi


    Is it one of the fishing weight molds?
    What do you do with the channel for the wire if it is the same?

    mansfield_ball_sinker_mould_018.jpg


  • Registered Users Posts: 220 ✭✭thehippychippy


    Same type of mould alright. I don't do anything with the slot for the wire. When I pour the lead in, the balls come out connected, like the old airfix kits. Just snip the lead balls off and stick the off cuts back in the liquid lead. I can stick up a few photos in the next day or two if ya like
    Great excuse to make more ammo :-)


  • Registered Users Posts: 622 ✭✭✭Deise Musashi


    That sounds about right.

    I need an aviation snips to tidy up the balls!

    Do you preheat the mold? I remember fishing sinkers wrinkled by the change in temp.


  • Registered Users Posts: 220 ✭✭thehippychippy


    this is my, fairly primative, set up for making lead ammo for the catapult


  • Advertisement
  • Registered Users Posts: 220 ✭✭thehippychippy


    Don't worry, the varnish cans in the backround no longer contain varnish, or anything flamable


  • Registered Users Posts: 220 ✭✭thehippychippy


    I think the pics are fairly self-explanatory, but, I cut the lead into about 20mm squared pieces. Heat them in a stainless steel ladle (from the 2 euro shop) over an old lidl camping stove. There tends to be a lot of dross on top from the impurities in the lead which you can take out with a spoon or stick. I hold the moulds together with a clamp, then pour the lead in trying to keep as fluid a pour as possible. the first pour warms up the mould, and if the balls aren't perfect, just put them back in the ladle!!
    After a minute (actually less), the lead in the mould is hard as, well, lead! Cut of the bits as close to the ball as possible and put the bits back in the ladle and hey presto, you've got ammo!! Don't worry if the balls have a few edges from the snips on them, they don't have to be perfect. Out of a piece of lead flashing around 6" x 4" and 1/8" thick, I got 24 lead balls. The last pic is my back up ammo store. I've about 50 more balls in my ammo bag with my catapult.
    Hope this helps.


  • Registered Users Posts: 3,088 ✭✭✭aaakev


    Where did ya get the mould?


  • Registered Users Posts: 622 ✭✭✭Deise Musashi


    Thanks a million for that Chippy!
    Never thought of melting in a ladle, was looking for a cast iron vessel to melt in and scoop out of...

    I got my moulds from ronnie sunshines on the Bay. Same as these ones.


    http://www.ebay.co.uk/itm/BALL-LEAD-SINKER-MOULD-FISHING-WEIGHT-MOULDS-/330828892935?pt=UK_SportingGoods_FishingAcces_RL&var=&hash=item4d06f04b07


    I have seen a lad on youtube making practice ammo out of modeling clay, rolled into a ball in the hands and left out to dry. Hard and roughly the same size and weight as each other, breaks in a puff of dust.


  • Registered Users Posts: 220 ✭✭thehippychippy


    aaakev wrote: »
    Where did ya get the mould?
    On eBay, just search for lead moulds and you should be good


  • Advertisement
  • Registered Users Posts: 3,088 ✭✭✭aaakev


    Bought a machete, nice one too


  • Registered Users Posts: 220 ✭✭thehippychippy


    aaakev wrote: »
    Bought a machete, nice one too

    Class


  • Registered Users Posts: 4,111 ✭✭✭ShadowFox


    aaakev wrote: »
    Bought a machete, nice one too
    How do you find the grip on the handle I was looking to get on a couple of years ago but the handle turned me off so picked up one of these instead (the one in the middle)

    DSCF0354.JPG


  • Registered Users Posts: 3,088 ✭✭✭aaakev


    handle feels ok so far but ill put it to the test tomorrow. Its very heavy and made solid so i have no doubt it will be good just wait and see how the edge holds up and how easy it is to maintain


  • Registered Users Posts: 622 ✭✭✭Deise Musashi


    A second cut file or a coarse stone are good for touching up machete.

    I like the size of the paratrooper machete, but I would consider using rubber shrink tube/inner tube/grip tape on the handle to save the blisters.

    If you'd like I could put a sharp convex edge on it with a slack belt grinder, very sharp but durable.

    Shadowfox, how do you like the Dark Ops knife? Looks a lot like an extrema ratio.


  • Registered Users Posts: 4,111 ✭✭✭ShadowFox


    Shadowfox, how do you like the Dark Ops knife? Looks a lot like an extrema ratio.
    I love it the one in the picture is my 2nd one not been in the field as yet the 1st one is still going strong a mate "borrowed" it last year for a camping trip to scotland and keeps forgetting to return it :rolleyes: The sheath it came with was crap so changed it for a plce one Its fairly heavy the cord cutter on the top of the blade is handy as i can cut cord while its in the sheath the match striker in the handle (dont think it was designed for that ) is also very handy The saw on the back of the blade isnt the greatest id rather a plain back to it Think i paid €25 each for them (bought 3) about 2 or 3 years ago and as i said I love it


  • Registered Users Posts: 3,088 ✭✭✭aaakev


    A second cut file or a coarse stone are good for touching up machete.

    I like the size of the paratrooper machete, but I would consider using rubber shrink tube/inner tube/grip tape on the handle to save the blisters.

    If you'd like I could put a sharp convex edge on it with a slack belt grinder, very sharp but durable.

    Shadowfox, how do you like the Dark Ops knife? Looks a lot like an extrema ratio.
    Ill defo take ya up on that dude if ya dont mind, ill send it down withe the young lad from work again some weekend!

    Put it through its passes today, was clearing trees and rubbish with the oul lad in his house so decided to use it in place of the chain saw for a while, i managed to cut a tree down out the back with it that was about 18-20 inches in diamiter and trimed all the branches off it too, used it on a loan of other stuff too just to give it a hard days work and it held an edge very well imo for the abuse it took. The handle was a bit of a problem, no blisters but it slipped around a small bit the odd time so will defo look at the rubber tube around it like you said because i think it will help.

    For anyone thinkin of getting one id recomend it, im gonna get another one to have and keep using this one. Very impressed and defo a good buy


  • Registered Users Posts: 375 ✭✭jugger


    picked up a lankesy sharpener as I am no
    Deise Musashi :(


    I gave it a quick run today and it looks pretty good well much better than my free hand sharping :o


  • Registered Users Posts: 622 ✭✭✭Deise Musashi


    :D

    Lansky do a good job, did you get the stones or diamond plates?

    The main thing with the Lansky is to get the guide rod level with the stone, may take a little bending. Let the abrasive do the work, use just enough pressure to make solid contact with the edge.

    Some blades can be awkward to clamp (full flat grind where there's no flats) but a bit of leather can help. On longer blades you might need to clamp in a couple of spots and blend the transitions into each other.

    Also handy to use one as a handheld stone for touch ups in the field, or on machetes and axes.

    Well wear lad, a sharp edge is a safer edge :eek:

    Handy tutorial here

    http://edcforums.com/threads/some-lansky-sharpener-tips-warning-pic-heavy.98802/


  • Registered Users Posts: 375 ✭✭jugger


    thanks for the link deise some nice tips there :)

    the kit came with three stones 600 grit 280 grit and 120 grit

    I am impressed however I can see this escalating as the degree markings are 17 ish 20 ish 25 ish and 30 ish I already want to remove the ish from the process


  • Advertisement
  • Registered Users Posts: 622 ✭✭✭Deise Musashi


    I can see this escalating as the degree markings are 17 ish 20 ish 25 ish and 30 ish I already want to remove the ish from the process

    Oh it's a slippery slope down the rabbit hole! :D

    You could start by using an appropriate rod guide on an adjustable post, something like this.

    JToO3.jpg

    It's an RBC Heim HM4, which is a "precision spherical joint."

    I feel your pain! Have a look at some of these, other poor addicts have tried to ease the itching!


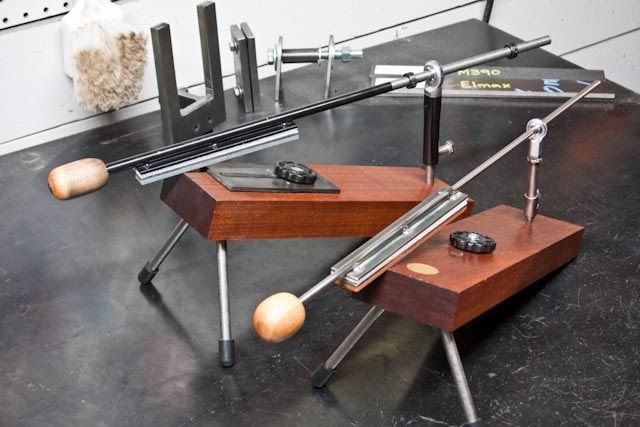
    Homemade Wicked Edge type sharpener

    http://www.bladeforums.com/forums/showthread.php/873219-My-Sharpening-Rig-Inspired-by-WickedEdge-and-ApexPro-Pict-Heavy

    JKN1J.jpg

    Edge Pro style

    2011-01-10221320.jpg

    IMG_6604.jpg

    Lansky Type

    images?q=tbn:ANd9GcSek-S78V1gX24121TfeyHLPE587ykl6xjJprx3QQ5yDpZlsr_9

    Knock Off Edge Pro Apex

    41DXPMfJ9eL._SY450_.jpg

    Angle Cube (I use one of these)

    31aJqn3rb-L.jpg

    Lansky leather stropping hone for final finishing

    41puqtqr90L._SX385_.jpg


    Best of luck with it buddy!

    Eric.


  • Registered Users Posts: 375 ✭✭jugger


    Oh it's a slippery slope down the rabbit hole! :D


    Best of luck with it buddy!

    Eric.


    your really not helping ...........the wife isn't going to like this at all ;)


  • Registered Users Posts: 622 ✭✭✭Deise Musashi


    I am helping!

    I didn't post links to the Edge Pro Pro model

    edgepro.jpg

    http://www.edgeproinc.com/Professional-Model-Edge-Pro-System/Pro-3-kit-p10.html

    the Wicked Edge

    we100pr2-1.jpg

    http://www.wickededgeusa.com/index.php?page=shop.product_details&flypage=flypage.tpl&product_id=467&category_id=72&option=com_virtuemart&Itemid=93

    Or the aftermarket add on stones and stropping pastes from Chefknivestogo.com Nanocloth strops anyone?

    http://www.chefknivestogo.com/edgepro.html

    http://www.chefknivestogo.com/wickededge.html

    http://www.chefknivestogo.com/kenscorner.html

    If you do nothing else, try stropping on some leather with a bit of Flitz or Autosol rubbed into it! Really nice finishing touch.


    P.S. Hide your wallet...


  • Registered Users Posts: 1,399 ✭✭✭Rosahane


    I am helping!

    I didn't post links to the Edge Pro Pro model

    edgepro.jpg

    http://www.edgeproinc.com/Professional-Model-Edge-Pro-System/Pro-3-kit-p10.html

    the Wicked Edge

    we100pr2-1.jpg

    http://www.wickededgeusa.com/index.php?page=shop.product_details&flypage=flypage.tpl&product_id=467&category_id=72&option=com_virtuemart&Itemid=93

    Or the aftermarket add on stones and stropping pastes from Chefknivestogo.com Nanocloth strops anyone?

    http://www.chefknivestogo.com/edgepro.html

    http://www.chefknivestogo.com/wickededge.html

    http://www.chefknivestogo.com/kenscorner.html

    If you do nothing else, try stropping on some leather with a bit of Flitz or Autosol rubbed into it! Really nice finishing touch.


    P.S. Hide your wallet...

    P.P.S. Hide the credit card statement :eek:


  • Closed Accounts Posts: 1,520 ✭✭✭eirator


    Or you could take your credit card out on this Tormek T7.

    Been on my mind for years to get one and nearly bought the much cheaper T3 a couple of times before I thought better of it. Perhaps more of a woodworkers sharpening system but it will still take handle a large felling axe or a machete with no problem.


  • Registered Users Posts: 622 ✭✭✭Deise Musashi


    I thought about the Tormek but eventually decided a hollow grind from a wheel wouldn't suit me, or be as flexible, as using abrasive belts on a grinder that allows convexing on a slack belt, hollow grinding on the wheel or flat grinding on the platen.

    I got a Viel 1" x 42" with no motor, had a lad here put a motor on it that's been set to run about 900rpm. to keep the steel cool.

    S-5-M-131572-1.jpg


    I know some lads who are very happy with their Tormek machines, but the dressing of wheels and different jigs for different jobs didn't appeal. I sort of freehand on the slack belt as I mostly convex with the belt grinder. I could knock up a clamp system to work with the table and use as a guided system.
    There are also knife and scissor attachments available for the Viel.


  • Moderators, Recreation & Hobbies Moderators, Sports Moderators Posts: 15,697 Mod ✭✭✭✭Tabnabs


    Finally got round to getting a button compass. Got the BCB one from ebay after reading decent things about it. Will put it in the new survival belt pouch I'm putting together.


  • Registered Users Posts: 211 ✭✭nuub


    Would not mind a small review Tabnabs if you get to put it to use.


  • Closed Accounts Posts: 678 ✭✭✭silentrust


    Got the frame of a second hand (free) 8x6 Aluminum glasshouse together, a grand youngfella in B&Q sorted me out with a bag of stainless steel bolts that are used to hold them together.

    Also collected two boxes of Augmentin and Britapen,

    Forgot, collected 2 x 5 Gallon drums for holding water.

    Excellent, how is greenhouse working out? I'm toying with the idea of getting one as to date have only used the small plastic ones for herbs - Have you thought about getting some rain butts to collect fresh water? Sadly it's very difficult to store so like you I only have a few gallons which I filled from the tap in addition to the rain barrels.


  • Advertisement
  • Closed Accounts Posts: 678 ✭✭✭silentrust


    ShadowFox wrote: »
    In the last month Ive moved to a rented house due to building work being done in my house that ive been planning for the last few years Ive had a complete nightmare with board gas due to the last tenant here having the same surname as me (no relation) Board gas wouldnt connect the gas even though i was changing address it took 2 weeks landlords estate agents phone calls letters and faxes to get it all sorted Thankfully I had 2 supersers in my bug in kit and lots of extra blankets as the house was like a fridge with no open fire And of course the cooker worked off of gas too so my gas camping stoves were used for the first day until i got to argos to get the bigger gas cooker (landlord paid) Im just glad i had some stuff put by or it would have cost me a fortune

    Thanks Shadowfox, I love hearing these kind of stories - although naturally I'm not happy you were inconvenienced in this way! It helps people get into a survival mindset and also illustrates that it doesn't take flesh eating zombies for your kind of skills to come in handy!

    I am hoping to move towards solar power as time goes on but to be realistic think my home will have to stay "on the grid" power wise for the foreseeable future.

    Toyed with the idea of getting a diesel generator but I wouldn't have the faintest idea how to fix it if anything went wrong, the noise would draw too much unwanted attention and there'd be no way to fuel it - something that doesn't seem to have occurred to those people in the Zombie Survival threads jocularly imagining what kind of vehicle they'll be driving!


Advertisement