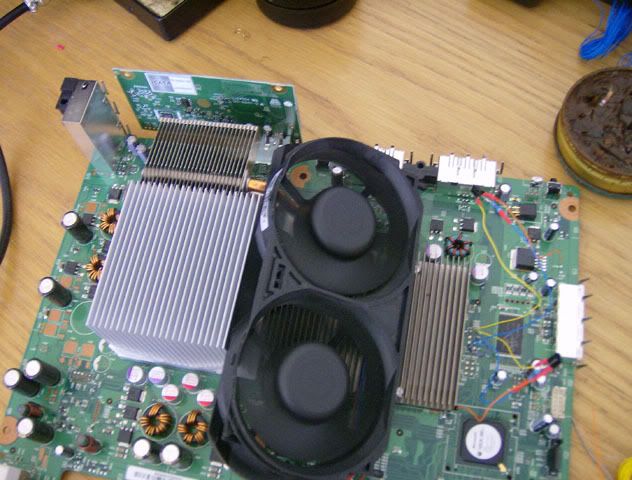
I get a few private messages and there are plenty of posts here on the forum about the xbox 360 JTAG. With that in mind, here's a condensed version of what you need to know, and what you need to do to get up and running with your very own JTAG.
Please note that a more thorough/complete guide is available
here.
Can my console be JTAG'd?
The key to the JTAG is the version of the console's 2nd level bootloader (CB). Certain bootloaders are vulnerable to exploitation, others are not. A massive indicator as to the eligibility of the console for the JTAG is the dashboard version you are running. Go to the System Settings menu, then Console Settings and then System Information. You will see the "Dashboard version" on the right. You
need a dashboard version of 2.0.7371 or
lower before you begin. If the dashboard version is higher (e.g. 2.0.8955, 2.0.9199 etc) then you
cannot JTAG.
Following the dashboard check, you need to check the console's manufacturing date/service date which is printed on a sticker above the A/V or HDMI ports. Microsoft began updating the bootloader to an unexploitable version on
new consoles in
June 2009. So if your console has a manufacturing date or service date before June 2009 (in addition to the dashboard version of 2.0.7371 or lower) then it's almost a certainty that you can JTAG.
There are a few exceptions to the June 2009 general rule. I have a console here that was sent to Microsoft for an RROD repair and came back with the date July 28th 2009 and it had dashboard 2.0.7371 and the old bootloader - it is JTAG'd. I also have one that came back dated August 5th 2009 with dashboard 2.0.7371
but it has the new bootloader and cannot be JTAG'd. I have consoles here with manufacturing dates of 10th June 2009 and 16th June 2009, both of which are JTAG'd.
Even still, purchasing a June 2009 console for the JTAG is risky and I would strongly advise against it. If you must purchase one, purchase one with a date as early into June as you can.
I have the right dashboard version but the date is June/July 2009, what now?
There's a very high chance you cannot JTAG. The only way to be 100% sure is to read the xbox 360's memory, and use a program called 360 Flash Tool to get your 2BL (bootloader, CB) version if you took a full memory dump, or a hex editor if you took a 2MB dump.
I have the wrong dashboard version, what now?
It's the end of the road for that console. It took years to figure the first exploit out, and now that it's patched there is very little chance of finding another one. I definitely wouldn't be holding my breath. Go find another console.
Reading/Writing to the Xbox 360's NAND (memory)
Reading the 360's memory is done over LPT port or USB.
LPT is an ancient standard and many newer computers (and laptops) do not have LPT ports. You need what's known as a "native" port, that is one that's built into the laptop or motherboard. There may be sporadic reports of somebody buying an LPT expansion card and that working but it is taking a risk, it probably won't work. LPT is slow, much slower than USB. A 16mb memory dump over LPT takes approximately 40 minutes. For arcade consoles (256MB/512MB internal storage) you need to dump the first 64MB, which will take 3 hours over LPT. LPT is also prone to problems caused by poor soldering, interference and device polling. That isn't to say it can't be done, my first JTAG was performed over LPT.
USB is much faster than LPT. Dumping with a PIC18F2555 board with a 12MHz crystal and a 64MB nand takes 35-40 minutes and a 16MB nand takes 6 minutes. There are faster solutions out there, like the
Nand-X by Xecutor that can dump a 16MB nand in around 2 minutes. USB is less affected by interference and is generally less fussy than the LPT reader in a "It just works" kinda way.
Personally I would recommend USB, though that usually involves a pricey enough sum to buy the USB reader/flasher - €25-€30, or more in the case of the Nand-X. You can try build your own PIC-based USB flasher, but I've tried and failed, as have a few others on here - maybe we're crap builders

The guide I linked to has information about LPT/USB readers and how to build them.
There are two headers on the xbox 360 motherboard, they are labelled J1D2 and J2B1. You need to solder 4 wires to J1D2 and 2 wires to J2B1, no matter what method you choose. In addition to this, you need a ground wire which can be taken from any ground point. I choose to use the little thin stems from the outside of any xbox 360 connector port (e.g. the AV port, the hard drive port, the memory unit port). This is because heating them up to flow the solder is much easier than heating other suggested ground points (for example J1D2.6, or J2B1.12).

Up-close look at J1D2, complete with numbering for the nand reader:

This is J2B1:

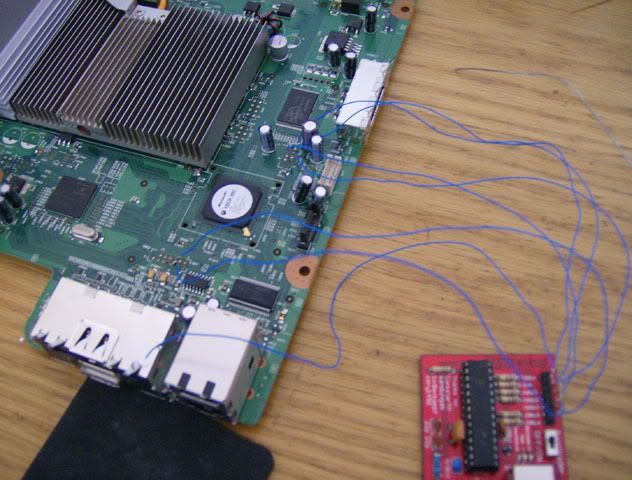
Here's a picture of a Falcon motherboard hooked up to my nand reader:
 Nandpro
So you've hooked up a nand reader. Your next step is to get a copy of Nandpro, the latest version at the time of writing is 2.0e. Put the power plug into your console, but
do not turn it on. You just want the console in standby mode.
To begin the JTAG you need to take a backup of some data off your console, including the all important keyvault.
To do this there are two ways, one is to take a dump of the first 2MB of memory, install Xellous and then take a dump of the rest by hooking up the xbox and computer with a network cable. The other is to take a full backup from your reader (highly recommended for all consoles). I'm going to go with dumping the first 2MB of the nand and checking the CB version first to see if the console is JTAGable. I'll follow with a full backup after that. If you want to try dumping the rest of the nand over HTTP (may or may not work) then go to the next section after dumping the first 2MB and the Keyvault, you can skip the bit about dumping 16 or 64MB. If the HTTP dump doesn't work, come back here and take the full backup.
Open a command prompt (Start->Run->cmd.exe) and change directory to to wherever you extracted nandpro (e.g. "cd c:\xbox\nandpro") and type the following (replace usb: with lpt: where necessary)
nandpro usb: -r2 2mb_dump1.bin
This will use USB to read the first 2MB of your nand into the file 2mb_dump1.bin.
If you get an error about "Could not detect flash controller" there is a problem with your reader so check your soldering with a multimeter, ensure you have the right drivers installed for USB etc etc. This isn't a troubleshooting guide so start your own thread here on the forum and we'll try help, or check out the big guide at the top of the post. If you have any bad blocks within the first 50 blocks of your nand when reading it, then you
may have issues getting Xellous working so create your own thread and we'll look at your problem.
Make sure to create a thread if you've got a bad block at block #1 (your Keyvault). If you have more than 32 bad blocks, something is wrong with your reader.
What you should see is something like the following image which is from my first JTAG (using LPT):

Keep an eye on the FlashConfig value, valid ones are : 01198010, 00AA3020 and 00023010. Google any other value to see if it's common or a problem. You don't want to take a botched dump.
Run the same command again changing dump1 to dump2.
Do not unplug the console between dumps. Now you've two separate reads of the nand. Next, run the following command:
fc 2mb_dump1.bin 2mb_dump2.bin
This will compare the two files to each other. They
need to be the same. FC should state no file differences found. If they are not the same, and FC reports a few changes between the files then dump a third time, checking your wires etc for problems. You need matching dumps. If they don't match, re-check your wires and reader and dump again until you have two (or ideally 3) matching dumps. That way you can be pretty sure you got a valid dump.
Open up a
hex editor and then open up your 2MB nand dump. Press the find button, make sure ASCII is selected, and type CB. It should bring you to line number 8400 where there first two numbers are 43 42 (which is CB in Hex). Take note of the next two numbers. In the following picture, they are 1a 43:

.
Open up the Windows Calculator (Start->Run->calc.exe) then press View->Programmer. Make sure the radio button for Hex is pressed, then type in the numbers you have (no space required). Then click DEC to convert it into decimal. 1a43 converts to 6723 in decimal, which is a vulnerable CB.
Xenon: 1921 or lower is Exploitable (exception: 8192 IS EXPLOITABLE)
Zephyr: 4558 or lower is Exploitable (exception: 4580 IS EXPLOITABLE but needs falcon version of Free60)
Falcon: 5770 or lower is Exploitable
Jasper 16mb: 6712 or lower is Exploitable
Jasper Arcade (256/512): 6723 or lower is Exploitable
If your CB is not here, it isn't exploitable. Put your console back together, the dream is over. But if the show must go on...
The full backup via NANDpro
This tells nandpro to use the USB reader, -r means read so -r16 = read 16MB and xbox_backup.bin is the file it's going to read to.
nandpro usb: -r16 xbox_backup1.bin
There are 3 types of memory size in use in xbox consoles, 16MB, 256MB and 512MB. Most older consoles have 16MB only, so the -r16 switch is fine. The arcade consoles need a different command
nandpro usb: -r256 xbox_backup1.bin 0 1000
Change 256 to 512MB where required. This tells nandpro to read from 0 (first block of memory to block 0x1000). The dump should be approximately 64MB in size. There is no need to dump all 256MB or 512MB of memory, anything after block 0x0FFF (i.e. 0x1000 or higher) is on-board storage, and you have already backed that up, right? :pac:
When that dump is completed, run the same command again, but change the filename to xbox_backup2.bin.
Once that's done, type the following:
fc xbox_backup1.bin xbox_backup2.bin
Again, you don't want any differences between the dumps. I dump my nand 3 times to make extra sure.
Flashing Xellous
So you either have a full backup of your nand now, or you're going to try take it via HTTP once you get Xellous running.
The first thing you need to do is read your Keyvault from the nand
nandpro usb: -r1 keyvault_1.bin 1 1
This will read your keyvault (which is located at block 1, and ends at block 1, hence the 1 1 at the end of the command so
don't forget this). Again, dump it a second time to a different file and compare them. Make sure they're the same.
Now you need to grab Xellous. The file you want depends on your motherboard revision. If you don't know what it is, then consult this image

I'm putting the links here, the code is not copyrighted by Microsoft so it's fair game. Other mirrors are in the guide.
Xenon -
Mirror 1Falcon/Zephyr/Opus/Jasper -
Mirror 1
Extract xenon_hack_xellous.bin or <falcon/zephyr/opus/jasper>.xellous.smc.bin to the nandpro directory.
Rename it to free60.bin for simplicity. You're now going to write it to your console.
nandpro usb: -w2 free60.bin 0
The above command can be interpreted as write via USB, 2MB of data from free60.bin to the nand starting at block 0. Make sure this is the command you're using, only changing USB to LPT where necessary.
Once nandpro has flashed Xellous, you need to write your keyvault to the nand or it won't boot.
nandpro usb: -w1 keyvault_1.bin 1 1
This command can be interpreted as write (with a limit of 1MB maximum) keyvault_1.bin to the nand, starting at block 1 and only write 1 block (which is all the keyvault is, one block).
Now that it's done you can desolder your reader. I don't, just in case I run into a problem that might mean flashed back the original nand for testing but you can do it if you want because if this works you're finished with the nand flashing

Either way, take out the power plug and disconnect the reader from your computer, it's time to solder the actual JTAG
The JTAG
All this mucking around with the nand doesn't make stuff happen. You need to solder a few more wires to get the code you've just flashed to the nand to actually work. This is the heart of the JTAG, the wiring that unleashes the xbox.
For the Xenon model, you will need 2x1N4148 diodes or 2xSchottky BAT41 diodes and 3 wires. For all other models you will need 7 wires, 2x10k resistors and 2x2N3904 NPN transistors.
Xenon
The diode should be soldered directly to the motherboard at J1F1.3 and J1F1.4 with the thick black line on it nearest the board. Do not solder wire->diode->wire, this may cause problems.
Others:
 Click here for bigger image
. The 2N304 transistor has a flat back with a curved front as in the small image. With the legs facing you and the transistor on it's back the legs go C, B, E.
Please take special note of the location of AUD_CLAMP. There is another transistor (Q2N3) to the right of Q2N1, you
do not want to solder there so check and double-check that you're nailing Q2N1's right side leg and nothing else. The wire from Q2N1 can be run through the hole just south of it (the black hole in the image) which will bring it to the other side of the board in a much neater fashion than around the edge of the board. The blue line on J2D2 does connect pads 4 and 7, so there is a jumper wire there. I suggest all 3 wires connecting to pad 7 are twisted together, and soldered in one go with plenty of excess on the other end for trimming to length. Soldering one at a time is a pain and the last thing you want is a fleck of hot solder from the wire you just soldered there hitting your skin while you try to solder the next one.
DB1F1 is tiny and almost always has no solder on the top side. I suggest liberal use of flux and don't forget to put solder on the point before trying to solder wire to it. Apply flux, heat up the pad, apply solder, remove, wait for the pad to cool down, apply flux, apply wire, heat and apply more solder to wire & pad and you're done. Always let the pad cool down, it can be tricky but don't rush it. All of the alternative points to DB1F1 are more difficult so you really don't want to lift the pad. Also, make sure you're putting the right transistor c-leg the the right pad (1 or 2) on J2D2. Mixing up the two C-legs on J2D2 leads to an E79

Here is a picture of the above wiring in action: