Hi folks,
Having followed this and other threads on boards I decided to pull the trigger on adding (DIY) storage to my existing PV setup. My house was bought with PV installed; 8 panels 2.5kwp and a Solis Mini 5G 2500 inverter. Below, I have tried to document the process to help with others, and to get any feedback you may have! I've gleamed a lot of info from @championc @garo @DrPhilG @graememk and many others. Thank you so much!
Just a note before I move on. I’m still battling a bit with getting cells balanced and hoping I don’t have a dodgy cell. I have top balanced my pack in 2 lots of 8 cells in parallel, but I still seem to have one cell that bottoms out too fast on discharge and is dropping my SOC to 10% from 45%(ish) on the BMS while other cells are still in the 3.41v range. I’ll update as I get more testing done. Details below, but here is the (almost) finished project:

For the install…. I’ll structure the post like this:
- Inverter
- Battery Pack
- BMS
- Shopping List
- Hardware Install
- Software Configuration
Inverter
Originally, I was going for a Sofar ME3000SP inverter and keeping my Solis alongside it, but a Sofar HYD3000 came up close by for a great price. After toying with the options quite a bit, I decided to decommission the Solis and replace with the Hybrid inverter. There are a couple of reasons. Firstly my 8 panels consist of 4 across the top of my roof and 4 in a rectangle next to a dormer window. They were on a single string but by splitting into 2 strings and connecting to the 2 MPPT connections on the Sofar I am getting a better yield overall (due to some early morning shadowing on the panels next to the dormer). Secondly, I plan to put panels on the shed roof and so will put the Solis out there in future. There is no easy way to get a CT cable back to house from shed so again the Solis made more sense, to me, to put out there. Finally, the shed gets cold and damp in winter as not insulated at all. Didn’t like the pack being out there. Attic will be a little warmer and not damp.
Battery Pack
So, the battery pack… I went with the “OYE Store” on AliExpress for my Grade A 16PCS CALB 3.2v 200Ah LiFePO4 Rechargeable Battery Pack and purchased on the 21st Jan. To be fair this was a couple of days out from the Chinese New Year celebrations and OYE had a big banner on their page to say that they would be on leave for a couple of weeks. It was 7th Feb before I got any further comms from OYE and this was to get some details from me and a UPS tracking number was sent to me on 24th Feb. This number remained inactive for a few weeks while the batteries made their way from China to Poland. I did message OYE a few times for updated and their reply was always within an hour (if messaging in the morning here). I could not fault the comms. The UP scans showed picked in Poland on the 12th April and they landed to my house on the 20th/21st , three boxes the 1st day and one the second. Batteries are packed well and included all the bus bars I needed. One slight oddity was that some of the bolts had 13mm heads while some had 14mm. All are M8 size screws. Pack cost was €1162 once VAT etc was removed by Ali. Nothing was re-applied on arrival.
BMS
For the BMS I went with Minerals Official Store and bought the Seplos BMS 48V 16S LiFePo4 150A for €200.20 after VAT was removed by Ali. This included the screen, USB dongle (RS485). Customs value was set low by the seller and so An Post hit me with €4.76 of import duty and VAT. Ordered 29th Jan and received on the 23rd Feb. Very quick by Ali Standards!
Shopping List
For the rest of the shopping list, I used links from thread on here so thank you again for all that post here.
Amazon
Screwfix
- Non-Insulated Metallic 8mm Ring Copper Tube Lug 10 Pack (54720) – for Battery, & Isolator Switch connections
- Non-Insulated Metallic 6mm Ring Copper Tube Lug 10 Pack (51735) – for fuse, BMS and connection to Inverter.
- Time 3183Y White 3-Core 2.5mm² Flexible Cable 10m Coil (721JY) – for wiring the EPS plug and isolator
I bought a hot air gun from Aldi/Lidl for about 20-25 quid. Great yolk where you can preset exact temps.
I also sourced some 25mm2 cable for the battery wiring. I had some lying around and bought a couple of lengths with lugs connected but as I discovered that I needed different sizes of lugs on each end of cabled I would advise to make your own cabled up.
Finally, (optional!) I have a Raspberry PI and so bought this guy to enable connection from the inverter to Node Red (& Home Assistant!). More detail on that later… DSD TECH USB 2.0 to
RS485 Serial Data Converter - https://www.amazon.co.uk/dp/B0721BB8PQ/ref=cm_sw_em_r_mt_dp_TZTDWRW2WCP8QWDV6G7B?_encoding=UTF8&psc=1
From AliExresss, I bought “3.81MM, Right Angle, 2P” Connectors from “LCdatalink Store” as I do not have a proper connector for the RS485 connection for the above. Same connectors as the CT wire also, if you need one.
I think I have covered everything on the shopping list here. Note I had an inverter already, so I reused an AC isolator. I also had one of those wiring connector packs from Aldi/Lidl which had the connectors to extend the BMS cables.
Hardware Install – Part 1
Let me start this section by saying I am an amateur DIY type. I work in the technical side of IT so I have a logical mind. That said, this is an easy job. There is so much help on this forum that the process is well documented. Take your time, test the connections as you make them, and a DIY battery install is a simple task that does not take months, or even weeks to complete.
So onto the process….
- Step one for me, as I had it early, was to prep the BMS, by extending cables. I added 50cm to each cable which is more than enough for me. Extended each cable and add an 8mm ring connector to the end.
- I sized up and cut the battery cables to connect the pack to the isolator, fuse, BMS and on to the Inverter. Added the Lugs, crimped and wrapped.
- I mounted the Sofar HYD and connected the EPS wiring and isolator.
- Wired up CT senor. Bit of a trick here as I had Cat 5 from attic to near my fusebox so was able to use 2 wires from that.
- Split the PV panels into 2 strings and connected up
- Connected the AC wiring.
- Mounted the BMS board but did not cable to invertor as was waiting on the battery pack.
I then ran the invertor without the battery while I waited on the pack to arrive. A couple of things I did in the meantime just to be tinkering!
- Made sure to set the inverter to the right country code (it was wrong when I bought it). This failed to begin with, but I found out that you need to set the code during the initial countdown as the inverter powers up. Cannot change once inverter is fully online. Code is 039 for Ireland)
- Upgraded the Inverter firmware. There is a Facebook group called “Sofar Solar Inverter - Remote Control & Smart Home Integration” https://www.facebook.com/groups/2477195449252168 and they have links to the latest firmware and a ton of great info. I installed V3.40
Hardware Install – Part 2
Battery pack arrived! I was well on my way to this only took a few hours. I unpacked the cells and placed them in their final position, as per pics. I then spent the time adding the busbars and including the BMS wiring exactly as per the instructions. Ensure the BMS wires are not plugged into the BMS as you do this. Each wire on the plug connects to the next cell as you move through the white and black connectors. Once you have all the wires from each plug done, test by putting a multi-meter on the neutral pin (1st one) and then move the positive across the connector, skipping the temperature sensor wires. Each pin should increase the voltage by approx. 3.3(ish) volts.

I did not have a bench power supply to top balance my pack at this point so I just wired it up and made sure to have the parameters set correctly on the BMS to ensure that none of the cells would fall outside of tolerance. I was only getting about 60% of its capacity as the charge and discharge graphs below show

So, I went and bought a bench power supply and reconfigured the cells into 2 parallel packs of 8 cells and each took 2.5 days to balance fully. I balanced to 3.65v but found that my bence power supply would drop current to about .270a (or 1w) and would never drop to 0 current. I think this is expected due to voltage drop on the cables. One tip here, the cables that came with the power supply would oly push 5amps to the pack. I made up new larger cables with crimped ring connectors (8mm on battery end and 6mm on supply end) and I was able to push 10a to the pack for balancing.
So, the hardware install is done. Very straightforward really and I’m very happy with the setup. Once I get the cells re-balanced :-)
Software Configuration
For the software config of the BMS I was sent a parameter file from @championc which I used as a base. I did not realise that when downloading the parameters to the BMS the SOC value, for example, is sent down. One to watch out for as you can easily reset your SOC to a new value and the BMS will need to relearn from a change/discharge cycle. The parameters are all pretty straightforward, setting alarm and cut off levels for the individual cells and the combined pack.
On the Sofar I set the battery to type "DEFAULT" with a capacity of 200ah and discharge to 15% DOD.
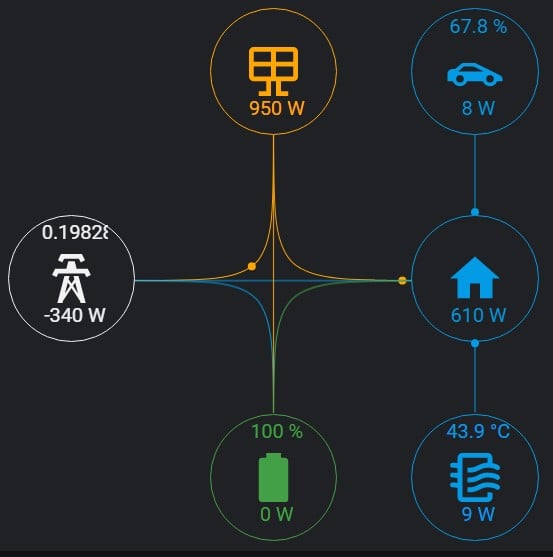
Next, I had one main ambition… to get the data from the Sofar to Home Assistant. My use of Shelly devices to read circuit loads was no longer possible as so much happens internally in the SOFAR so to understand PV->Battery or PV/Battery -> House I needed help.
Thanks again to some pointers on here I tried two options. The first was to go the SOFAR2MQTT route and I build out an ESP8244 board as per https://github.com/cmcgerty/Sofar2mqtt. I had no luck though getting the connection working and every tried to build a second one. I‘m sure the issue was on my end but I gave up and went another route, using a Raspberry Pi I have knocking around. With the addition of the RS485 Serial Data Converter mentioned in the shopping list above I used this guide: https://github.com/AndyWhittaker/HYD6000 to get up and running. Made a few tweaks and now have devices set up in HA and using the cool custom:tesla-style-solar-power-card on a HA dashboard to show energy consumption.
Some pics of the final install. Still a bit of cable management to be completed and a bit of tidying up. Also, I will be boxing in the batteries with insulation before the winter months.
Firsly.... I would recommend you ensure your tools are well insulated! The smallest slip can cause big sparks!

Here is the main board. On the top you'll see my Raspberry PI with RS485 adapter to connect to the Sofar Inverter. Note the CAN cable to the Sofar from the Seplos.... I was too impatient to wait for an Amazon delivery so I bought a phone in Argos for €6.50 just to use the handset cable which is RJ10 as required for the Sofar end :-)

Next, the battery, Inverter and board to the left.

and the battery pack itself. a €10 labeller from Aldo/Label saved time and pain when removing BMS when re-configuring to top balance and then moving back into series again afterwards.

There is a lot of other info I could have posted here, and I may update this post later to cover some more info, based on any feedback. The objective of posting this info was to help others understand the process, tools & parts needed, and to show that a DIY battery addition is not an overly complex or tricky task.


