Advertisement
If you have a new account but are having problems posting or verifying your account, please email us on hello@boards.ie for help. Thanks :)
Hello all! Please ensure that you are posting a new thread or question in the appropriate forum. The Feedback forum is overwhelmed with questions that are having to be moved elsewhere. If you need help to verify your account contact hello@boards.ie
Please note that it is not permitted to have referral links posted in your signature. Keep these links contained in the appropriate forum. Thank you.

https://www.boards.ie/discussion/2055940817/signature-rules
Hi all,
Vanilla are planning an update to the site on April 24th (next Wednesday). It is a major PHP8 update which is expected to boost performance across the site. The site will be down from 7pm and it is expected to take about an hour to complete. We appreciate your patience during the update.
Thanks all.

Detailing Thread

Options
1181921232426

Comments

  • Registered Users Posts: 4,377 ✭✭✭Curran


    Plenty of lubrication using the clay and you won't go wrong....just don't drop it.

    Cut the clay bar into 3 pieces in case you do drop it. Don't move onto the next section until the clay runs over the area totally freely. You can't do any damage provided there is no contamination on the clay, keep it lubed and turn and knead it every few minutes.
    Claying makes a massive difference, so it's worth spending time making sure you do it right and ensuring you cover every square inch of paintwork.

    Used / dirty clay can be used on wheels, glass, etc, anything you want to get bonded contaminants off a smooth surface.


  • Registered Users Posts: 1,830 ✭✭✭RandomAccess


    Curran wrote: »
    Plenty of lubrication using the clay and you won't go wrong....just don't drop it.

    Cut the clay bar into 3 pieces in case you do drop it. Don't move onto the next section until the clay runs over the area totally freely. You can't do any damage provided there is no contamination on the clay, keep it lubed and turn and knead it every few minutes.
    Claying makes a massive difference, so it's worth spending time making sure you do it right and ensuring you cover every square inch of paintwork.

    Used / dirty clay can be used on wheels, glass, etc, anything you want to get bonded contaminants off a smooth surface.

    Thanks for the tips,
    I bought the Sonus clay with lube kit, so reckon it should be pretty slick. I've seen a few videos of people claying, and the Junkman probably gave the best truly practical tips (but then he started showboating and dropped his clay :D ). Good point about using the clay on the windows once its part used.

    One area of the car was resprayed in the past so the paint is softer there and picks up swirls and marring easier than the rest so thats my main area of concern. I plan on taking it pretty handy anyway.


  • Registered Users Posts: 4,377 ✭✭✭Curran


    Generally repainted areas should have alot more paint than machine painted panels by factory robot....so in theory you should have more clear coat to remove, even if it is softer. Softer means easier to correct, but also easier to leave holograms, so a finer polish or softer pad will be needed.
    But you said you'll take it handy, so your grand! ;)


  • Registered Users Posts: 15,503 ✭✭✭✭vectra


    Unfortunately I have a sixth sense for rubberneckers.

    Wait till they see me taking an 'angle grinder' to the paint :eek: :pac:

    Yeah,
    I was getting some queer looks last January when I was doing the Toledo.. Freezing cold and windy and there's me "Grinding" away :D


  • Registered Users Posts: 1,045 ✭✭✭deaglan169


    have some detailing kit but ive got new car so want to take it to a more pro level namely to start with cloths first, ive always used microfibre cloths but i was on cleancar.ie about to order up some quality cloths and ive got a bit confused what should i use for applying polish its SRP that i use and what should i use for buffing it off, then secondly what cloth should i use to apply extra gloss protection and again what kind to buff it off, sorry if this is basic stuff to you guys


  • Advertisement
  • Registered Users Posts: 4,377 ✭✭✭Curran


    You could use microfiber cloths but it can be a bit awkward.

    Apply SRP with a foam applicator pad and buff off with a plush microfiber cloth.
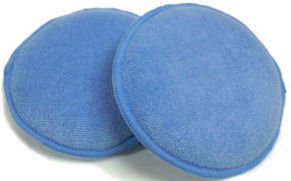
    Apply Extra Gloss Protection with a microfiber applicator, similar to below, and buff off with a plush microfiber cloth.

    418_large_image.gif

    or

    Microfiber%20Wax%20&%20Sealant%20applicator%20pad.jpg

    For buffing, I've never used a buffing cloth better than Microfiber Madness Crazy Pile, really plush and makes removing wax / sealant or polish so much easier!


  • Registered Users Posts: 1,045 ✭✭✭deaglan169


    Curran wrote: »
    You could use microfiber cloths but it can be a bit awkward.

    Apply SRP with a foam applicator pad and buff off with a plush microfiber cloth.
    Apply Extra Gloss Protection with a microfiber applicator, similar to below, and buff off with a plush microfiber cloth.

    418_large_image.gif

    or

    Microfiber%20Wax%20&%20Sealant%20applicator%20pad.jpg

    For buffing, I've never used a buffing cloth better than Microfiber Madness Crazy Pile, really plush and makes removing wax / sealant or polish so much easier!

    excellent thanks for the info clears it all up for me


  • Registered Users Posts: 3,668 ✭✭✭eringobragh


    Jaysus lads that kestrel DA must some sort of black magic! :D

    Pics to follow.:cool:


  • Registered Users Posts: 3,668 ✭✭✭eringobragh


    Car was in a definate need of a wash...using my birds da's Karcher..have to say I was impressed..I've never used a portable one before and might make the
    investment!

    img8860large.jpg

    BEFORE: Some VERY bad clear coat scratching on this car...poor thing has obviously been attacked with a sponge for manys a year :(

    img8867large.jpg

    img8864large.jpg

    AFTER: First timer using a DA so I will admit I haven't the foggiest what I'm doing...but thats the advantage of using the Kestrel DA
    I started off with the finishing pad and menzrena final finish, I then moved onto Menzrena medium cut and finishing pad, and then to medium cutting pad and medium cut menzerna. The car actually looks like it has a new wing on it and it hasn't even been waxed yet! RESULT :) definately some Voodoo inside that Kestrel machine :)

    I only done the top half of the wing , I took currans advice as its back breaking repetitive stuff..so I am goin to choose a panel and move through the car

    img8873large.jpg

    img8871large.jpg

    I only picked one of these up the other day in Aldi :) 11.99....you do not want to try and detail without one!

    img8869large.jpg

    img8868large.jpg

    Some small scrapes still need doing but a 1000% improvment

    img8872large.jpg

    Look closely and you can see the difference between door and wing

    img8874large.jpg

    ALOT DONE...............MORE TO DO.:cool:


  • Registered Users Posts: 19,106 ✭✭✭✭TestTransmission


    Very impressed


  • Advertisement
  • Registered Users Posts: 3,668 ✭✭✭eringobragh


    Very impressed

    Cheers man, appreciated :)

    The other wing is just as bad if not worse! but the rest of the car isn't too bad with the exception of the engine bay at the rear. Its a long process but it will be worth it in the end!


  • Registered Users Posts: 3,668 ✭✭✭eringobragh


    Curran wrote: »
    Working at about 2500 / 3000 rpm will be safe.

    Generally.....
    Speed 1, to spread the polish on one pass, move onto....
    Speed 2, to warm the polish up, two passes, move onto....
    Speed 3, to work polish until clear...two or three passes.....move onto....
    Speed 2, to final refine...
    Buff off.

    Work in small sections, 12" x 12" sections...bigger and the polish dries out or not worked properly.
    Take your time, be patient, dont expect full correction in just one or two hits. A panel an evening, or two a day off and enjoy it, because it can get tedious.

    Hope this helps! ;)

    I followed your advice earlier Curran..roughly how long timewise should I be spending on each pass?


  • Registered Users Posts: 15,503 ✭✭✭✭vectra


    I followed your advice earlier Curran..roughly how long timewise should I be spending on each pass?


    I was told to cover approx 1/2 the pad per second if this makes sense to you


  • Registered Users Posts: 9 DetailerCork


    eringobragh good start,
    you will go for rotary polisher when u get mad about it ;)


  • Registered Users Posts: 4,377 ✭✭✭Curran


    I will admit I haven't the foggiest what I'm doing...but thats the advantage of using the Kestrel DA
    I started off with the finishing pad and menzrena final finish, I then moved onto Menzrena medium cut and finishing pad, and then to medium cutting pad and medium cut menzerna


    Good work eringobragh!! Massive improvement there!

    Maybe its the way you worded it, but just to clarify, you start with the final finish on a finishing pad, then move up to the next stage off cut, and up again, until you find the combo that is giving you the best results / or satisfactory results. There is no need to go through the three pads.

    So next time you do a panel, go straight for the medium cut polish and medium pad ;) This will give you correction on one hit, but then might need a hit with final finish and finishing pad.....especially on soft Jap paint. Medium cut will likely leave holograms on soft paint.

    Also, did you go through the decontamination process fully? Wash, de-tar and clay, before you started polishing? If no, you probably noticed your pads getting very dirty??


  • Registered Users Posts: 3,668 ✭✭✭eringobragh


    Curran wrote: »
    Good work eringobragh!! Massive improvement there!

    Maybe its the way you worded it, but just to clarify, you start with the final finish on a finishing pad, then move up to the next stage off cut, and up again, until you find the combo that is giving you the best results / or satisfactory results. There is no need to go through the three pads.

    So next time you do a panel, go straight for the medium cut polish and medium pad ;) This will give you correction on one hit, but then might need a hit with final finish and finishing pad.....especially on soft Jap paint. Medium cut will likely leave holograms on soft paint.

    Also, did you go through the decontamination process fully? Wash, de-tar and clay, before you started polishing? If no, you probably noticed your pads getting very dirty??

    Yeah I was try combos of pads and polish to find the perfect match...I was told to use the least first and work your way up until you find what suits the scenario!

    Theres very little car if any as I did detarred it a while ago but I didn't clay it as I don't have one!

    Which leaves me to my next purchase!

    Which clay kit should I get?? http://www.cleancar.ie/detailingclay.html

    Further to that is there anything else I need for the bodywork..Ive the DAS-6 kit with Blacklight..


  • Registered Users Posts: 4,377 ✭✭✭Curran


    Further to that is there anything else I need for the bodywork..Ive the DAS-6 kit with Blacklight..

    Personally, I use Autoglym's clay bar. Wouldnt be a fan of the Chemical Guys Clayblock as its no good for getting into tight corners and around the curves of the bodywork.

    Blacklight should look great on your colour car - I have have yet to use it, but gets great reviews on detailing world.

    Would recommend picking up some tar remover and perhaps a good drying towel so your paint work wont get those light swirls back so quickly!!


  • Registered Users Posts: 2,079 ✭✭✭irelandspurs


    Without going through the whole thread can someone recommend products for doing interior. A friend has just asked me to price someone to clean the inside of her car so i said i will do it and instead of paying someone that she buy good products and i'll do it and keep products as payment.
    Its a peugeot 307 and seats and carpets are very bad,heavy stained.plastics are sticky with sweets etc.Kids have destroyed it.

    Also can someone recommend something for dash as we have been using autoglym vinly care on focus dash but is very shiny and when sun hits it,its hard to see out of window.


  • Registered Users Posts: 3,668 ✭✭✭eringobragh


    Curran wrote: »
    Personally, I use Autoglym's clay bar. Wouldnt be a fan of the Chemical Guys Clayblock as its no good for getting into tight corners and around the curves of the bodywork.

    Blacklight should look great on your colour car - I have have yet to use it, but gets great reviews on detailing world.

    Would recommend picking up some tar remover and perhaps a good drying towel so your paint work wont get those light swirls back so quickly!!

    Cheers man, I have one of those big blue drying towels..does a great job and some holts tar remover which is very good as well.

    I will grab a claybar before doing the other panels, car has alot of swirling but very bad clearcoat scratching on the other wing and bonnet...should buff out though..

    I have the detailing bug :pac:


  • Registered Users Posts: 15,503 ✭✭✭✭vectra


    ^^ Blacklight will work great with your color. ( Look at EPM's Mazda 6 in the pics of last Saturdays Motors Meet. )


  • Advertisement
  • Registered Users Posts: 4,377 ✭✭✭Curran


    Its a peugeot 307 and seats and carpets are very bad,heavy stained.plastics are sticky with sweets etc.Kids have destroyed it.

    Also can someone recommend something for dash as we have been using autoglym vinly care on focus dash but is very shiny and when sun hits it,its hard to see out of window.

    Obviously the car gets a good vacuum first to lift the heavy stuff, then....
    For carpet and fabric Id recommend Chemical Guys Fabric Clean - dilutes, sprays on, agitate with a clothes brush and wipe off or wet vac off.
    For plastics, All Purpose Cleaner (APC), dilute down, spray on, agitate with a detailing brush or paint brush, wipe off with a microfibre cloth (Id use the same process if you were doing leather). The for sealing it, something like Chemical Guys Silk Dressing or I find that Orchard Auto Care's Interior Wizard leaves a nice matt finish, no scent off it and can be used as a light cleaner and sealer in one step (heavy dirt needs to be removed first)


  • Registered Users Posts: 2,349 ✭✭✭Fiona


    vectra wrote: »
    ^^ Blacklight will work great with your color. ( Look at EPM's Mazda 6 in the pics of last Saturdays Motors Meet. )

    Blacklight is brilliant!


  • Registered Users Posts: 3,668 ✭✭✭eringobragh


    vectra wrote: »
    ^^ Blacklight will work great with your color. ( Look at EPM's Mazda 6 in the pics of last Saturdays Motors Meet. )

    Saw that looks well, final stage for me I guess :cool:


  • Registered Users Posts: 3,730 ✭✭✭E39MSport


    Good stuff :) Will look great when you're done.

    Did you get to the sound deadening?


  • Registered Users Posts: 19,854 ✭✭✭✭MetzgerMeister


    Saw that looks well, final stage for me I guess :cool:

    I hope it's the penultimate stage for you! Wax must go on after BL ;)


  • Registered Users Posts: 4,792 ✭✭✭Ded_Zebra


    well I'm a first time poster in this thread but have been reading it for a while now and started to get into detailing.

    Before I started to getting the car cleaning bug I used to wash the car regularly and polish it a few times a year.

    I recently got €30 for doing a survey so decided to spend it on a "Meguiars clay bar kit"

    Here is the result after a wash clay and polish on the dads Insignia over the weekend. (i'm a poor student so can't afford to run my own car :( )

    Insignia

    now I need tar remover recommendations!!!!


  • Registered Users Posts: 3,668 ✭✭✭eringobragh


    E39MSport wrote: »
    Good stuff :) Will look great when you're done.

    Did you get to the sound deadening?

    funny thing that, meant to say it to you: I changed the back tyres in January from 195's to the Falken 225s (factory spec) and the bad road noise stopped! :D

    It's much smoother now..just goes to show you


  • Registered Users Posts: 3,668 ✭✭✭eringobragh


    Ded_Zebra wrote: »
    well I'm a first time poster in this thread but have been reading it for a while now and started to get into detailing.

    Before I started to getting the car cleaning bug I used to wash the car regularly and polish it a few times a year.

    I recently got €30 for doing a survey so decided to spend it on a "Meguiars clay bar kit"

    Here is the result after a wash clay and polish on the dads Insignia over the weekend. (i'm a poor student so can't afford to run my own car :( )

    Insignia

    now I need tar remover recommendations!!!!

    Holts Tar Remover - 6 euros or so from Motorfactors and trust me it works...others say petrol does the job as well.


  • Registered Users Posts: 3,668 ✭✭✭eringobragh


    I hope it's the penultimate stage for you! Wax must go on after BL ;)

    ...I've CG V7 to go ontop of the Blacklight...surely thats enough! :)


  • Advertisement
  • Registered Users Posts: 19,854 ✭✭✭✭MetzgerMeister


    ...I've CG V7 to go ontop of the Blacklight...surely thats enough! :)

    Yup, that's a sealant ;)


This discussion has been closed.
Advertisement