Advertisement
If you have a new account but are having problems posting or verifying your account, please email us on hello@boards.ie for help. Thanks :)
Hello all! Please ensure that you are posting a new thread or question in the appropriate forum. The Feedback forum is overwhelmed with questions that are having to be moved elsewhere. If you need help to verify your account contact hello@boards.ie

Sharpening your knives.

Options
  • 12-06-2011 3:02am
    #1
    Registered Users Posts: 622 ✭✭✭


    I had a PM earlier today (or yesterday now), to post up a how-to on sharpening. It's something I've meant to do many times but gibbed it as it's a large subject. I have posted bits and pieces before on Boards, so I will shamelessly pillage those posts to flesh out this one!

    Well, here goes, I may need to use a few replies to fit in all the pics I want to use, but we'll get there in the end!

    I want to make it clear how to go about making a sharp knife out of whatever finish the factory left on your knife. So to start we'll look at what grind the factory (or maker) has put on our knife.

    Meat the Steal.

    I'm a fan of Alton Brown so you can expect these horrible puns!

    There are about six knife grinds, and real quick here's the highlights.

    common-knives.gif


    Hollow ground, done on large round grinding wheels gives a thin edge with less metal behind the edge. Good for slicing but bad for chopping.

    Full flat, tapers from the very spine to the edge in one Vee shape, may have a tiny micro bevel right at the edge.

    Sabre ground, the knife sides remain even until halfwayish down the blade, then taper to meet at an edge. Tapered lower down the blade it's Scandi ground, mainly used in scandinavia, the knife is flat until maybe five mil. from the edge then a bevel is made to bring to the edge, may also include a micro bevel.

    Chisel ground, common on Japanese cutlery to leave a shiny surface on the face of the cut.

    Double bevel, often used on a fine thin blade to leave a bit more beef at the cutting edge, handy if your knife is chipping out but you want to keep the fine slicing geometry behind the edge.

    Convex grind, what I usually use on softer western kitchen knives. Has an apple seed profile so has a nice sharp edge but with a bit more support behind the edge so less flopping of your edge and less aligning needed in use, also good for outdoorsy knives, machetes and axes!

    These are the basic ones that you probably have, there are some variations but these are the basics!

    The other big variable we have to look at is the steel itself, what is your knife made of? How was it heat treated and how hard did it get?

    This will dictate what angle you will sharpen at, I like to sharpen at the thinnest angle the knife can tolerate without failure. Some knives will be 5 degrees a side, some 25 degrees. It all depends.

    Japanese steels are generally hardened to a higher level than French/German kitchen knives. This means they will hold an edge rather than roll it, so less need for a steel to realign the edges.

    They are also usually carbon steel laminated with softer cladding (Hitachi White paper or blue Paper steel).

    Sometimes like my Hattori some of the Japanese "Super" steels are used that are not allowed to be used outside Japan unless under licence (Cowry X, VG10, S30V, S90V, BG42)

    What this means is you can go for a thinner angle and the steel will take an hold that edge, the downside is too thin and the brittle core can chip on you instead of folding like a Sabatier/Henckels/Wusthoff et al.

    Traditional Japanese knives are usually specific to various cutting tasks. A Deba is for cutting up heavy fish like a big tuna so is thicker and generally chisel ground (beveled only on one side, also makes some knives left or right handed).

    A Nakiri is a light cleaver like knife and used for vegetables mainly. Any heavier work it can chip like a mother (or like my Shinichi Watanabe mukimono!).

    There are some Japanese blades that are more multi-purpose and similar to Western knives.

    A Santoku, "three virtues" close to a medium chef knife in use, has a pointy enough point, enough belly for rocking chopping cuts and enough length for slicing and mincing.

    A Petty which is basically a paring knife, can be long or short but is a great prep knife and peeler but the lack of length can mean slicing is more awkward.

    A Gyuto or "Cow Sword" is like a big chef knife more than a dedicated carver (Sahimi) and does what it says on the tin. It's a long knife with a decent belly for long gliding slices and also good for winter squash and Pumpkin carving!

    Most western knives are "Rostfrei" or Stainless, this means that they "stain less" than high carbon steels, unless you have a knife made of Spyderco H1 which replaced carbon with Nitrogen and does not react or corrode at all! (It's an Austenitic work hardening tool steel, mad stuff!

    OK, but how would I sharpen the damn thing!

    Well basically, you rub the steel against an abrasive until both sides (planes) meet each other. This can be done using stone (water or oil), abrasive ribbons on a loop (belt sander) Diamonds or sheets of abrasive known as "Sandpaper"

    I have all of these, but for someone starting out the easiest and cheapest option is abrasive sheets. The technique is largely the same for any edge, exceptions excepted!

    The main choice now is backing material (or substrate if ya need to get fancy). A flexible backing like a foam mouse mat gives a convex edge, very Bark River. I like it for softer Western Kitchen knives or cheaper stainless knives as the convex supports the edge. A knife prone to rolling can be made a star using a soft backing and an edge trailing stroke.

    The other option is a very hard and flat backing. This is the "Scary Sharp" method, can be done with float glass, granite surface plate, or my cheap favourite is a cheap mirror on a rubber mouse mat.

    http://dans-woodshop.blogspot.com/2009/01/sharpening-with-scary-sharp.html

    The mirror is made of float glass or the reflection would distort! Flat as a flat thing so your edges will be perfect Vee shapes, as much as human muscular control allows anyway. Any hand sharpened edge will be a little convexed by the action of the body in driving the abrasion.

    I get my abrasives from any car body work place, you need the paper used for car body work. Available up to about 1500 grit, I then use Micro mesh "paper" to finish and then strop. You can also get Pressure Sensitive Adhesive backed sheets (PSA) of the stuff used to polish fibre optic connections. Same stuff I use on my Edge Pro for polishing, just writ large!
    http://www.toolsforworkingwood.com/Merchant/merchant.mvc?Screen=PROD&Store_Code=toolshop&Product_Code=ST-MAF.XX&Category_Code=THS

    How we Rub

    I like an away and back motion. Something in the articulation of the human shoulder makes the side to side stroke a worse option when sharpening. Use one hand or both, just use the same number of strokes on both sides!

    On smaller blades I like to make one long stroke, heel to point each time.

    Larger knives I go section by section and blend in the overlaps, helps with working up poor areas on a sharp knife.


    I do like to press on the blade lightly with my off hand, especially good on flexible blades like fillet knives! These boys are talking about using coins to set the edge angle, and that's fine on a kitchen knife! I like a 15 or 20 degree angle on my harder use knives, mainly so I can easily touch them up on my Spyderco Sharpmaker.

    http://japanesechefsknife.com/HowToSharpen.html

    These lads are good! I usually use edge in strokes to minimise burr formation, change to edge trailing when finishing to polish up an edge.

    More scary sharp


    Use enough grit, not force!

    If a knife is like a ruler, go down to 120 grit and make an edge. Most of your work the first time is setting an edge or bevel on your knife. Make the edges meet cleanly and all steps after are refining or polishing the edge you set first day.

    Use the minimum grit.

    If an edge has been set and is good, just a little blunt. Use the minimum of grit to get the edges back meeting and refine on from there. Many Chef knives aren't blunt, a rub on a loaded strop is enough to keep them going for six months!

    Don't wear out your steel prematurely.


    The same thing can be done on oil or waterstones. The substrate here is stone so convexing is done by "rocking" the blade, tricky to do. The stone needs to be flat, so before I bought the special stone I flattened all my stones using sand on a lintel or kerb stone.

    Sharpening works the same way, away and back.


    Keep on keeping on

    Once the edge is set, refine and use as appropriate.

    I like to deburr during sharpening by lightly slicing some Cork or hard felt.

    I use a Champagne Cork, just how I roll ;)

    A knife sharpened and honed to mad grit levels on paper or stone can be further refined using strops.

    I like leather, but it's just there to hold or carry a bit of polish compound.'

    Stroke your blade edge trailing (so you don't cut the strop) and use a little pressure to make the grits work for their keep!

    Maintain-A little butt often

    To keep your edge in tip top condition, strop often!

    A little abrasive, very fine, will preclude a resharpening for months in a busy kitchen. I have stropped on paper, rubber, leather etc. It's just a medium to hold a very fine abrasive. I have several leather strops for hand and machine use. The best I like is "Smurf Poo" and a Longstrider Strop.

    Any bit of leather belt and a flat stick will make a strop, using Diamonds or str8 razor stuff all ends the same way, I've used them all!

    I like Smurf Poo, Diamonds and Red and Black Razor Paste (Dovo) in that order!

    The other touch up option is steel!
    A steel should really only be used to realign an edge that has deformed slightly through use. Most steels that come with knife sets are way too coarse and chip or abrade the edge too much. Smooth glass, ceramic or polished steel would be miles better for these regular touch ups.

    Most butchers knives and a lot of Western knives are hardened to a lower point than Japanese knives. A butcher will steel before cuts, between cuts over and over until the knife is used up and replaced.

    Japanese knives being harder are more brittle, which can be offset by cladding or laminating, using high tech powder steels and by carfeul handling. They are honed and then polished to give a very refined edge. Even a fine ceramic would be too coarse to use even to touch up these edges, I would prefer to see a light touch on a strop loaded with chromium oxide or fine diamond paste.

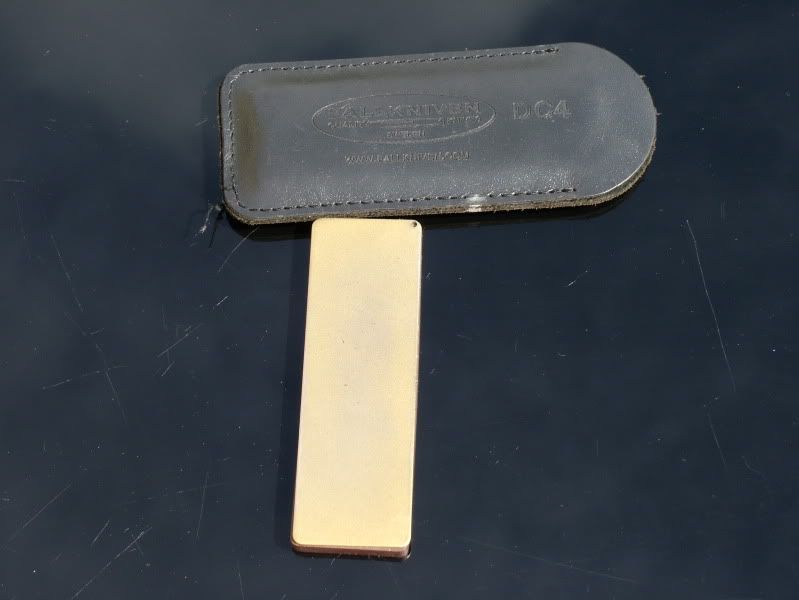
    Diamond abrasives, paste, mounted to a steel like the excellent Fjallkniven or on bench stones like DMT and Eze-Lap are good to cut very hard steels. You need diamond if your knife is made of Super gold powder steel, S30V or better, VG10, Cowry X or most of the newer cutlery steels coming out of Japan (and only licensed for use in Japan).

    Diamond because of the shape of the particles will not give as highly polished an edge as stropping with Chromium Oxide (about.5 micron grit) or the other metal polishes like Flitz or razor strop abrasives from Dovo.

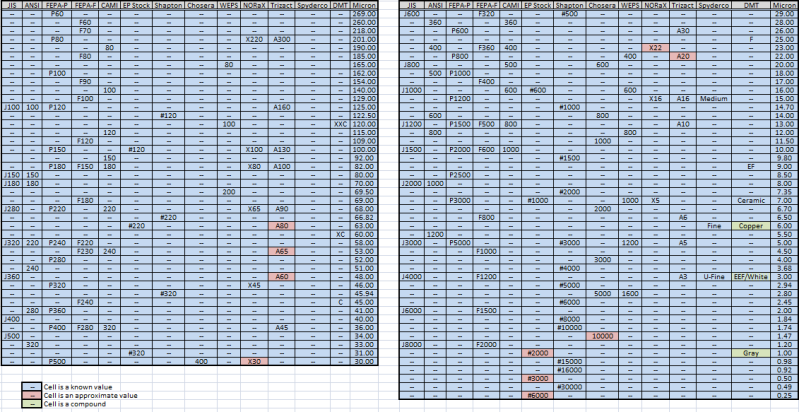
    Grits are not standard over different systems either, so a 2000 grit sheet of wet and dry isn't the same as a 2000 grit Japanese waterstone. There's a handy chart showing comparisons here.


    http://blogs.popularwoodworking.com/editorsblog/True+Grit+Understanding+Sharpening+Grits.aspx

    Scroll to the bottom of the page for the grit comparison charts.


«13

Comments

  • Registered Users Posts: 622 ✭✭✭Deise Musashi


    My Gear

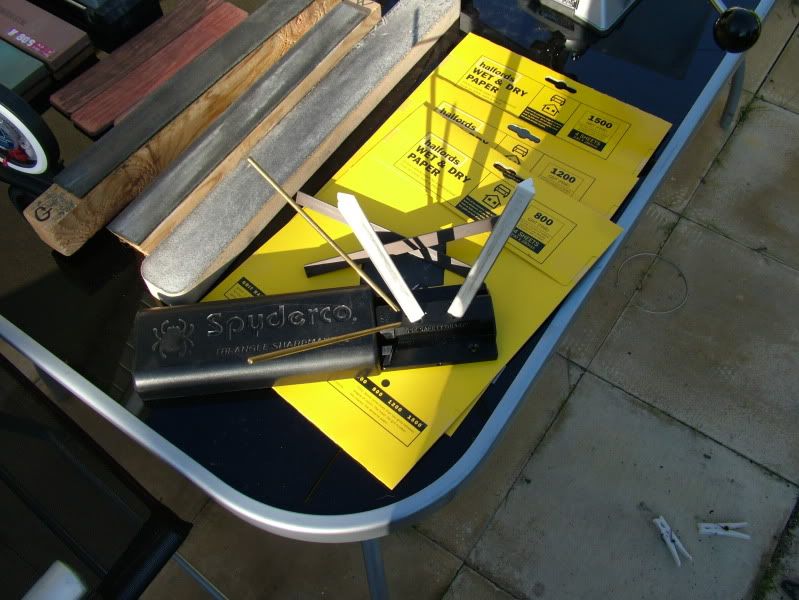
    Here we have the Spyderco sharpmaker, black plastic base and ceramic triangular hones. The angles are set at 20 and 15 degrees. It's ideal for touching up an edge if you have those angles set already.

    DSCF1596-1.jpg

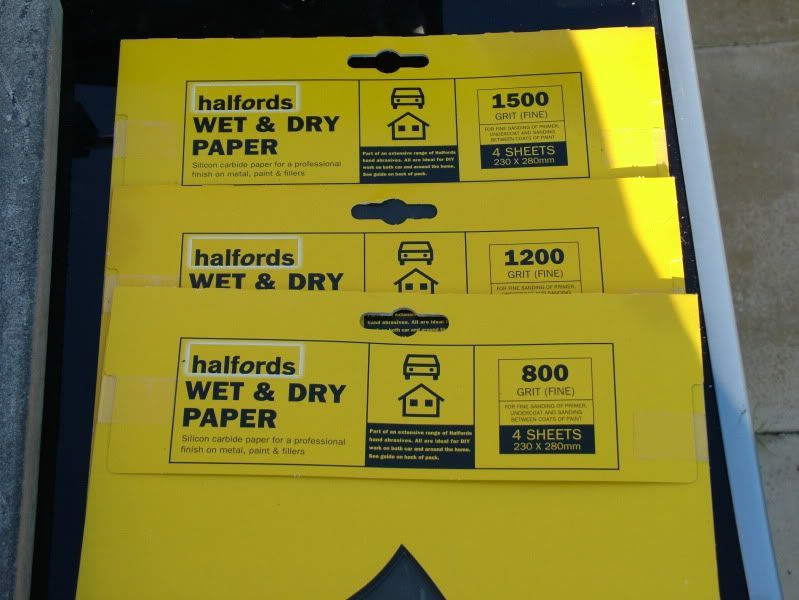
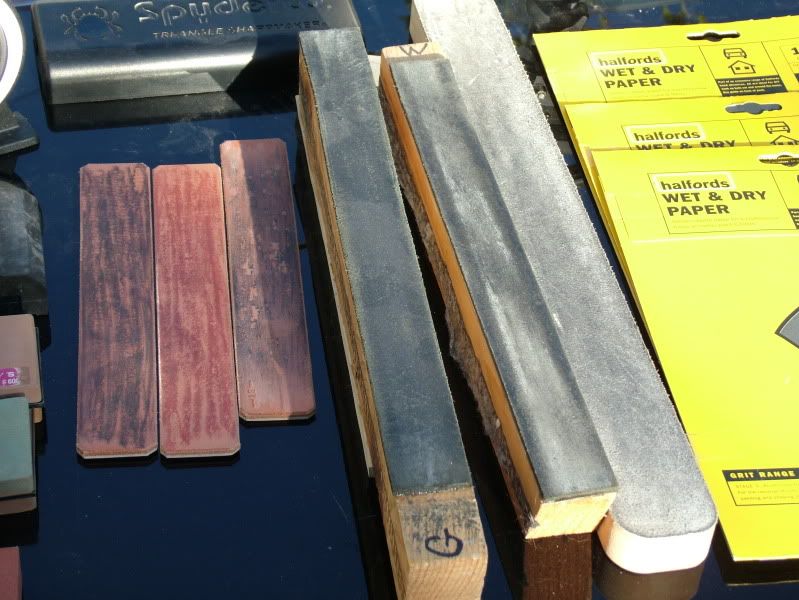
    Underneath that is some automotive abrasive sheets, good for convexing on a mouse mat or as sort of disposable stones on a hard backing like granite tile or glass.

    DSCF1596-1.jpg

    These are good, and once you've finished with them you can move on to micro mesh abrasives.

    DSCF1594-1.jpg

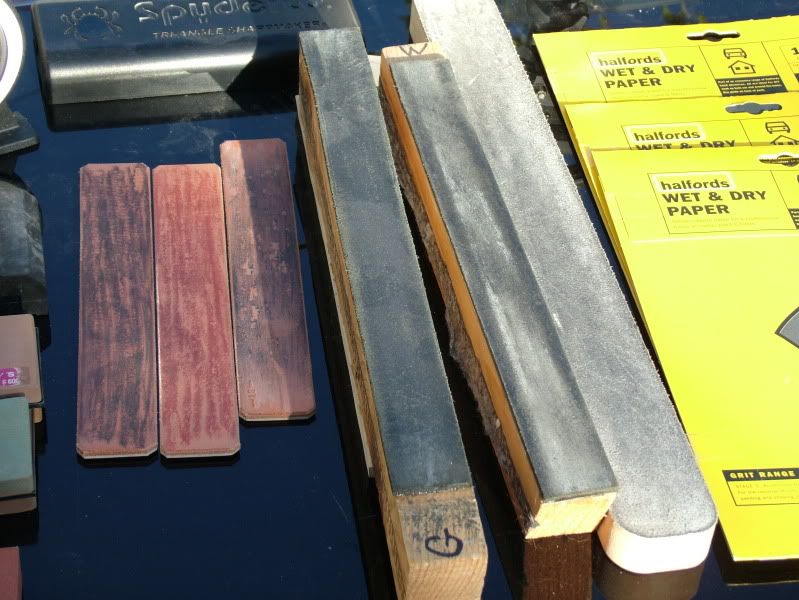
    Some strops, three on the left have diamond abrasive and razor strop paste. The three on the right are two homemade strops from leather belts and a Longstrider strop with blue compound.

    DSCF1593-1.jpg

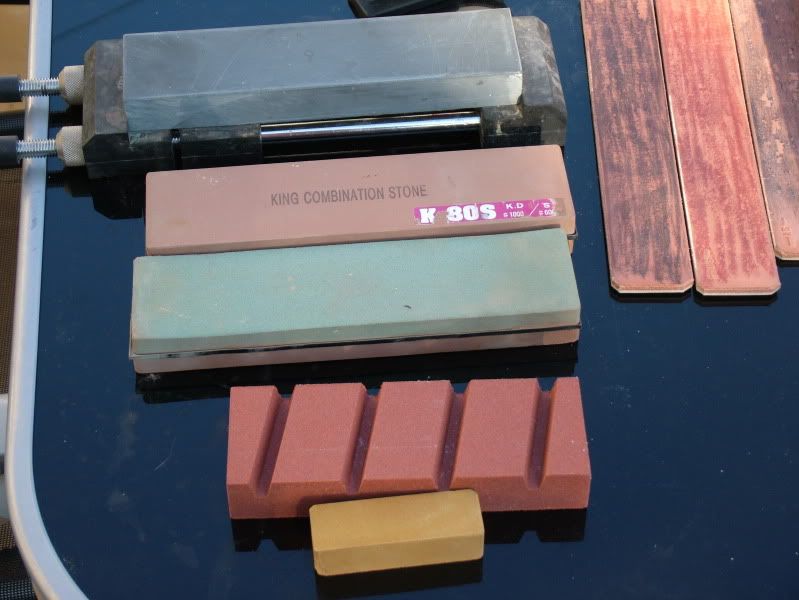
    Japanese water stones, a flattening stone and a Nagura stone for making slurry.

    DSCF1592-1.jpg

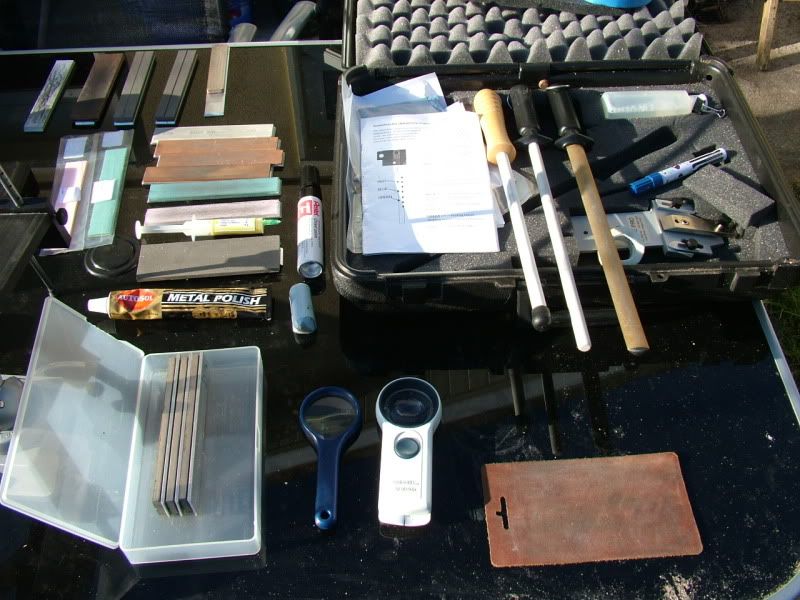
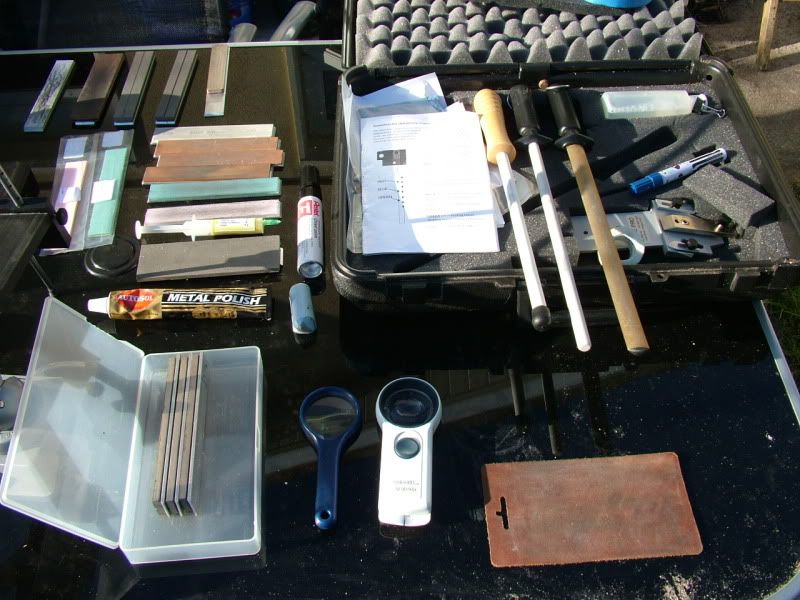
    Edge Pro stones, autosol, diamond plates on edge pro mounts and some magnifiers to check the edge and scratch patterns.

    DSCF1587-1.jpg

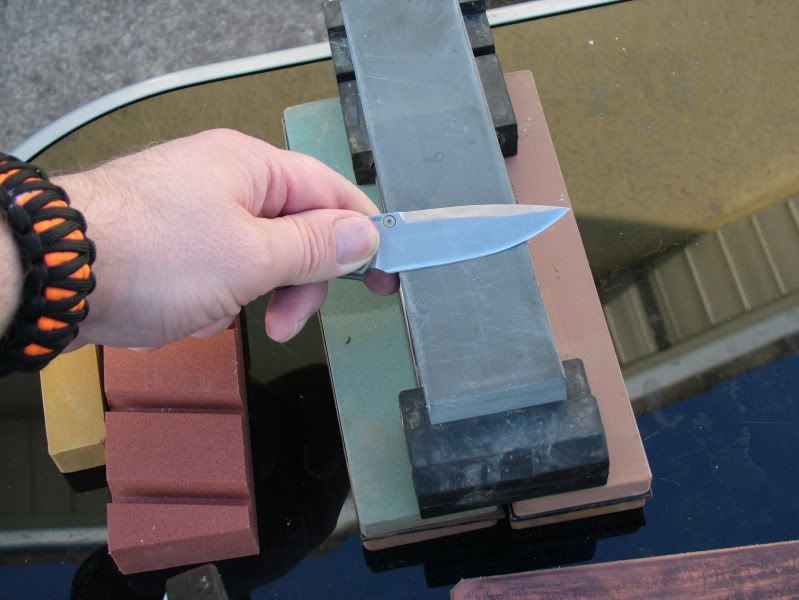
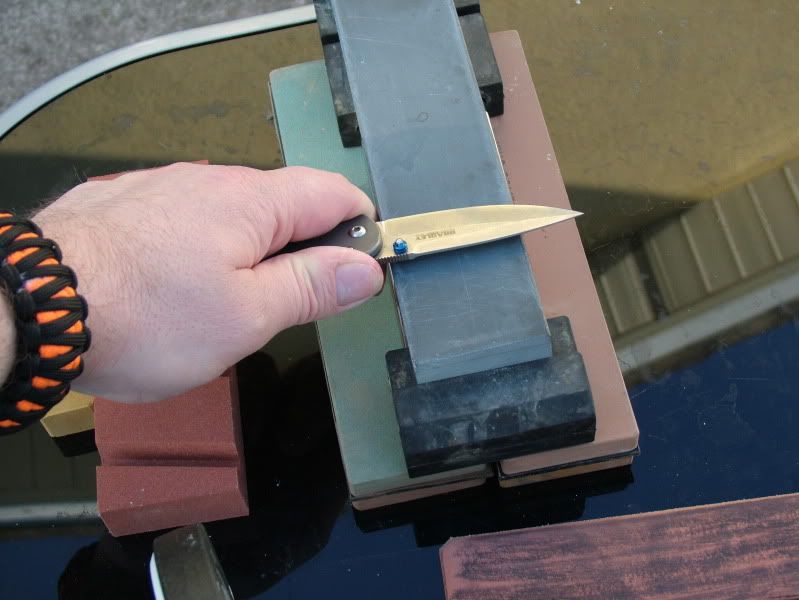
    Slice along the stone at your selected angle. Edge leading and try to do the same number of strokes on each side.

    DSCF1607.jpg

    Finish by stropping on your stones, edge trailing strokes and light pressure.

    DSCF1606.jpg

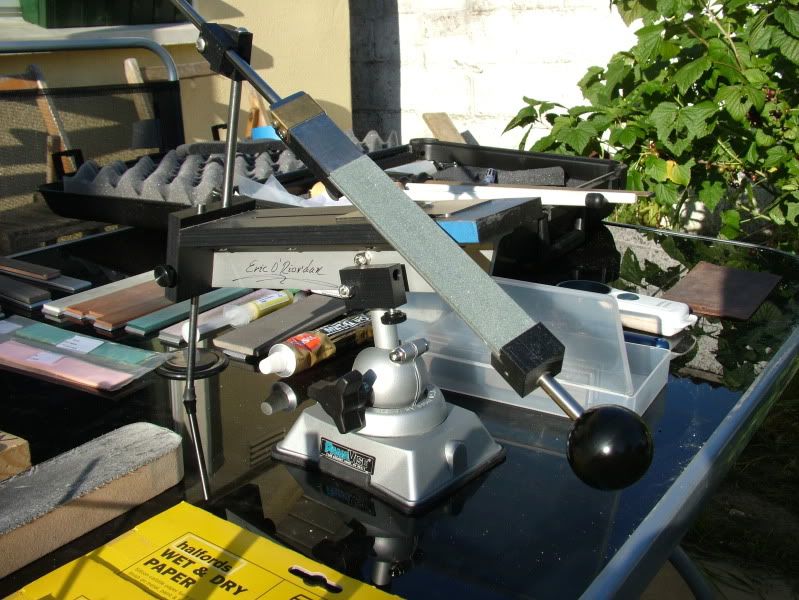
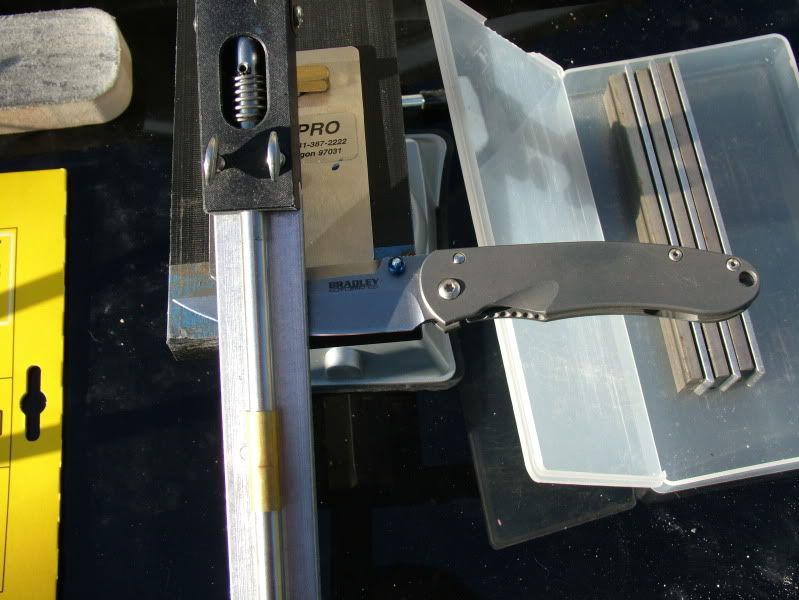
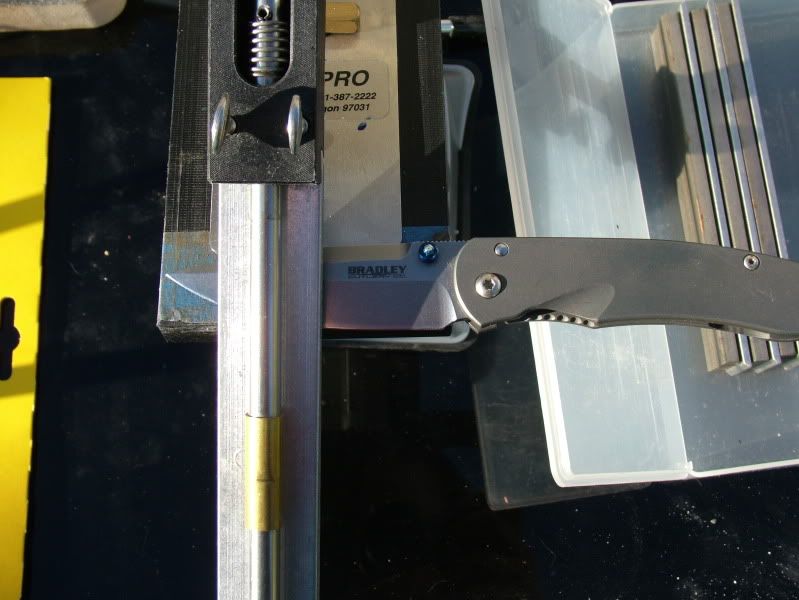
    The edge pro, set the height of the mast to set your angle, then slide the stones across the blade to sharpen and polish. It comes with synthetic stones and I made up a set of diamond plates to work on it using eze-lap plates.

    DSCF1597.jpg

    If your knife has large flats you just hold it on the table, a full flat grind you keep the side of the knife on the table and adjust the mast height to compensate, usually about four degrees in the difference.

    DSCF1604.jpg


    DSCF1605.jpg

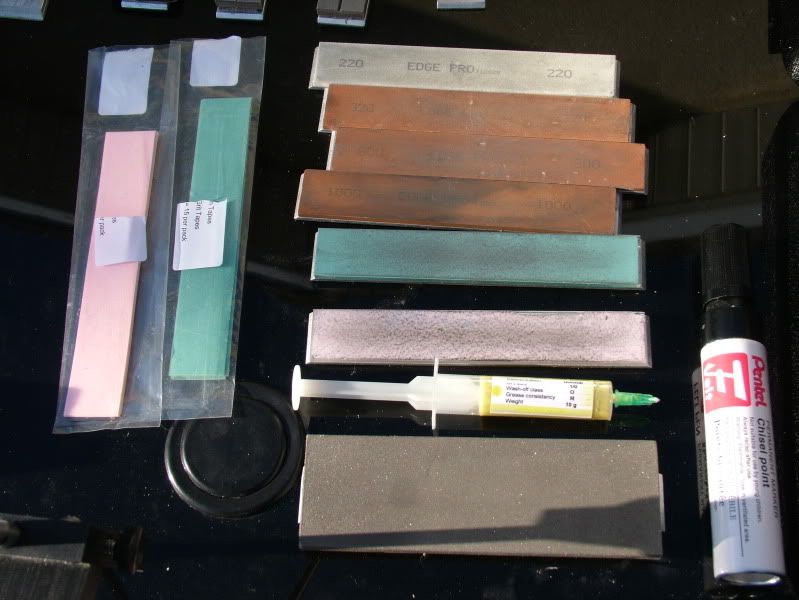
    Some edge pro stones, a large eze-lap plate mounted on an edge pro aluminium mount and a big fat marker for colouring the edge. It makes it very easy to see when your angle is correct and you've ground out to the very edge. The pink and blue plates are 3M polishing film mounted to glass blanks for final polishing of edges. The syringe contains diamond paste I use on medical paper tape stuck to an aluminium blank or on leather strops.

    DSCF1599.jpg

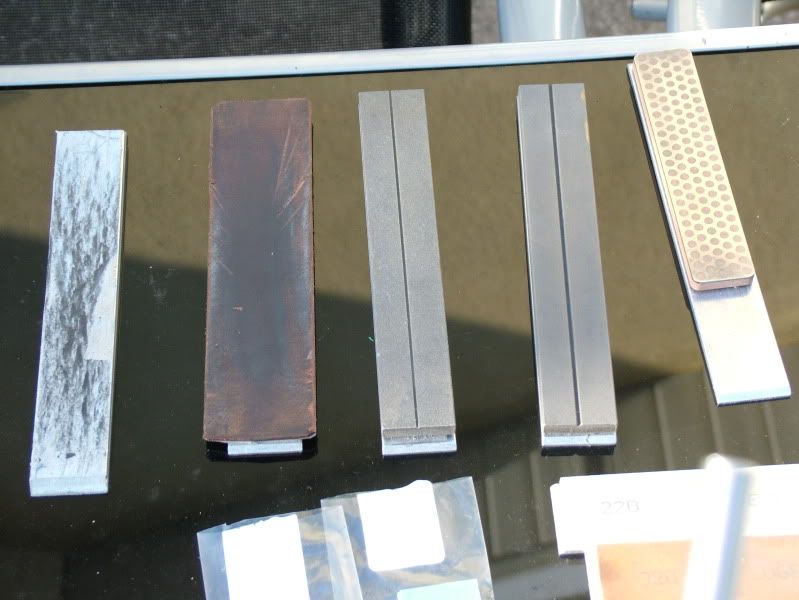
    Paper tape strop, leather strop, fine diamond eze-laps and a very fine DMT mounted to an edge pro blank.

    DSCF1598.jpg

    Autosol and "Smurf Poo" polish compound in a crayon.

    DSCF1600.jpg


    DSCF1593.jpg

    Stroke the blade towards and away, swap hands or use the same hand, tip to heel or heel to tip.


  • Registered Users Posts: 622 ✭✭✭Deise Musashi


    DSCF1587.jpg

    On my edge pro case you can see three "steels"

    Smooth ceramic, ridged ceramic and Diamond Oval.

    A borosilicate rod is the dream, a shiny hardened rod from a hydraulic is also good!

    A fecked car shock would be good! Larger diameter makes less pressure on the knife edge.

    A rod (steel) is only used to realign steel edges, stones and other abrasives make new edges.

    DSCF1608.jpg

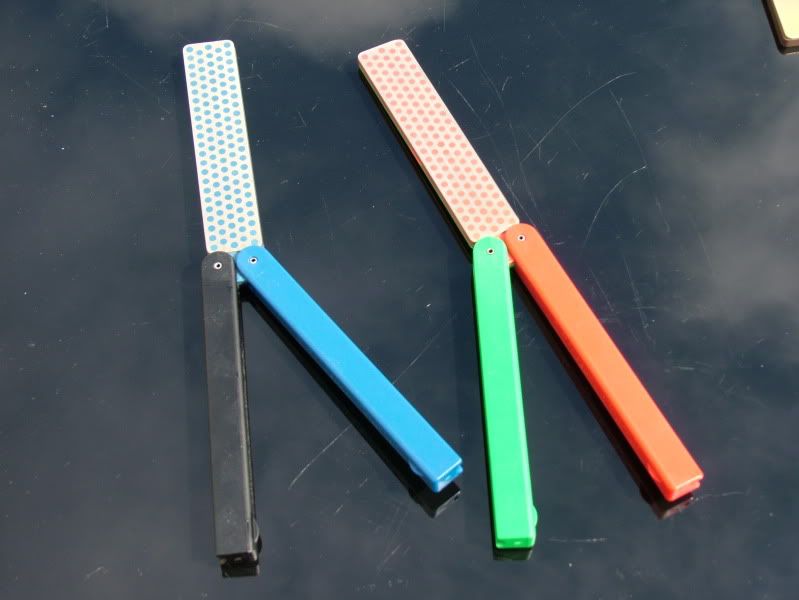
    Two DMT duofold sharpeners, very handy to bring along and good for awkward things like mowers, axes and scythes!

    DSCF1610.jpg

    Fjallkniven diamond and ceramic sharpener, also handy for touch ups.

    DSCF1611.jpg

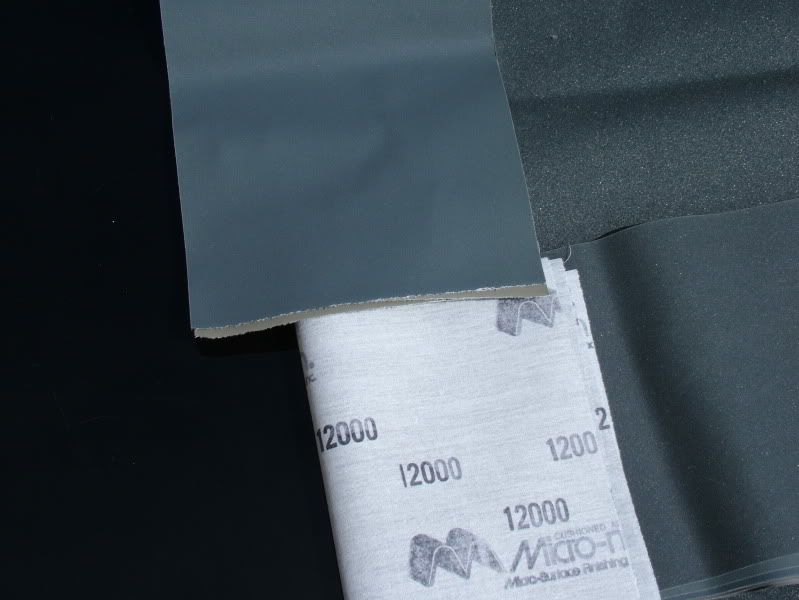
    Micro mesh fabric backed sheets, you can see it goes up to 12000 grit! You can strop from that or get some 3M pressure sensitive adhesive backed polishing film (used in fiber optics polishing) and use that instead.

    search%3Fq%3D3M%2Bpolishing%2Bfilm%26hl%3Den%26sa%3DX%26rlz%3D1G1GGLQ_ENZZ260%26biw%3D1280%26bih%3D929%26tbm%3Disch%26prmd%3Divns&itbs=1&biw=1280&bih=929


    I am sure I have missed stuff out and not explained things clearly.

    Please let me know and I will edit these posts . :D

    As always, if anyone needs knives polished I am happy to oblige.


    Eric.


  • Registered Users Posts: 1,275 ✭✭✭endasmail


    deadly post
    fair f*cks to ya


  • Closed Accounts Posts: 8,590 ✭✭✭Tackleberrywho


    Where did you buy a strop?


  • Closed Accounts Posts: 1,898 ✭✭✭poulo6.5


    that all looks very complicated yet simple at the same time.

    say i had a normal shop bought blade with 440 stainless and a hollow grind will these methods work the same.


  • Advertisement
  • Registered Users Posts: 15,848 ✭✭✭✭Discodog


    It has to be horses for courses. Sharpening is a compromise between making the edge fine enough to be sharp but strong enough for the edge to last.

    Kitchen knives are being used at home & they don't have to cut wood !. Hunters & outdoorsmen generally need to sharpen their knives to achieve a multitude of tasks. Also we only want to carry a small piece of kit.

    For example I use one of these a lot. It's a Japanese Hori Hori digging knife. Because it is being pushed through stony soil it has to be sharpened every day.

    products_2223_1_large.jpg
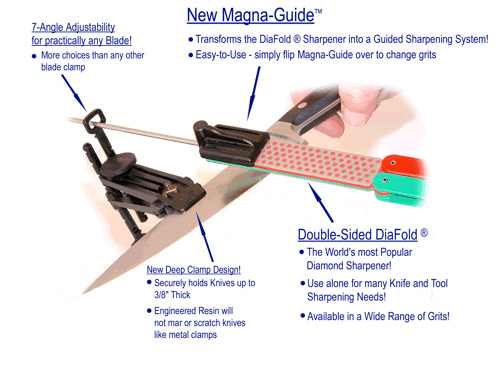
    I keep one of these in my pocket they are expensive but last for years.

    dmgef_guide.gif
    I bought the kit with two double sided diafolds. One is Coarse+Fine & the other Fine+Extra Fine. In time I won't need to use the guide as my freehand sharpening will improve. During the day I just carry the Coarse/Fine without the guide & it can get my Hori sharp in seconds.

    Having 4 grits gives flexibility & the whole lot fits in a pocket. The stones just need a drop of water.


  • Registered Users Posts: 622 ✭✭✭Deise Musashi


    Where did you buy a strop?

    Most of my strops are bits of leather belt glued suede side up on a bit of wood. Rub on a little abrasive, blue crayon or Autosol metal polish and strop at the same angle you sharpened at, using an edge trailing stroke.

    My big strop (good for long strokes) and smurf poo came from a guy called Longstrider over on British Blades.

    http://www.britishblades.com/forums/showthread.php?123112-Longstrider-Strops-and-Starkie-Blue&highlight=strop

    say i had a normal shop bought blade with 440 stainless and a hollow grind will these methods work the same.

    Yes, pick an angle (20 per side for 40 inclusive would be good) and sharpen at that until your edges meet. Then work up the grits until done.


  • Closed Accounts Posts: 8,590 ✭✭✭Tackleberrywho


    Most of my strops are bits of leather belt glued suede side up on a bit of wood. Rub on a little abrasive, blue crayon or Autosol metal polish and strop at the same angle you sharpened at, using an edge trailing stroke.

    My big strop (good for long strokes) and smurf poo came from a guy called Longstrider over on British Blades.

    http://www.britishblades.com/forums/showthread.php?123112-Longstrider-Strops-and-Starkie-Blue&highlight=strop


    Yes, pick an angle (20 per side for 40 inclusive would be good) and sharpen at that until your edges meet. Then work up the grits until done.

    That Smurf Poo, I tried to look it up and only found stuff about teh smurfs and poo :eek:

    Is there anywhere in Ireland that you can buy leather for a strop?

    I see places online that vary from €20 to €100 for a strop
    http://www.flair.ie/products.php?c0=2&ct0=hair&c1=704&ct1=barber-supplies&c2=1028&ct2=shaving-equipment&p_id=8125&pt=strop-leather-shaving-belt

    http://www.onsalenow.ie/?p=s&sch=details&store=151&prod=739585


    I actually can get blocks of granite polished, which I would never have considered, but I want something portable like a stop or one of those timber thingies that I can carry in a small toolbox along with the butchering knives


  • Registered Users Posts: 622 ✭✭✭Deise Musashi


    Smurf Poo is made by Richard Starckie for use with his Starckie Sharp strop.

    I like it better than other crayon type compounds as it's made to be used with hand strops rather than powered belts. Drop me your address and I'll send you a bit.
    Is there anywhere in Ireland that you can buy leather for a strop?
    I get old leather belts from second hand shops and glue them to a stick, rub of sand paper to raise the fibres and apply a light coat of strop compound. You should only barely see the colour on the strop. The abrasive is only one micron, you don't need an inch of it on there! ;)

    Longstrider gets his leather from a mate of his who makes furniture, the leather is skived thin so glued to a bit of MDF makes a very hard strop with no give. Keeps your edge from rounding over when you strop hard.

    Any old handbag or leather jacket should be fine, glue suedey side up to a bit of durabella batten or handy sized piece of granite :D

    Leather can be got from Le Prevo or The Identity Store or on the Bay. If you are buying, go for veg. tanned. Most clothing and furniture leather is chrome tanned. You can use plain leather sans compound as well, horse butt being highly sought after! Something about natural silicates in the leather?

    I actually can get blocks of granite polished
    Ideal! Spray of adhesive like art students use and your wet and dry or micro mesh is stuck in place, use like a stone and just swap sheets for finer grit progression!

    Hard substrate is ideal for harder steels that can take a finer angle without rolling or otherwise failing.

    Softer steels just use a mouse mat or piece of leather under your wet and dry to give a soft convex to the edge.


  • Closed Accounts Posts: 8,590 ✭✭✭Tackleberrywho


    I have an old Biker Jacket at home somewhere for leather, I'll stick that to a bit of timber.

    Them yokies with the perforations/dimples, where do you get them?

    Fancy swapping some gear for a 640G hard drive :D


  • Advertisement
  • Registered Users Posts: 412 ✭✭Deerspotter


    Excellent post - thank you


  • Registered Users Posts: 622 ✭✭✭Deise Musashi


    Them yokies with the perforations/dimples, where do you get them?
    They are double sided DMT diamond sharpeners. I got mine from Heinnies.

    http://www.heinnie.com/Accessories/Sharpeners/D.M.T.-Sharpeners/c-1-93-370-210/


  • Closed Accounts Posts: 8,590 ✭✭✭Tackleberrywho


    They are double sided DMT diamond sharpeners. I got mine from Heinnies.

    http://www.heinnie.com/Accessories/Sharpeners/D.M.T.-Sharpeners/c-1-93-370-210/

    With one of them, and one of these
    http://www.heinnie.com/Accessories/Sharpeners/D.M.T.-Sharpeners/DMT-Diafold-Magna-Guide/p-93-370-210-4796/

    Could anyone get a razors edge?


  • Registered Users Posts: 42 shane32819


    superb post. very interesting and useful!


  • Registered Users Posts: 15,848 ✭✭✭✭Discodog


    Depends on the knife & the grade of Diafold. Ideally you need two Diafolds. The Coarse/Fine & the Extra Fine/extra extra fine. If the knives arn't too bad the a single Fine/Extra fine will do followed by a strop

    There are lots of demo's on youtube including using the magna guide. `the secret is not to use any pressure & let the diamond do the work.

    I have one of these beauties & it comes up scary sharp.

    images-2.jpg

    The thing that I like about the Magna Guide is it is difficult to get it wrong. It removes guess work & inconsistency


  • Registered Users Posts: 15,848 ✭✭✭✭Discodog


    Depends on the knife & the grade of Diafold. Ideally you need two Diafolds. The Coarse/Fine & the Extra Fine/extra extra fine. If the knives aren't too bad the a single Fine/Extra fine will do followed by a strop

    There are lots of demo's on youtube including using the magna guide - the secret is not to use any pressure & let the diamond do the work.

    I have one of these beauties & it comes up scary sharp.

    By the way the dimples are there to trap removed metal filings so that they don't clog the diamond.

    images-2.jpg

    The thing that I like about the Magna Guide is it is difficult to get it wrong. It removes guess work & inconsistency


  • Closed Accounts Posts: 8,590 ✭✭✭Tackleberrywho


    Discodog wrote: »
    Depends on the knife & the grade of Diafold. Ideally you need two Diafolds. The Coarse/Fine & the Extra Fine/extra extra fine. If the knives aren't too bad the a single Fine/Extra fine will do followed by a strop

    There are lots of demo's on youtube including using the magna guide - the secret is not to use any pressure & let the diamond do the work.

    I have one of these beauties & it comes up scary sharp.

    By the way the dimples are there to trap removed metal filings so that they don't clog the diamond.

    The thing that I like about the Magna Guide is it is difficult to get it wrong. It removes guess work & inconsistency
    I like simple solutions and that looks simple to me.
    I have a load of hunting knives and butchers knives and I only can get them so sharp.

    I've never shaved with them :o
    The butchers knives do the job for me, but I'd prefer them sharper so I could make cleaner cuts.
    When offering meat to people the more attractive it is the easier it is to get people to taste it!
    Like most grind stones, do you have to dress the stone dimples when they fill with material, and how?
    Or is it a case that they remove so little that they never fill?


  • Registered Users Posts: 15,848 ✭✭✭✭Discodog


    Wet it before you start - spit works !. Then rinse under the tap to clean when you have finished.


  • Registered Users Posts: 622 ✭✭✭Deise Musashi


    Like most grind stones, do you have to dress the stone dimples when they fill with material, and how?
    Or is it a case that they remove so little that they never fill?
    The beauty of diamond plates like the eze-lap and DMT products is that they are made of diamond. They will never dish or hollow out, you don't need to dress or lap them flat.

    Wet them with water (and maybe a little washing up liquid in it), use them, rinse off and dry them, put them away again. I use mine on the edge pro or freehand, I have a wider coarse stone for really hogging off steel. The only better tool for the job will be when I get a motor for my belt sander :rolleyes:


    Was talking to a lad tonight who was having trouble sharpening a convex grind on mouse mat with abrasive sheets.
    This is often due to using too much force with a soft backing, the same can happen when stropping if the leather is soft or thick. Thin and with a hard backing and you can strop hard!

    I saw this post on Bladeforums a while back which really explains well what goes on when stropping so I'll add it here.

    http://www.bladeforums.com/forums/showthread.php/750008-Stropping-angle-plus-pressure

    A lot of people have noticed that stropping can make an edge duller as well as sharper. Some say you need a lot of pressure, some say you need no more than the weight of the knife. Actually, you need to get the right combination of angle and pressure.
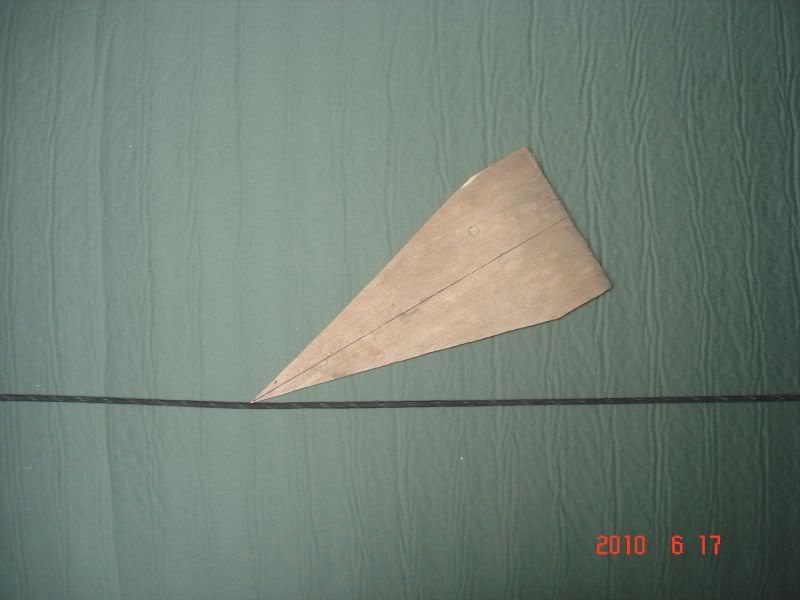
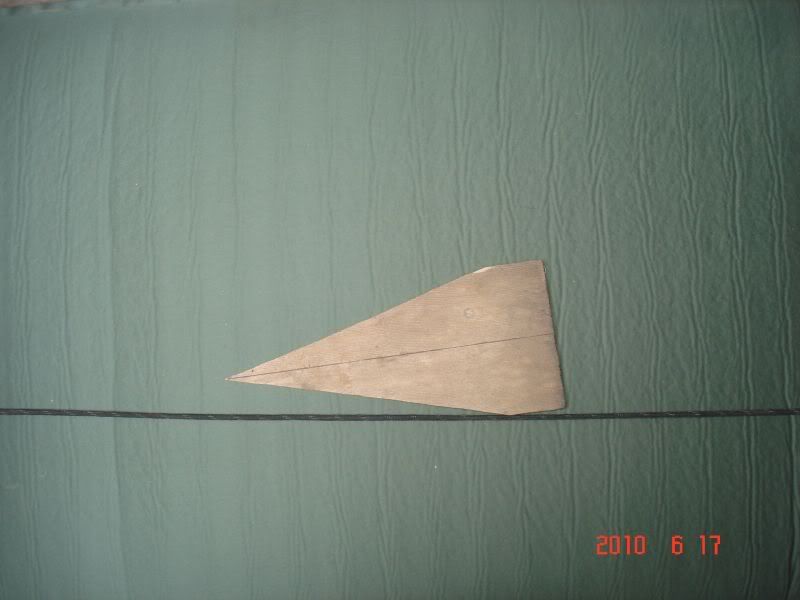
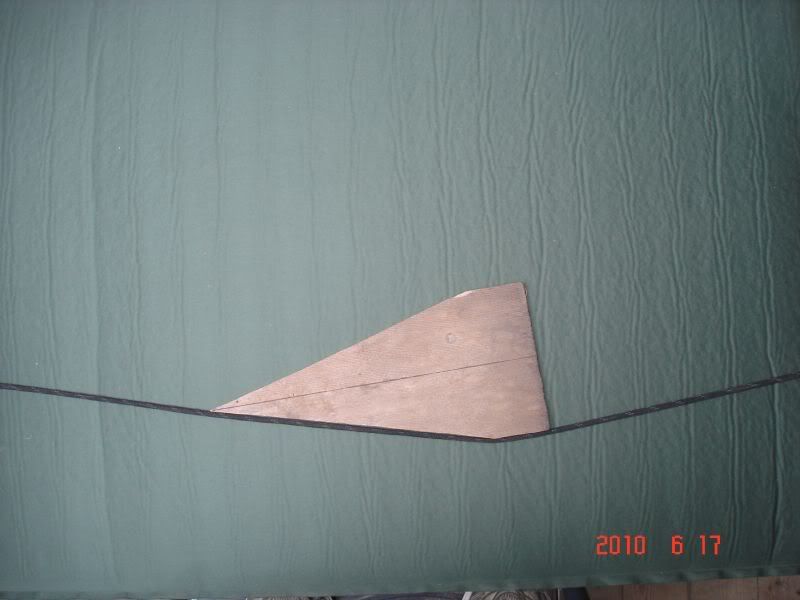
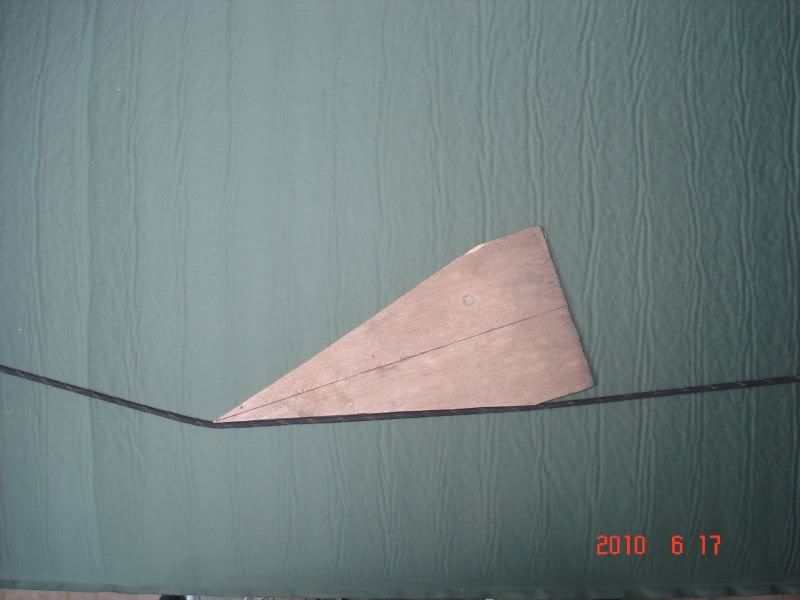
    I tried to capture this relationship visually:
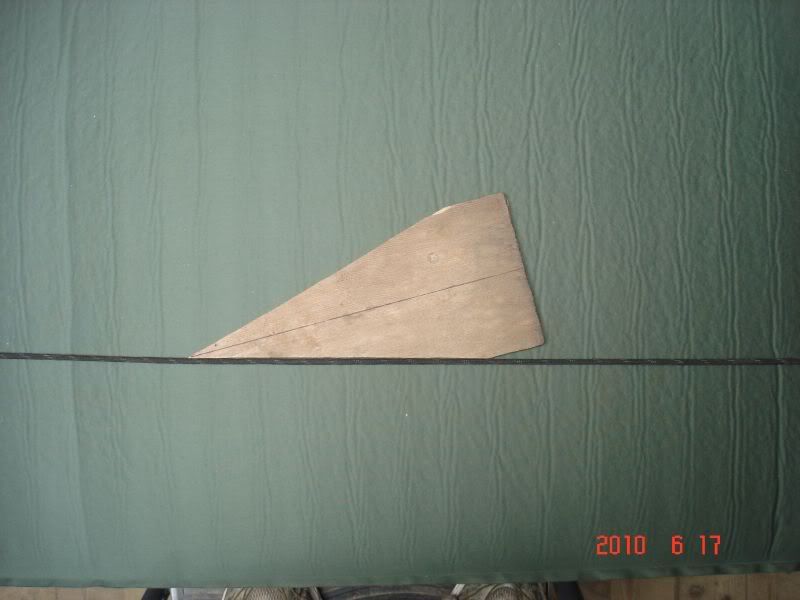
    The black string represents the surface of the leather strop. The wood represents the edge. It is cut to a 30-degree inclusive angle, a popular edge angle for knives with good steel. Ideally, you want the string parallel with the edge bevel.

    First: Proper angle and very little pressure on the strop. With very little pressure, the leather is not depressed significantly and dragging the edge over the strop at the sharpened angle sharpens the entire edge bevel without rounding the edge. People who say you need little pressure are using the correct sharpening angle. Notice the string is parallel with the edge bevel.

    DSC01609.jpg

    Second: This shows the angle of the knife held too high on the strop, rounding the edge. This is wrong no matter what the pressure.

    DSC01610.jpg

    Third: This shows the edge held at too shallow an angle, with little pressure applied. This combination of angle and pressure rounds the shoulders of the edge bevel without affecting the edge.

    DSC01611.jpg

    Fourth: This shows the angle held too shallow, but with a lot of pressure. The pressure compensates for the incorrect angle and the edge is sharpened. Notice the string is parallel with the edge bevel. This combination will sharpen well. People who use a lot of pressure, are using a shallow stropping angle.

    DSC01612.jpg

    Finally: This shows the correct sharpening angle, but with a lot of pressure. The extra pressure causes the stopping leather’s surface to drag around the edge, dulling it.

    DSC01613.jpg

    Notice in the last picture that the abrasive is forced up and aginst the edge, dulling it. On a soft backing like foam mouse mat this will make your abrasive sheet take the edge back off your knife as you stroke.

    Reduce the pressure and allow the abrasive to cut and you get better results. Stropping is the same thing with finer abrasive particles.
    The butchers knives do the job for me, but I'd prefer them sharper so I could make cleaner cuts.

    What brand of butchers knives? Often butchers knives are left softer than average, designed to be steeled often and will roll rather than chip if hitting bone. There may be a practical limit to how fine an edge a butchers knife can take and hold, convexing can help there as it leaves more "meat" behind the cutting edge to support that edge.

    For very clean looking cuts a japanese sashimi or gyuto may be an option? Presentation of the cut food is very important in sushi for example, hence chisel ground knives designed to leave a glossy finish, much as a good plane or chisel does in wood.

    Anybody wanting to go into the realms of obsessive knife sharpeners, guys who buy the best sharpening stones in the world (Shapton Pro glass stones, Choseras, Japanese Naturals) and then cut them up to make edge pro stones out of them :eek: Have a look here.

    http://www.knifeforums.com/forums/showforum.php?fid/48/


  • Registered Users Posts: 15,848 ✭✭✭✭Discodog


    With every topic there are always those enthusiasts who want to take things to the limit - my knife is sharper than yours. The torch forums are a classic example.

    Many sharpening problems are caused by impatience which often comes from using the wrong grit & because it doesn't appear to be working, using too much pressure.


  • Advertisement
  • Registered Users Posts: 622 ✭✭✭Deise Musashi


    The torch forums are a classic example.

    I only got one Surefire modded with a custom LED and heatsink, honest! :o


  • Closed Accounts Posts: 8,590 ✭✭✭Tackleberrywho


    Ok lads
    The "idiots" guide to sharpening hunting and Butchering knives.

    (440 steel and 420)

    The angled yoke and the diamond thingy, then strop?

    As patience is a virtue that I only have in small doses will this method work good enough?
    And do I give away my "Dick" Butchers steel ? No jokes please :D


  • Registered Users Posts: 622 ✭✭✭Deise Musashi


    Coarse diamond thingy (if needed) to set angles to match angled thingy.

    Fine/Extra Fine diamond thingys and a strop to finish.

    Angled thingy to touch up as needed/butcher steel as needed on butchers knives.

    Which steel have you? Dick are a good brand but there are several steels, an abrasive one will give a toothy edge that's good for cutting. If you find your steel is too coarse, use a strop or a polished steel rod instead. The inner from a hydraulic is good, wider diameter ones spread the pressure over a wider area.

    There isn't a lot of point in polishing and stropping an edge, and then the first touch up using a coarse diamond steel knocks the edge back to that grit level.

    Smooth ceramic steels are better on a polished edge to realign without removing lots of steel.

    Even then, me edge pro smooth ceramic is 1200 grit, no so good if I've lovingly polished an edge to 30,000grit and stropped with .05micron diamond :rolleyes:

    Generally Diamonds/stones to set the edge then strops and steels to maintain them. Saves excess wear and tear on your knives, though a lot of butcher knives are basically disposable items, especially if used on a line rather than in a butcher's shop.

    For the folk who like to go to extremes, there is some debate about polishing lower grit edges rather than refining as far as possible and then polishing. Also, more than two strokes on your steel can apparently degrade your edge more than help it. I've posted this before but I may as well put all the sharpening stuff in this thread.

    All steels and indeed all abrasives no matter how fine remove steel from your edge to a greater or lesser degree. If I do steel I use a 12 inch smooth ceramic steel, but I prefer to use a leather strop between sharpenings.

    The steeling thing was tested by John D. Verhoeven, Emeritus Professor,
    Department of Materials Science and Engineering. His paper is a good read, if a little dry.

    The effect of decreasing the number of back-and-forth passes from 15 to 2 is shown by comparing Figs. 15 and 16. Using 15 b&f passes was clearly too severe. In all of the steeled samples the action of the steeling process produced a series of linear scratches running parallel to the edge. With 15 b&f passes these scratch indentations extend back from the edge further than with 5 or 2 b&f passes. Also, with 15 b&f passes it was very common to observe breaking off of ledges of material along the edge as is shown most clearly on the Up face view at the center of Fig. 15. Study on the Edge view at the left of Fig. 15 reveals a region along the edge at the top right where one of these 000.jpg

    ledges of material has broken out of the edge. Reducing the number of b&f passes to 2 dramatically reduced both the density of such ledge break-out regions along the edge as well as the size of the ledge regions. In both of the face views presented in Fig. 16 there is no ledge breakout, and the edge straightness is very good, however, no better than in the original control blade, compare to Fig. 12. The Edge view of Fig. 16 shows a region at the lower right where breakout has occurred. In regions where no breakout occurs, such as the upper left of Fig. 16, the edge width runs around 1.5 microns, which is at the high end of that observed on the control blades prior to steeling. The blades examined after 5 b&f passes presented results intermediate to those of the 15 and 2 b&f passes, but closer to those of the 2 b&f passes. In summary, the effect of the number of passes was fairly clear, the lowest number of passes studied, 2 b&f passes, produced the best edges


  • Registered Users Posts: 622 ✭✭✭Deise Musashi


    I guess if anyone has read this far they have an interest in knives and steels. I have a couple more tables I'll add here that have information on grit from various standards.

    Handy if you want to know what the next step from 1500 grit sandpaper would be if moving to diamond plates or japanese water stones.

    gritchartrev4.png

    copied from here http://www.bladeforums.com/forums/showthread.php/856708-The-Grand-Unified-Grit-Chart

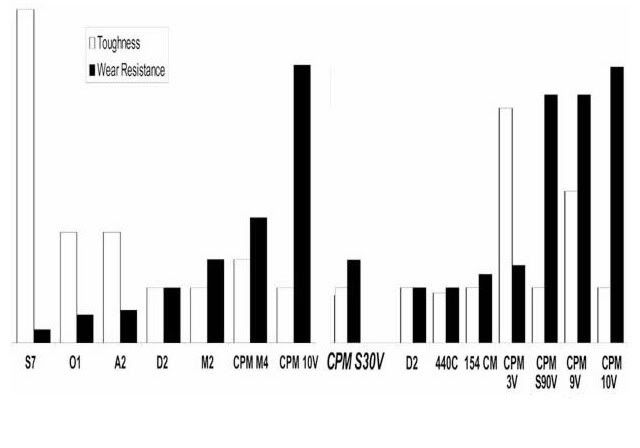
    I can't remember where I got the next chart, it shows toughness versus wear resistance. What we generally call "tough" in steels is sometimes a function of ductility.

    Wear Resistance, just like it sounds, wear resistance is the ability to withstand abrasion. Generally speaking, the amount, type, and distribution of carbides within the steel is what determines wear resistance. This will make a knife hold an edge, but you may need diamonds to put an edge back on!

    Strength is the ability to take a load without permanently deforming. For many types of jobs, strength is extremely important. Any time something hard is being cut, or there's lateral stress put on the edge, strength becomes a critical factor. In steels, strength is directly correlated with hardness -- the harder the steel, the stronger it is. Note that with the Rockwell test used to measure hardness in a steel, it is the hardness of the steel matrix being measured, not the carbides. This, it's possible for a softer, weaker steel (measuring low on the Rockwell scale) to have more wear resistance than a harder steel. S60V, even at 56 Rc, still has more and harder carbides than ATS-34 at 60 Rc, and thus the S60V is more wear resistant, while the ATS-34 would be stronger.

    Toughness is the ability to take an impact without damage, by which we mean, chipping, cracking, etc. Toughness is obviously important in jobs such as chopping, but it's also important any time the blade hits harder impurities in a material being cut (e.g., cardboard, which often has embedded impurities).

    ToughnessWearResist.jpg

    You've seen me referring to different steels through this thread, high carbon, stainless, tool steels, S90V etc. There are some good sites that explain the differences in steels, their applications and relative merits, and what exactly adding alloying elements do to steels.

    Like Spyderco's use of H1, a work hardening austenitic steel using Nitrogen to prevent corrosion. For further reading I like these links.

    Chemical additions and their effects

    http://zknives.com/knives/steels/steelelements.shtml

    Knife steels and their properties

    http://zknives.com/knives/articles/knifesteelfaq.shtml

    And the previously quoted "Experiments on Knife Sharpening" by John D. Verhoeven, good stuff from a guy who took the time to do the work and find out if stuff "everybody knows" was actually correct.

    http://www.bushcraftuk.com/downloads/pdf/knifeshexps.pdf


    Hope these are of some interest to ye.


  • Registered Users Posts: 622 ✭✭✭Deise Musashi


    I was sent a pair of knives to touch up, so I made a bit of video to show a bit of sharpening. My first time doing video like this so apologies for the quality.


  • Registered Users Posts: 622 ✭✭✭Deise Musashi


    I realise I didn't show the convexing of the F1 or the stropping bits, rookie errors on the Youtube thing!

    In an attempt to rectify that, and after turning up the settings on my wan's camera! We'll try again to show convexing and stropping, well worth a go on your knives. Not many edges cannot be improved by stropping.


  • Registered Users Posts: 622 ✭✭✭Deise Musashi


    I've just remembered a jig I made up one time. It was intended to allow me to set any angle I needed to while hogging off steel with coarse diamond plates, like the ones I bought in Lidl ;)

    I've tried using the Sharpmaker as a guide for reprofiling, it's a bit awkward though!
    DSCF1213.jpg


    Another solution used by nozh2002 on Bladeforums was to make a wooden angle block at 15 Deg. to sharpen on.

    http://www.youtube.com/watch?v=EP9tII6Tp7s

    This means you learn to hold one angle, horizontal, and sharpen to match the Sharpmaker always. Neat and easy, as nozh2002 says "If you can keep soup on a spoon you can use this".

    It also allows the use of full size benchstones, DMT and Shapton stones, glass plate and Post-Its or Leather strops.I made one and it is good, but what if I need a 20Deg. version, or an 11 Deg. for a kitchen knife? Five or ten of these blocks would not be a neat thing anymore.

    So I modified the idea so be adjustable, two pieces of board joined by a door hinge to be exact!

    DSCF1207.jpg
    DSCF1208.jpg

    I covered the base with a non-slip matting I had on hand, and put a strip on top to help hold stones in place. I am using a hard rubber door stop wedge to set the angle for the time being.

    DSCF1209.jpg

    I can use the magic marker to set the edge, but i've ordered one of these from Axminster for a bit more precision. I got the idea from Kens thread about his Sharpening Gizmo Prototype.

    DSCF1248.jpg


    DSCF1253.jpg

    So I can set the appropriate angles for waterstones, Sharpmaker, stropping etc. I'll mark the most common angles on the base so I won't need the Inclinometer for every session.

    DSCF1210.jpg

    DSCF1211.jpg

    DSCF1212.jpg

    I want to get some plate glass shelving to use as backing for stropping with paper, leather and possibly films? I know this is still a bit bigger than really necessary, but I had the bits laying around wink.gif

    Hopefully this is some use to others out there. Since I got an edge pro I don't really use this anymore, but I would like people to have every option and choose which suits them best.


  • Registered Users Posts: 33 Justashotgun


    I have found this post very informative, thankyou to Deise Musashi for his time and effort in putting this all together, it is much appreciated.


  • Registered Users Posts: 435 ✭✭leupold90


    +1 on the thanks for this thread.

    I've seen knifes sharpened by Deise, unbelievable! The man's an artist!
    Generally when I try to sharpen a knife I wind up making it blunter than when I started.

    Just to do a bit of highjacking - I've a few knives in the 'for sale' section if anyone wants to have a look..


  • Advertisement
  • Closed Accounts Posts: 8,590 ✭✭✭Tackleberrywho


    leupold90 wrote: »
    +1 on the thanks for this thread.

    I've seen knifes sharpened by Deise, unbelievable! The man's an artist!
    Generally when I try to sharpen a knife I wind up making it blunter than when I started.

    Just to do a bit of highjacking - I've a few knives in the 'for sale' section if anyone wants to have a look..

    I'm getting a little better at sharpening, but I think a Training workshop should be organised :D

    I'd love to be able to sharpen a blade well in the quickest way possible.
    You must not be too bad at sharpening knives, that SOG knive you sold Dev110 is very sharp.


Advertisement