Advertisement
If you have a new account but are having problems posting or verifying your account, please email us on hello@boards.ie for help. Thanks :)
Hello all! Please ensure that you are posting a new thread or question in the appropriate forum. The Feedback forum is overwhelmed with questions that are having to be moved elsewhere. If you need help to verify your account contact hello@boards.ie

PC Building and Upgrading 101

Options
  • 13-01-2012 11:15pm
    #1
    Registered Users Posts: 7,179 ✭✭✭


    So:

    Recently I've noticed a lot of people posting some truly excellent info, and I'm thinking it would be a horrible shame if all of it went to waste, so with that in mind, maybe we should have it all in one place?

    My thinking is that we can have (hopefully) a sticky, detailing everything about everything to do with PC building and upgrading. nesf did a great piece on computer audio, deconduo did an excellent bit on PSUs, and partyatmygaff did one on motherboards just yesturday.

    I'm thinking that we'll use this thread as a sort of assembly. People can re-post guides here (and new ones), and they can be refined and critiqued by the rest. When we've got everything, we can do a nice contents-post in a new thread, with every post after that being a separate section, to make things as easy-to-find as possible for newcomers.

    The little bit I've just finished is on overclocking. Yes, I realise it might be more applicable to overclocking and modding, but there have been quite a few questions here about it too, and if it's going to be a guide about everything computer hardware, I think OCing deserves a place in there too.

    Anyway, to start what I sincerely hope will be one of the most informative threads to grace the Internet: (suggestions/corrections/etc. welcome)


    Overclocking

    __________________________________________________


    Introductory note


    This is a section perhaps more suited to the enthusiasts, but it's something almost every new computer builder looks into at one point or another: Overclocking. This guide aims to give you the basics in CPU and GPU overclocking. This guide assumes that you're familiar with the components of a computer, their functions, and can find your way around a BIOS. My recommendation is that you read the whole section relevant to whatever component you’re going to overclock, in its entirety first, then start, using the guide as a reference.

    Unfortunately, as regards CPU and RAM overclocking, I am only going to focus on socket 1155 systems. I may add 1366 (my own) at a later date, or if another users wants to write up a 775/AM2/AM3 version, they’re more-than-welcome, but the simple fact is it would just take me too long. Also, in particular with AMD systems, I wouldn’t be doing users any justice, as I haven’t used an AMD system in a few years now, and am not very familiar with them as of this point.


    What is overclocking?

    Overclocking (OCing) is the process by which computer components - be it the CPU, GPU, whatever - are made to run past their out-of-the-box speeds, thus yielding (among other things) an increase in performance. This is done by changing certain BIOS settings. More on this later.


    Should I overclock?

    This is something that you need to consider carefully before you go fiddling around in the BIOS too much. Is your computer slower at certain tasks than you'd like? Would you like your games to run a little smoother, or be able to enable a couple of extra graphics settings? If yes to any of these, then odds are OCing might be something to think about. If you're a gamer, and play lots of RTS or MMO games, then you'll stand to benefit quite a bit, as RTS and MMO games are among the most CPU-intensive games around. If you're more into FPS titles, you might be more suited to a GPU overclock (though a CPU OC couldn't hurt either). What you have to figure out is where you're being limited. In a gaming context, this will usually be a toss-up between the CPU and the GPU. The easiest way to do this is to leave a monitoring program open while you're gaming. For your CPU, the Windows Task Manager will display CPU usage over a small period of time. If you see your CPU usage rising to above 95% or so, then an overclock could help. A good GPU monitoring program is MSI's Afterburner. It's also the program I recommend for GPU overclocking.

    Now you should think about what sort of overclock you want. Many people only overclock their processors enough so that they're sure that their graphics card(s) won't be bottlenecked. This is often the most cost-effective route, as it means you get maximum performance, at minimal cost in terms of an aftermarket CPU cooler, and your ESB bill. If you're going to be overclocking your graphics card as well, then to avoid bottlenecking, you'll want to scale your CPU overclocking with your GPU speeds. If you want see how far you can push your components, then that's fine too! Just make sure you have what you need to do this effectively and with minimal risk (following sections).


    What are the risks?

    There is really only one risk (that can't be rectified by a simple reset) when overclocking, and that is the scourge of all computer components: Heat. Because components are being made to run faster than they usually would, more heat is going to be generated, and you'll need to have a way to dissipate this excess. As long as you follow a good overclocking guide (hopefully this one), and have adequate cooling, the risk of anything catastrophic happening will be minimal. Having said that:

    I take no responsibility for damages, etc. All users undertake overclocking at their own risk, blah blah, you get the point.

    Now, on to the good stuff.


    CPU Overclocking

    ________________________________________

    What do I need?

    The most important things you need are a motherboard and processor that will allow you to overclock. With Intel's newer processors, overclocking is all-but impossible on all but the K and X variant CPUs, and P67 and Z68 motherboards.

    • Core i3 & i5 2100 series - Locked
    These CPUs are a no-go for overclocking. The multiplier cannot be increase beyond the factory setting.
    • Core i5 & i7 non-K series - Partially unlocked
    These CPUs can be overclocked mildly - The multiplier can be adjusted up to X+4 from the factory setting.
    • Core i5 2500K & i7 2600K - Fully unlocked
    These CPUs’ multipliers can be adjusted for a maximum overclock of 5.2GHz.
    If you're not sure, or have an older processor, your best bet is to Google "[processor model] overclock" and see what speeds other people are getting. If they're only slightly above the stock speed, then it's almost-certainly not overclockable. You also need to double-check your motherboard chipset, though on anything earlier than a second-generation i3/i5/i7 board, you'll most-likely be fine.

    The next thing you need is a power supply that can handle the extra power draw created from the speed increase. If you've had your build specced out on Boards by someone here, then you most-likely have a high quality power supply and are fine. It's only those people who bought the €20 XtremeCoolGamerPro 800W UltraRaid XXX Edition PSUs that need to be concerned. For reference, most PSUs from manufacturers like Seasonic, Corsair, Cooler Master, Enermax, and Antec are of high quality. Check your PSU from comparisons on other forums to be sure.

    Last, but certainly not least: cooling. This comes in two forms; your case, and your CPU cooler. As long as your case has at least two decently quick fans (~1000RPM+) you should have enough ventilation to cope with the extra heat. Just be sure that you have at least one fan pulling cool air in, and at least one pushing air out, either at the back, or top, of the case. That brings us to the CPU cooler. There are two main types of coolers available today. Air coolers and water coolers. An example of an affordable air cooler would be the Freezer 7 Pro Rev. 2 from Arctic Cooling. For about €20 (Q1 2012) you can obtain moderate to high overclocks, though with potentially higher-than-normal noise and/or temperature levels. Examples of high-end air coolers would be the NH-U9B SE2 and NH-D14, both from Noctua. This brings us to water coolers. These must not be confused with a watercooling setup. This usually implies a custom-made loop, comprising separate pump, CPU block, radiator and tubing. The water coolers I'll be talking about for this piece are closed-system, single piece cooling solutions, such as the Corsair H70. These typically offer quieter operation and lower temperatures than all but the best air coolers though can be more expensive.


    How is it done?

    The CPU’s speed is calculated by multiplying the base clock (BCLK) by the CPU multiplier. For example, Intel’s i5 2500K comes by default with a multiplier of 33. Multiply this by the BCLK (100MHz) and you get 3300MHz, or 3.3GHz. The RAM frequency is derived by multiplying the BCLK by the memory multiplier in much the same way.

    The basic methodology for overclocking is to increase either the BCLK or CPU multiplier until either the system becomes unstable, or too hot. So the first thing you should try to increase is the CPU multiplier. Raise it by one, keeping all other settings the same, and then boot back into Windows. If you can successfully do this (if you can’t, you have a problem) then we can try and test the overclock for stability.

    A note on BCLK overclocking though: While you can increase the BCLK, it’s problematic. Because the base clock controls everything in your system – from the memory frequency to your PCI lanes and I/O – when you increase it, everything runs faster, not just the CPU. This can lead to a lot of instability problems, and to be quite honest, is better left alone. At most, you might be able to increase the BCLK to 106MHz without affecting instability, but in the interests of simplicity (and well-rounded numbers) my advice would be to ignore it as an option entirely.

    A second note on power-saving features. While in previous generations of processors power-saving features such as C1E and SpeedStep sometimes adversely affected overclock stability, this does not appear to be the case with 1155 CPUs, therefore, I’d recommend that unless you’re going for very high overclocks (5.0GHz or more) that you leave them enabled to save power.


    Testing for stability

    Well what everyone has to remember here is that there is a difference between "benchmark" and "stress test". A benchmark is used solely to gauge performance. You run a pre-defined test, and you get a number back. A stress test on the other hand is used for stability. You don't get any sort of rating, you just get a pass, or failure.

    So, to start off: I don't bother with CPU benchmarks at all, really. I don't do any video transcoding, or anything like that, so I don't need to know exactly how fast my CPU is. As long as it doesn't bottleneck my games or applications, I don't much care, so I'm only going to talk about CPU stress tests here. One of the best - and an old favourite with many, is Prime95. This has three different tests within it, and you'll be asked to choose one upon running.
    Small FFTs is usually the best to give the quickest indicator of stability. Usually, errors will show up here within an hour.
    Large FFTs, tends to stress the parts of the CPU that aren't the core - cache, controller, etc. - and to be honest, I don't use it a whole lot.
    The last Prime95 test is Blend. This tests everything in your CPU, as well as your memory.

    The next CPU test that I use is called Intel Burn Test (IBT). This uses the Linpack algorithm, and is the same test used by Intel to bin CPUs. You want to run it at its maximum settings, for a minimum of 5 passes. If you're going for long(er)-term stability, try 20-25, but I wouldn't use more than that - Linpack isn't really something you want to leave running for 24 hours like Prime. For complete stability in an overclock, I usually use IBT for 5-10 passes each increment, as well as about 15 minutes of Small FFTs. When I've found an overclock I'm happy with, I use 24 hours of Blend, 24 hours of S-FFTs, and about two hours of IBT. If it passes all that - along with the usual games / whatever else I normally do, of course - then I deem a CPU OC stable.

    Now: Temperatures. While running these stress tests, you’ll want to keep an eye on your temperatures, making sure they don’t exceed the specified maximum temperature set down by Intel (much). In the case of the 2500K for example, Intel specifies that for long-term usage, the processor should not exceed 72.6°C. What must be made clear here though, is that the temperature specified by Intel is tCase. This means it’s the average temperatures across the CPU heatspreader, not the individual cores (tJunction), which usually run hotter. Because of this, if you see cores running at 75-80°C on your 2500K (or 5-8°C above tCase for your particular processor) during a test, this is ok, though it is at the upper-limit. Expect also to see quite a difference between core temperatures, sometimes as much as ten degrees. This is normal, and is usually down to imperfect contact between the CPU, and the heatsink. This is not to say it’s incorrect; we’re talking about tiny abnormalities here. It should also be noted that IBT will usually exhibit higher peak temperatures than Prime, unless Prime is left running for 12-24 hours. HWMonitor is an excellent program for monitoring (among other things) CPU temperatures.


    Tell me how to overclock already!

    Fine, fine! To start off, boot into your BIOS. If you’ve tried overclocking before, it would be best to load defaults, and restore any hard drive or boot settings from there, to ensure all overclocking-related settings are as they should be.

    Start by increasing your CPU multiplier by one. Save this and boot back into Windows. Run whatever stress tests you’d like, though I’d recommend a minimum of 15 minutes of IBT.

    If this is stable, boot back into your BIOS and up the multiplier another notch. If it’s not, and your temperatures are still in the green, increase the CPU voltage (vCore) one notch, and test again. If at any point your temperatures have gone above the numbers outlined earlier, then you’ll need to drop the multiplier down one. Depending on what you’ve changed, you might also be able to drop the voltage down a notch.

    The most important thing to remember here is that you must only change one thing at a time! If you start making a bunch of changes and something goes wrong, you’re going to have a hell of a time figuring out what caused the problem. Hopefully, if you follow the above, you’ll be able to achieve your desired overclock. It’s best to start from the beginning with a goal, rather than with a “we’ll take it as we go” attitude.


    GPU Overclocking

    ________________________________________


    What do I need?

    As with CPU overclocking, you’ll need a compatible graphics card, a case capable of ventilating any excess heat, a power supply capable of supplying the necessary power, and as always, the appropriate cooling.

    As far as a case goes, it requires similar traits to that of a good case for CPU overclocking. As long as you have at least one fan pulling, and one fan pushing air, you should be fine, though a side intake fan can also be helpful, particularly with multi-GPU setups. In fact, I’d go so far as to say it’s a requirement if running SLI or Crossfire.

    A good PSU is a particular must for GPU overclocking, as high +12V amperage is one of the main characteristics of a good quality power supply. Most modern high power graphics cards such as the HD7970 or GTX 580 (Q1 2012) would require about 40A to leave enough room to have enough comfortable headroom to cope.

    As for the GPU cooler, on most cards, a fairly high overclock can be achieved with the stock cooler (though it will be loud as hell). Many companies ship cards with custom coolers, that are often more powerful and quieter than their reference counterparts. Though these keep the cards cooler – and are therefore better for our purposes – they have one big disadvantage: They dump virtually all of that heat back into the case. As you can imagine, having a good case becomes even more helpful here.


    How is it done?

    For our overclocking, we’ll be using MSI Afterburner. Though released by MSI, this application will work with all cards from AMD and NVIDIA, regardless of brand. With this program, you can monitor almost everything about your card - GPU temperature, memory usage, framerate, core and shader clocks, core voltage, and so on.

    Overclocking your graphics card is somewhat simpler than the CPU in certain respects. When you open Afterburner, you’ll see a series of sliders on the left. From top to bottom, these control: Core voltage, core clock, shader clock, memory clock, and fan speed. We will changed some of these to overclock the card.


    Testing for stability


    While overclocking, you’ll want to manually set your card’s fan speed to something higher than it would otherwise be. You can either set it to 100%, or whatever the highest fan speed you can tolerate (in terms of noise) is. Every time you increase clocks or voltage, you’ll want to run appropriate tests. I don't know about AMD GPUs, but NVIDIA recently changed the type of memory is uses in its GPUs, with the result that the 4xx/5xx series GPUs almost never show artifacts now, so tests like Furmark don't really work as well as you'd think. The best test, is to play the most intensive game you can - jack up the AA if it's not stressful enough - and just keep playing. If you see drops in performance, and your temps are still ok, then it's the card throttling for stability reasons, and you know your OC isn't stable. For testing, benchmark loops or heavy gameplay will almost always be better than synthetic stress tests. Don't ask me why, they just are. As for good benchmarks and/or stress tests to use, 3DMark 11, Heaven 2.5, GTA IV, Just Cause 2, and pretty much any other modern games with a built-in benchmark is a good bet.

    A word on temperatures. Generally speaking, graphics cards from both the red and the green time are fine with anything up to around 100°C as an absolute maximum. In-game, I would call 95°C your maximum acceptable-but-highly-uncomfortable temperature. Try to keep things in the 80s if possible.


    Overclocking

    On newer AMD and NVIDIA cards the core and shaders are directly linked, so changing one proportionally changes the other. So, we’ll start by upping the core clock 10MHz. Simply move the slider to the right, and hit apply down the bottom right. Then it’s time to open up 3DMark, or whatever other tests you're using, and check for artifacts and/or drops in performance that would indicate instability. If all’s well, and your temperatures are ok, keep upping the core clock, testing as you go.

    Once you reach a point of instability, and assuming your temperatures are ok and you want to keep going, you’ll need to increase the voltage. This is where problems can arise. It is entirely possible to ruin your card when overvolting, so be sure to monitor your temperatures. In this regard, graphics cards are more fragile than CPUs. Some people will say that anything up to 1.15V is fine for NVIDIA cards, and the voltage can be upped even higher with a custom vBIOS, but I’d stick with 1.15, personally. For 6000 series AMD cards, 1.15V is also the highest possible, and what I would stick with.

    Ideally, you want to be about 10-20MHz (at minimum) below the lowest instability point. Riding the very edge of the line the whole time you're gaming isn't a good idea for the card's lifespan, so you're better off giving it a bit of breathing room.


    Useful Links

    Intel ARK – CPU Specifications: Thermal and voltage limits
    HWMonitor – PC component voltage and temperature monitoring
    MSI Afterburner - GPU monitoring and overclocking

    Prime95 - CPU stability test
    Intel Burn Test - CPU stability test
    3DMark 11 - PC benchmark / GPU stability test

    3 Step Overclocking – Overclocking guides from TechREACTION
    Overclocking & Modding - Boards.ie Overclocking forum.


«13

Comments

  • Registered Users Posts: 1,600 ✭✭✭Eboggles


    Great post Serephecus well done! Just what this forum needs :D


  • Registered Users Posts: 10,992 ✭✭✭✭partyatmygaff


    Excellent idea. Here's my short post on computer hardware. Knowing what's written here isn't strictly speaking necessary to "build" a computer but knowledge of how the different parts of a computer interact with each other not only gives you a finer appreciation of the inner workings of a computer but is useful in troubleshooting complex hardware issues.

    A few basic terms
    • I/O = Input/Output. These are devices that are not part of the computer itself but input instructions in to it and output what the computer processes. E.g. in a game, your input would be mouse and keyboard movement and the output would be what is displayed on your monitor.
    • Volatile / Non Volatile flash storage = "Volatile" flash storage such as RAM loses its contents every time the computer restarts. Non-volatile flash storage such as an SSD or even a USB stick or SD Card retain their contents even if they're not actively receiving any power.
    • RAM = Random Access Memory. Very fast storage that stores instructions for the CPU to process.
    • ROM = Read only memory. Fast but usually small storage that's used to store pieces of software that does not change often such as the BIOS (To be explained later) or the firmware of certain devices such as a HDD. Contrary to what the name would imply, it's usually possible to alter the contents of ROMs.
    • Cache = Found in many components from the CPU to hard drives. All that a cache does is act as a buffer between two components to compensate for differences in speed. An easy way to understand the purpose of a cache is through example. Take a hard drive for example. I can send commands to a HDD far faster than the HDD can actually perform them. To prevent the computer from having to wait for the HDD to finish the command, it sends the command to the cache to add to a queue of commands.

    Motherboard:
    As the name would suggest, this is the board which essentially forms the "computer" as a unit. It connects all the components together, transfers instructions and information between them and regulates many aspects of the computer such as voltages and frequencies.

    Essentially, the main parts of a modern desktop motherboard and their functions are:
    1. Northbridge:
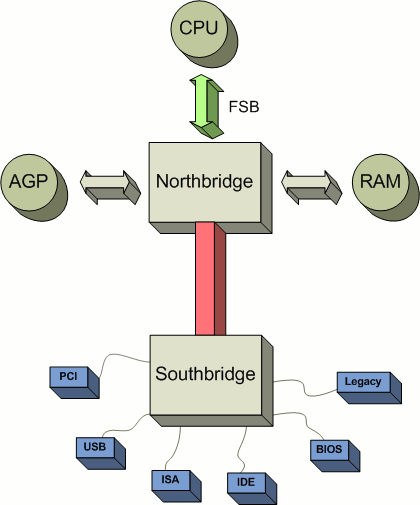
      Connects the main components of the computer used for processing instructions. Namely the CPU, RAM and the video controller. In the past, this may have meant "Integrated Graphics" where the chipset used to process graphics was physically located within the Northbridge. Nowadays, Integrated Graphics tends to be physically located on the CPU. In most Desktops however, a dedicated graphics card is used and connects to the Northbridge through a PCI-Express interface. As you'd imagine the Northbridge needs to be able to communicate information in a synchronised manner and at high speed. The Northbridge then connects to the Southbridge. Very recently, component makers such as Intel have started to put the Northbridge on the same chip as the CPU.
    2. Southbridge:
      Communicates with and connects the (Relatively speaking) slower components and inputs/outputs of the computer. Traditionally communicated with the rest of the computer through the Northbridge but that is changing. Examples of components that the Southbridge handles are the system clock, the system management bus (SMBus) which monitors temperatures and adjust voltages to reduce the temperature or increase performance, storage such as hard drives or DVD drives, non-volatile BIOS memory and Audio controller. It also controls many other parts of a computer but they're far too technical for just needing to know how to build a computer. These are things like the interrupt controller that while incredibly important aren't very relevant to someone who just wants to build their own computer.
    3. CPU Socket:
      In the past, an actual socket where the CPU's pins used to make connections. Nowadays, with BGA/LGA (Ball Grid Array/Land Grid Array) CPU packages the pins are in the socket and the CPU's pads just rests on the pins. Essentially all that the CPU socket does is provide an interface and power for the CPU. Connects to Northbridge.
    4. RAM Sockets:
      Provides power and an interface for the RAM. Connects to Northbridge.
    5. ATX Power connector:
      Biggest power cable in the computer. Supplies power to the CPU, Motherboard and RAM as well as the graphics card (Most require another power cable).
    6. PWM Fan connectors:
      Provides power to the computer's fans (Whether Chassis or CPU fan) and monitors fan speeds in accordance with component temperatures. Communicates through the SMBus (Southbridge).
    7. PCI-Express Slot:
      PCIEx16 slots provide an interface and connect a dedicated graphics card to the rest of the computer through the Northbridge. This provides a very high bandwidth (High Capacity and Speed) link between the slot and the rest of the computer. PCIEx1 slots also provide an interface but they are generally used for expansion cards such as video grabbers and extra USB ports and the like.
    8. PCI Slot:
      Slowly being phased out by PCIEx1 slots. Used for the same purpose.
    9. SATA/IDE socket:
      Most modern disk drives and DVD/Blu Ray drives are SATA. Older devices are IDE. SATA provides a relatively fast link with the rest of the computer through the Southbridge. Only very high speed SSD drives (Read more on these later) even approach the capacity of SATA. Your standard HDD or DVDRW won't.
    10. I/O Panel
      The back panel of most computers. It's where you'll find audio ports, USB ports, a serial port, Legacy keyboard/mouse ports and an Ethernet port or two. A monitor connection may also be available if you have a motherboard or CPU with integrated graphics. Most of these connections are routed through the southbridge to the rest of the computer. That said, there are many controllers in between the port and the southbridge. One example is an ethernet port. The way it would go is Ethernet port -> Ethernet Controller -> Southbridge -> Rest of computer
    11. BIOS
      The Basic Input/Output System or "System ROM" is the firmware of the motherboard. By that I mean it is the lowest-level or most fundamental piece of software needed for the computer to even function. It controls many aspects of the computer and may allow the user to configure some settings. Enthusiast motherboards often used for overclocking (Running CPUs at a frequency higher than what the manufacturer intended for better performance) give you control over more or less every aspect of the computer. You can change frequencies, RAM timings and the voltage being sent to the various components of the computer. Another very important function of the BIOS is that it directs the computer to the storage device containing an operating system (The hard drive where Windows is installed in other words). This can be changed to other devices such as a DVD drive or USB stick. It is stored on non-volatile ROM (I.e. it's backed up by a battery that stops it from being erased every time the computer is turned off and not receiving power). It controls the rest of the computer through the Southbridge.

      All of these components (And many others that I didn't mention) work together to function as the backbone of a computer.

      Here is a diagram of a typical motherboard followed by a schematic of how it all fits together.
      motherboard-parts.jpgSchema_chipsatz.png


    CPU (Central Processing Unit):
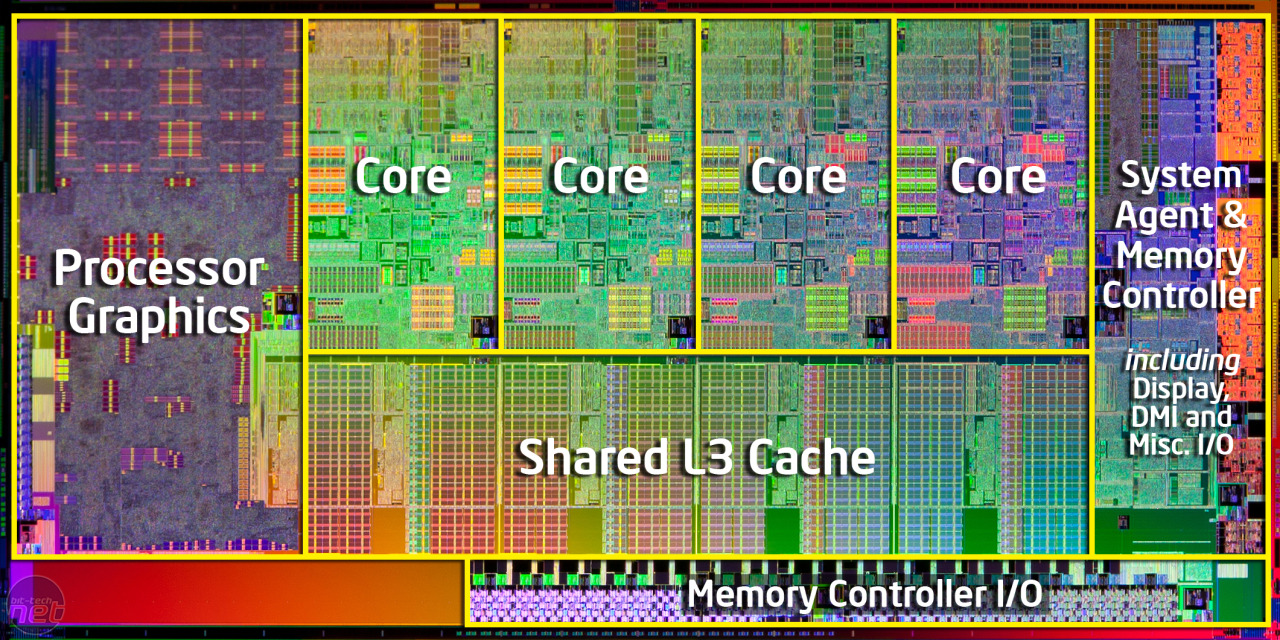
    As other have said, the CPU is more or less the brain of the computer. It does the vast majority of the processing required for the computer to function and do work (Except while gaming or working with graphics heavy work such as CAD or Animation). CPUs are incredibly complex chips. They consist of millions of tiny transistors etched on to a silicon die. It's best to describe the CPU through example. I'll use the very popular i5-2500K (Currently powering the computer i'm typing this on).

    sandy-bridge-die-map.jpg
    What you see above this text is a photo of a processor. Normally, the processor is covered by a metal case that's further covered by a metal heatsink and fan but this is what it looks like underneath all of that and at high magnification. As you can see it consists of multiple different parts each composed of millions of transistors.
    • Cache:
      There are generally three levels of cache. L1, L2, L3. L1 is the fastest but smallest cache. L2 is average on both counts and L3 is the largest but slowest cache. When I talk of speed here i'm talking in relative terms. CPU cache is incredibly fast. All that the cache does is act as a last site of storage for instructions for the CPU to execute. The typical flow of instructions for say... opening and playing an MP3 would be
      Hard Drive -> RAM -> L3 -> L2 -> L1 -> CPU
      As you can imagine, the more L2/L3 cache you have the less time your CPU will spend idling waiting for instructions and therefore the faster your computer will be.
    • Core:
      As this is a photo of a Quad core CPU there are four identical cores. A core itself consists of many different parts each tasked with a different function. Two typical parts (Out of many) are the arithmetic logic unit (ALU) and the control unit (CU). The ALU does what the name would suggest, arithmetic and logic operations and the CU is tasked with taking instructions out of the RAM, converting it and sending it for execution by the ALU and the other units of a CPU. Cores operate at a specific frequency (Measured in GHz) and at a specific voltage (Called the vcore).


    UNFINISHED


  • Registered Users Posts: 456 ✭✭Bonesy.


    Great thread, should be stickied.


  • Registered Users Posts: 22,929 ✭✭✭✭ShadowHearth


    It is great thread, but I think we need some simpler shorted version too. I bet that if newby will see those walls of text he will get confused and scared away!

    Still good read though! Good job lads.


  • Registered Users Posts: 7,179 ✭✭✭Serephucus


    I dunno. When I try something for the first time, I like having as much information as possible before giving it a go.


  • Advertisement
  • Registered Users Posts: 4,983 ✭✭✭Tea_Bag


    I tried reading this while I was hammered but the wall of text made my eyes loose focus all the time :D

    great posts all the same.

    I haven't contributed much to this forum in a while, sorry lads.

    maybe I could update the budget builds to this era? something at €300, 400, 500 etc price points? I dunno.


  • Registered Users Posts: 22,929 ✭✭✭✭ShadowHearth


    Tea_Bag wrote: »
    I tried reading this while I was hammered but the wall of text made my eyes loose focus all the time :D

    great posts all the same.

    I haven't contributed much to this forum in a while, sorry lads.

    maybe I could update the budget builds to this era? something at €300, 400, 500 etc price points? I dunno.

    good idea. we could do some basic builds which could be used as base:

    i3 2100 with h61
    i5 2400 with h61
    i5 2400 with z68 ( for future upgrade )
    i5 2500k with z68 ( ultimate gamer edition )

    do all builds with no GPU option so then anyone who builds pc can decide how much he can spend extra on GPU and ssd if desired.

    if someone has spare time they could do something like this and it would be very very useful for newbies.


  • Registered Users Posts: 456 ✭✭Bonesy.


    Tea_Bag wrote: »
    maybe I could update the budget builds to this era? something at €300, 400, 500 etc price points? I dunno.
    I would really appreciate that :D


  • Registered Users Posts: 4,983 ✭✭✭Tea_Bag


    Bonesy. wrote: »
    I would really appreciate that :D

    grand so I will. unfortunately I've got work in a bit all night so it'll have to wait till Monday. or, as usual, deconduo will beat me to it :D


  • Moderators, Computer Games Moderators Posts: 4,281 Mod ✭✭✭✭deconduo


    Tea_Bag wrote: »
    grand so I will. unfortunately I've got work in a bit all night so it'll have to wait till Monday. or, as usual, deconduo will beat me to it :D

    You called? :D

    ~€350 - Cheap office or HTPC, no gaming:

    Item|Price
    Total build cost: €336.70 + €30 shipping
    Intel Core i3-2120 Box, LGA1155|€107.34
    ASRock H61M-HVS (B3), Sockel 1155, mATX|€42.25
    8GB-Kit G.Skill PC3-10667U CL9|€31.84
    Samsung SpinPoint F4 320GB, SATA II (HD322GJ)|€75.00
    Xigmatek Asgard, ATX, ohne Netzteil, schwarz|€31.61
    Samsung SH-222AB bare schwarz SATA|€15.03
    Antec BasiQ VP350|€33.63


    ~€450 - Cheap gaming PC for older games at less than 1080p:

    Item|Price
    Total build cost: €421.48 + €30 shipping
    Intel Core i3-2120 Box, LGA1155|€107.34
    ASRock H61M-HVS (B3), Sockel 1155, mATX|€42.25
    8GB-Kit G.Skill PC3-10667U CL9|€31.84
    Samsung SpinPoint F4 320GB, SATA II (HD322GJ)|€75.00
    Xigmatek Asgard, ATX, ohne Netzteil, schwarz|€31.61
    Samsung SH-222AB bare schwarz SATA|€15.03
    Antec BasiQ VP350|€33.63
    Sapphire HD6770 1G GDDR5 PCI-E|€84.78


    ~€600 - Cheap gaming PC for newer games at 1080p:


    Item|Price
    Total build cost: €549.16 + €30 shipping
    ASRock H61M-HVS (B3), Sockel 1155, mATX|€42.25
    8GB-Kit G.Skill PC3-10667U CL9|€31.84
    Samsung SpinPoint F4 320GB, SATA II (HD322GJ)|€75.00
    Xigmatek Asgard, ATX, ohne Netzteil, schwarz|€31.61
    Samsung SH-222AB bare schwarz SATA|€15.03
    Powercolor HD6870 1024MB Dual-DVI/HD1M2I5|€145.99
    Super-Flower Amazon 80Plus 450W|€40.45
    Intel Core i5-2400 Box, LGA1155|€166.99


    ~€800 - Gaming PC to max most games at 1080p:


    Item|Price
    Total build cost: €758.84 + €30 shipping
    8GB-Kit G.Skill PC3-10667U CL9|€31.84
    Xigmatek Asgard, ATX, ohne Netzteil, schwarz|€31.61
    Samsung SH-222AB bare schwarz SATA|€15.03
    Intel Core i5-2500K Box, LGA1155|€197.91
    ASRock P67 Pro3 (B3), Sockel 1155, ATX|€85.67
    Sapphire HD 6950 Dirt3, 2GB GDDR5 PCI-Express|€235.40
    Super-Flower Amazon 80Plus 550W|€51.48
    Samsung SpinPoint F3 1000GB, SATA II (HD103SJ)|€109.90


    ~€1000 - Gaming PC to max most games at 1080p + crossfire + SSD:


    Item|Price
    Total build cost: €965.04 + €30 shipping
    8GB-Kit G.Skill PC3-10667U CL9|€31.84
    Samsung SH-222AB bare schwarz SATA|€15.03
    Intel Core i5-2500K Box, LGA1155|€197.91
    Sapphire HD 6950 Dirt3, 2GB GDDR5 PCI-Express|€235.40
    Samsung SpinPoint F3 1000GB, SATA II (HD103SJ)|€109.90
    ASRock Z68 Extreme3 Gen3, Sockel 1155, ATX|€119.99
    Super-Flower Amazon 80Plus 650W|€67.40
    Crucial M4 64GB SSD 6,4cm (2,5")|€92.99
    FRACTAL DESIGN Gehäuse DEFINE R3 Black Pearl|€94.58


    ~€1500 - You have too much money:

    Item|Price
    Total build cost: €1,457.21 + €30 shipping
    8GB-Kit G.Skill PC3-10667U CL9|€31.84
    Samsung SH-222AB bare schwarz SATA|€15.03
    Samsung SpinPoint F3 1000GB, SATA II (HD103SJ)|€109.90
    ASRock Z68 Extreme3 Gen3, Sockel 1155, ATX|€119.99
    Super-Flower Amazon 80Plus 650W|€67.40
    Thermalright HR-02 Macho|€33.88
    Sapphire HD 7970 3GB GDDR5 PCI-Express|€499.80
    FRACTAL DESIGN Gehäuse DEFINE XL Black Pearl|€123.89
    Crucial M4 128GB SSD 6,4cm (2,5")|€178.49
    Intel Core i7-2600K Box, LGA1155|€276.99


  • Advertisement
  • Registered Users Posts: 7,179 ✭✭✭Serephucus


    Nicely done!!

    In the €800 build, it only comes to about €790. You could up the P67 to Z68. Fantastic builds though. :P


  • Moderators, Computer Games Moderators Posts: 4,281 Mod ✭✭✭✭deconduo


    Serephucus wrote: »
    Nicely done!!

    In the €800 build, it only comes to about €790. You could up the P67 to Z68. Fantastic builds though. :P

    Well I rounded off some of the numbers a bit to make them fit. :P


  • Registered Users Posts: 7,179 ✭✭✭Serephucus


    Oh yeah, I know, I just mean it would still fit in an €800 build is all.

    And they'll all have to get tweaked again when HDD prices change. :P


  • Registered Users Posts: 6,710 ✭✭✭Monotype


    :cool: Nice work.

    Maybe you should post a link to the overclocking forum in your overclocking guide!

    Some links in the guide need fixing: (i) the MSI afterburner one in the GPU section, (ii) the Intel Ark + 3 step overclocking links under the useful links and (iii) all the ones under the stability header.


  • Registered Users Posts: 7,179 ✭✭✭Serephucus


    Done. (Pretty sure)

    The links was Word trying to encode the bloody quotation marks in the URL. :P


  • Registered Users Posts: 6,710 ✭✭✭Monotype


    There's still just the one under How is it done? in the GPU section. You're missing a slash.


  • Registered Users Posts: 7,179 ✭✭✭Serephucus


    Got it, cheers.

    It's a pity Boards doesn't use decent spoiler tags. Most forums I've seen - particularly vBulletin ones - use what are basically expandable quotes via a show/hide button. Would be very useful wall-of-text style guides. :P


  • Registered Users Posts: 22,929 ✭✭✭✭ShadowHearth


    thats a great list, we should put it somewhere safe, maybe even in to same thread wheres FAQ?


  • Registered Users Posts: 6,710 ✭✭✭Monotype


    I think Serephucus' idea was that we collect a few of them in this thread. Then when there's a good resource set built up, it gets posted in one new thread (or added to/replacing/rejuvenating the FAQ).

    I'll try put a few short paragraphs together about Windows licence keys as people often seem to ask questions about German versions etc. It will have to wait until next weekend though.
    Serephucus wrote: »
    It's a pity Boards doesn't use decent spoiler tags. Most forums I've seen - particularly vBulletin ones - use what are basically expandable quotes via a show/hide button. Would be very useful wall-of-text style guides. :P

    What you could do is (when everything is prepared) to reserve post #1 on a new thread. Then post any major topics on subsequent posts -ideally one after another with no posts in between. Finally, edit the first post with an index linking directly to the various topics.


  • Registered Users Posts: 7,179 ✭✭✭Serephucus


    Monotype wrote: »
    What you could do is (when everything is prepared) to reserve post #1 on a new thread. Then post any major topics on subsequent posts -ideally one after another with no posts in between. Finally, edit the first post with an index linking directly to the various topics.

    That is exactly what I had in mind. :)


  • Advertisement
  • Moderators, Computer Games Moderators Posts: 4,281 Mod ✭✭✭✭deconduo


    Serephucus wrote: »
    That is exactly what I had in mind. :)

    I set up a google docs page to organise the stuff a bit better. If anyone wants edit rights send me a PM with your email address. Its just a copy/paste job for now, but with a couple of us working on it, it should start to look good pretty quickly.

    https://docs.google.com/document/d/1u0SydBF5vwTBTRNke25jYB9v9e8sCM-jGdyCmOyUAdw/edit


  • Registered Users Posts: 10,992 ✭✭✭✭partyatmygaff


    Definitely a good idea. I'm on the document at the moment and will send you my email whenever you notice i'm on the chat :pac:


  • Registered Users Posts: 6,710 ✭✭✭Monotype


    Which Windows Should I buy and stuff


    Windows comes in three main flavours – OEM, retail and upgrade.
    OEM, also known as a System Builder license is the type of license that PC makers use. The key difference between this and the retail licence is that you only may install windows once. These licenses are usually sold in computer hardware stores rather than your local supermarket. They tend to be tied to the motherboard and will deactivate with a lot of hardware changes. However, Microsoft may be lenient if you ring them up and have a good excuse for reinstalling such as if your motherboard was replaced in your laptop.

    A Retail license allows the user to transfer the license to a new system. This advantage means that a retail license is usually more expensive than the OEM. They come in a fancier box and usually include both 64-bit and 32-bit keys.

    Upgrade editions are often available cheaper than retail versions. Students can avail of cheap upgrade editions from Software4Students or Studentsoftware.ie. These editions appear to have been discontinued; perhaps they will return later with Windows 8.
    In some instances when upgrading from Vista, you can upgrade to keep your programs and documents. However, a clean install with a wiped (and backed up!) hard drive is always recommended over this. Here is an outline on how to install Windows 7 to a blank drive. Note that in order to qualify for an upgrade, by Microsoft’s licensing agreement, you are expected to be in possession of a previous version of windows and you will be forfeiting your old license.


    Student editions
    People attending school or university qualify for student editions.
    If you’re a third level student, some universities provide copies of windows very cheap/for free through Microsoft’s Academic Alliance programme (MSDNAA) for some courses, so check this out first.
    Don’t forget the excellent Microsoft resource Dreamspark. While you don’t get any Windows 7/8, you will get Windows Server 2008 RC2. You can get most of the essentials that you need by following this guide or this one in optimising for regular use. It takes a bit of work and maybe not ideal, but it’s free.


    64-bit vs 32-bit
    64-bit also described as x64 or x86-64 is what you should be looking at in most scenarios with a new PC. x86 refers to the architecture in PC processors and if you see “x86” on it’s own, it is probably referring to 32-bit. All desktop & laptop PCs with CPUs from Intel and AMD are 64-bit capable and have been for a few years (a few Atom CPUs haven’t been, so you might need to check this). The main obvious advantage to using a 64-bit OS is the ability to use over 4GB of RAM. You shouldn’t really consider the 32-bit version except in specific cases where compatibility is essential.
    The license key is the same in 32-bit and 64-bit versions, so if a 64-bit version is dearer or out of stock, you can still buy the 32-bit key and use it with a 64-bit disc.


    Windows versions
    Windows 7 comes in 6 various editions. Details can be found here. You’ll often find Home Basic with netbooks. Home Premium and Professional are the main licenses that people tend to buy while Ultimate is usually reserved for those with extra cash to burn. Thankfully, each progressive edition is a superset of previous editions and includes all the features of the editions below it, which was not the case with Vista.
    Home Premium is suitable for most people although Professional has a few good advantages. The 16GB RAM limit might be an issue for those running RAM heavy programs, although this is well above the needs of mainstream users and even gamers. Professional also includes XP Mode which aids in the use of older programs. Other noteworthy differences are restrictions in remote desktop and shorter support.


    Different languages
    Often you’ll see on places like hardwareversand that a German version is €5-10 cheaper than the English version. Only Windows 7 Ultimate supports language change. However, you may freely use a German license or a key with any other language with an English disc.


    Where to find English Windows 7 disc images
    Windows 7 x64 Professional
    Windows 7 x64 Home Premium
    Windows 7 x64 Professional Service Pack 1
    Windows 7 x64 Home Premium Service Pack 1

    Check here for a long list of SP1 images.

    When downloading large files like the Windows 7 .iso file, you should use a download manager to make life simpler. Being able to continue the download is very important with such large files in case of a dropped connection.
    Opera browser features a built in download resume or another separate option is JDownloader.


    How do I know that the image I downloaded is a clean, unaltered image?
    Microsoft has a list of hashes of their software images here.
    You will need a hash check program to compare the hash of the image you downloaded to the official one from Microsoft.
    This Hash check shell extension works well.
    When installed, you right-click on the file you want to check and click properties. You’ll see a new checksums tab. The image below shows the checksum for a Windows 7 Home Premium image, which matches with the official hashes.

    189743.png


    Installing from USB
    If you have your image downloaded, you can install from a USB flash drive instead of a DVD. This will delete anything from the drive. You can use Microsoft’s installer or the Universal USB installer which works with just about any bootable OS image.


    Reinstalling using the same key
    OEM versions occasionally need to be reinstalled because a hard drive breaks or whatever. You can ring up Microsoft during reactivation and in a lot of cases, they’ll be understanding.
    Other reasons to reinstall might be because your new laptop comes with a load of useless software that you don’t need or they’ve been silly and have given you a 32-bit version when you had your heart set on 64-bit. Or you might have a new SSD that you want to install to. The ABR tool comes in useful here and it works with both Vista and 7. It allows you to back up your activation and restore without having to contact. This tool is for using when reinstalling to the same system.

    For older version of windows, if I recall correctly, the free version of the Magic jelly bean Keyfinder will find your XP key license for you.


    Trial Period
    Disabled in Windows 8 unfortunately, but you can install and use Windows 7 without a key for 30 days. This saves you from using up your activations if you’re just trying out new hardware configurations temporarily. It’s good practice to install without a key to ensure that all hardware and drivers agree and no corruption during installation has occurred. You can extend this trial period by 30 days 3 times for a total of 120 days by “rearming”. You must rearm the trial before a 30 day period is over.
    To rearm:
    • Go to the start menu and type in cmd for the command prompt.
    • Don’t click or press enter to open it. Instead, right-click and select run as administrator.
    • Type in slmgr /rearm and wait a few moments.
    A message such popup to say it has been rearmed and you will need to restart.
    You can enter your key at any time to activate your license.


    Older OSs – XP and Vista
    Should I buy XP or Vista?
    No, don’t invest in these old operating systems.

    Should I reuse XP?
    XP can be a bit of a pain to get working on newer systems. The 64-bit version has a lot of compatibility issues so you’d be stuck with the 32-bit version and limited by the RAM maximum of 4GB. Security is much poorer in this OS. Many new programs and hardware don’t support XP but if you are determined to get it working, you’ll probably need to slipstream in drivers to even install it with nlite[/url. It is not recommended unless it is being used with older hardware are you need a very light OS.

    Should I reuse Vista?
    Maybe. 7 certainly is a better OS but a fully patched Vista isn’t too bad. Compatibility is good as the same drivers are nearly always used. It requires more tweaking and some features aren’t fully supported, such as SSDs, so if you have the funds, you should definitely invest in Windows 7.

    Should I upgrade to Windows 8 from 7?
    No. :pac:
    Well… for a desktop, the value is not really significant enough to warranty paying good money for it.


    Additional resources
    • Windows Forum for more help on the subject.
    • Ninite is an excellent tool for gathering many popular programs together in one install, saving a lot of time on a new system. With the programs I’ve tried, it omits “trojans” of toolbars that often appear in installers today.
    _________________________________________________________________

    Feedback welcome

    _________________________________________________________________


  • Registered Users Posts: 7,179 ✭✭✭Serephucus


    Very nice Mono!

    I haven't been very active here because I'm on holidays at the momemt but I'll hopefully have something else to contribute soon.


  • Registered Users Posts: 4,983 ✭✭✭Tea_Bag


    Thanks mono, excellent write up.

    anyone have any other ideas that could be expanded?


  • Moderators, Computer Games Moderators Posts: 4,281 Mod ✭✭✭✭deconduo


    What parts should I get?

    CPU:
    Intel G530 - HTPC/Office PC
    Intel i3-2120 - Low budget gaming
    Phenom II X4 960T - Low budget threaded
    Intel i5-2400 - Mid budget gaming/threaded
    Intel i5-2500k - High budget gaming
    Intel i7-2600k - High budget threaded

    Don't bother with the i7 for a gaming PC, it doesn't give any increase in performance over the i5. Don't bother with bulldozer, its a waste of money. The i3-2120 beats the 960T in gaming, but the 960T is better for threaded applications such as photoshop. However if your budget can stretch to the i5-2400 its a better option than the 960T. Intel CPUs with a K at the end can be overclocked if matched with a P67 or Z68 board. If you don't want to overclock then getting a K CPU is a waste.

    Motherboard:
    ASRock H61M - Intel non-k CPU
    ASRock H61M/US3 - Intel non-k CPU, USB3+SATA3
    ASRock H61M-ITX - Intel non-k CPU, mITX buid
    ASRock P67 Pro3 - Intel K CPU, no crossfire/SLI
    ASRock Z68 Extreme3 - Intel K CPU, crossfire/SLI
    ASRock 960GM - AMD, no crossfire
    ASRock 870 Extreme3 - AMD, crossfire

    Don't get a P67 or Z68 board if you don't have a K CPU to overclock. A cheaper H61 board is enough.

    CPU Cooler:
    Stock - Intel non-k CPU, low/mid budget
    Xigmatek Loki - High budget
    Thermalright Macho - Super budget

    Watercooling isn't really worth it except in certain situations. The Thermalright Macho is quieter and cools better than the Corsair H60 for €20 less.

    RAM:
    4GB - HTPC/Office PC
    8GB - Low/mid budget threaded, gaming.
    16GB - High budget threaded

    This one is pretty easy, just grab the chepeast kit. Timings, RAM speed, flashy heatsinks make almost no difference in actual performance. It used to be that better RAM helped with overclocking, but that isn't the case anymore. Grab the cheapest, that's all you need.

    HDD:
    Spinpoint F4 320GB - Low budget
    Spinpoint F3 500GB - Mid budget
    Spinpoint F3 1TB - High budget
    Spinpoint F4 2TB - Storage drive

    Hard drive prices are changing quite fast at the moment, so take this recommendation with a grain of salt. If there's a good deal on a reasonable WD or Seagate 7200rpm drive, you can grab it. Don't use 'Green' or 'Eco' drives as your boot disks, stick to 7200rpm or SSDs.

    SSD:
    None - Low/mid budget
    Crucial M4 64GB - High budget
    Crucial M4 128GB - Super budget

    Another option if you don't plan to use a lot of space is to only get an SSD for a low budget build. Given the prices of hard drives right now, this is a viable option, but as prices return to normal it won't be as good anymore.

    Graphics Cards:
    Onboard - HTPC/Office PC
    HD 6670 - Low budget gaming
    HD 6770 - Low budget gaming
    HD 6790 - Low budget gaming
    HD 6850 - Mid budget gaming
    HD 6870 - Mid budget gaming
    HD 6950* - Mid budget gaming
    GTX 570 - High budget gaming
    HD 6970 - High budget gaming
    HD 7970 - Super budget gaming
    2x HD 6950* - Super budget gaming
    2x HD 7970 - Super budget gaming

    *If you are getting a 6950, make sure to get either the MSI Twin Frozr III or the Sapphire Dirt3 edition ones. These have a very good chance of unlocking to a 6970, and the Sapphire one even comes with a dual bios switch and the apropriate bios already pre-loaded. Other than that, you can usually just grab the cheapest one regardless of brand. I'd personally avoid XFX as they have a higher fail rater compared to other brands, but thats just me.

    Power Supplies:

    Antec VP350 - Any GPU up to a 6770
    Antec EA380-D - Any GPU up to a 6770
    Corsair CX430 V2 - Any GPU up to a 6770
    SuperFlower Amazon 450W - Any GPU up to a 6870
    XFX Core Pro 450 - Any GPU up to a 6870
    Antec EA430-D - Any GPU up to a 6870
    SuperFlower Amazon 550W - Any GPU up to a 7970
    XFX Core Pro 550W - Any GPU up to a 7970
    SuperFlower Amazon 650W - Anything up to 2x6950
    XFX Core Pro 650W - Anything up to 2x6950
    SuperFlower Amazon 800W - Anything up to 2x7970
    XFX Core Pro 850W - Anything up to 2x7970


    Cases:
    Thermaltake Element Q - mITX HTPC, includes 200W PSU
    Xigmatek Asgard - Low budget
    Bitfenix Merc Alpha/Beta - Low budget
    NZXT Source 210 - Low budget
    Fractal Design Core 1000 - Low budget mATX
    BitFenix Shinobi - Mid budget
    Fractal Design Core 300 - Mid budget
    Xigmatek Midgard - Mid budget
    Thermaltake A90 - Mid budget
    CM HAF 912 - High budget
    CM Storm Enforcer - High budget
    CM 690 II - High budget
    Corsair Carbide 400R - High budget
    NZXT Phantom 410 - High budget
    Fractal Design Define R3 - High budget
    Fractal Design Define Mini - High budget mATX
    Corsair Carbide 500R - Super Budget
    Silverstone Raven 2 - Super Budget
    NZXT Phantom Big - Super Budget
    Fractal Design Define XL - Super Budget
    CM HAF 932 - Super Budget
    Corsair Graphite 600T - Super Budget
    Corsair Obsidian 650D - Super Budget
    Silverstone Fortress - Super Budget

    Massive selection here, mainly because cases are about your own personal likes. Some people prefer the simple looks of the Fractal R3, while others want the moster gaming NZXT Phantom. All the ones on this list are good quality and good value cases, so just pick whichever one looks good to you.


  • Registered Users Posts: 4,983 ✭✭✭Tea_Bag


    deconduo wrote: »
    WIP
    huh?


  • Moderators, Computer Games Moderators Posts: 4,281 Mod ✭✭✭✭deconduo


    Tea_Bag wrote: »
    huh?

    Work in progress, I was writing something up and hit post by accident. Its done now though.


  • Registered Users Posts: 6,710 ✭✭✭Monotype


    :cool: Excellent post deconduo! Very straightforward and clear.

    A few suggestions...
    The Samsung 830 is looking like a pretty good drive so and it's often priced close to the Crucial M4 so I think it's a worthy competitor.
    I'd also throw in the 560 ti to the graphics card list as you can sometimes get good prices on it if someone can't quite stretch to a 6950. The 6950s are going up all the time too, although next month will see some changes to this list.
    For hard drives, what about that hitachi drive? Deskstar D series iirc? I wouldn't normally go for hitachi but they're owned by WD now which have always been reliable for me. Sequential read & writes were very high, but access times weren't so good. Still a good option when paired with SSD. Also maybe throw in the WD or Seagate greens for the 2TB. For storage it'll make little difference and with the way hard drives prices are at the moment, any of them could be cheaper.
    RAM - Maybe mention that it's for Intel systems that it makes little difference with. There's big differences for Llano, even if it's not the most popular platform. Apparently it's selling well so someone must be buying them.
    It might be a good idea to throw a few different motherboard brands in there too. I see scan have started stocking them but they're not always widely available. I suggest one or two MSIs as quality, pricing and reliability has been fairly good this generation.

    Well, I suppose you don't want to give too much choice as it only makes people more confused and it means that the guide requires more updating. :o

    Tea_Bag wrote: »

    anyone have any other ideas that could be expanded?


    I think we could do with a bit more info on PSUs to add to deconduo's PSU guide. A bit of background info on OEMs and maybe a bit about efficiency curves to show people why they shouldn't overbuy with PSUs?
    I could type up a bit if people wanted. I wouldn't know enough to tear a PSU down to the components but I could do an essentials guide for builders which everyone can add.


  • Advertisement
  • Moderators, Entertainment Moderators Posts: 12,013 Mod ✭✭✭✭jaykhunter


    I'd very much appreciate a guide on physically putting together ur components u bought online! I've put in HDDs and RAM but never a whole build from scratch!


Advertisement