Advertisement
If you have a new account but are having problems posting or verifying your account, please email us on hello@boards.ie for help. Thanks :)
Hello all! Please ensure that you are posting a new thread or question in the appropriate forum. The Feedback forum is overwhelmed with questions that are having to be moved elsewhere. If you need help to verify your account contact hello@boards.ie
Hi all,
Vanilla are planning an update to the site on April 24th (next Wednesday). It is a major PHP8 update which is expected to boost performance across the site. The site will be down from 7pm and it is expected to take about an hour to complete. We appreciate your patience during the update.
Thanks all.

My garden Room Build

  • 04-05-2020 9:02am
    #1
    Registered Users Posts: 5,862 ✭✭✭


    Hi all,

    I've decided to blog my Garden Room build

    I dont really have a design on paper as such but it will be 3.6x3.6 and have a single door 2m ( sliding ) at the front

    Finish will be cedar on 2 sides and something else (cheaper) on the other (unseen )

    Estimated build price = 4.5k
    Estimate build time = ???

    In case anyone thinks I am clever and have any clue how to do this by myself, I am basically following this chap along a fair amount
    Ali Dymock - but at the rate he is going I think I will pass him out !


    Here is where I am so far ......

    I spent a lot of time clearing out and digging this area.
    Its pure topsoil and very soft, but also full of roots which makes digging it heart breaking - each shovel ends up empty by the time the roots have cleaned it

    49854821263_99b9c6e680_b.jpg

    Getting there now - the 3 squares where left over from another project but are intended to help me id where to dig the foundations

    49855661392_8a27b58d25_b.jpg


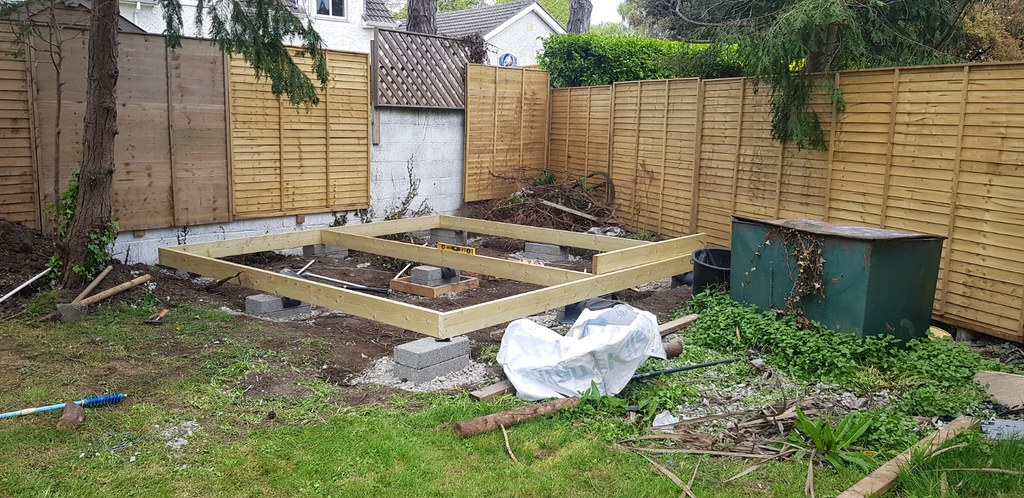
    Bit of a leap forward here, I was probably too exhausted to take photos of the next bit - I dug 9 holes, all about 600mm deep and minimum of about 500mm square to try get some solid footings

    I filled them with hard core and got them to level. ( dont underestimate how difficult this is )

    Not forgetting the DPC of course, and making sure its somewhere near square.

    49855358496_cfeb8c7e56_b.jpg

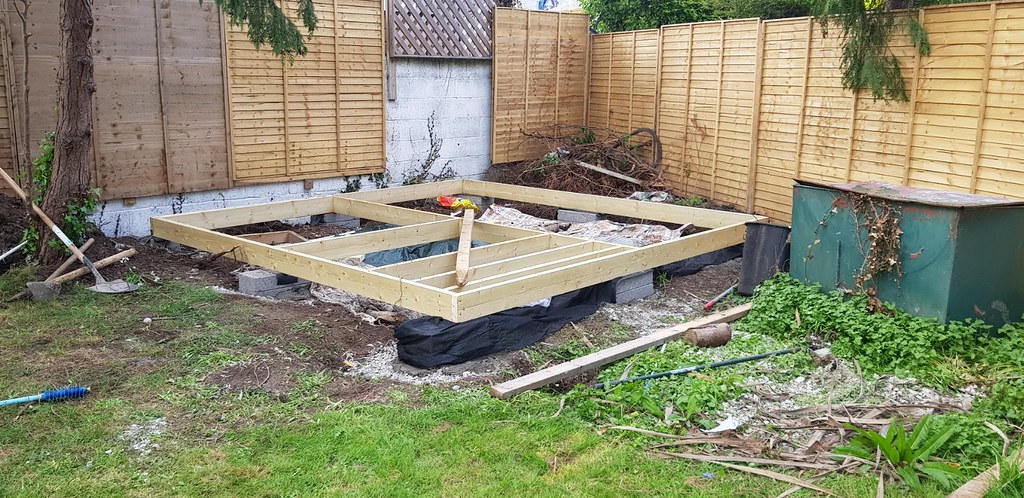
    Started filling in the frame floors. I am using 150*44 boards for the framing. There is nowhere more than 1.7m span so I think its more than enough
    I initially started by filling in the cross rafters directly into the frame.
    The extra rafter at the front is there to bolster the frame on the blocks.

    49855358251_5de176dd58_b.jpg


    I changed tack quickly - and decided to make 2 smaller inner frame for the other half as its much easier to break the job into chunks. These also sit on the same blocks inside the original frame. My apprentice helped a bit too !

    49854820643_f90380ecbc_b.jpg

    Getting there now - frames inside frame - all square, and level
    Weed control down, and some junk thrown in for good measure

    49854820528_da0590412d_b.jpg

    So, moved on another bit. Put DPC around all the bottom of the outside frame, not sure why other than the little lady and I were looking for something to do together the other night and I was awaiting a delivery of stuff

    Moved on to installing the insulation - rigid 100mm PIR
    I had read that cutting it a little smaller with lugs to stop them falling through, then filling with expanding foam is the way to go.

    I didnt do that, instead opting to cut them fairly exact and only filling where necessary

    I then taped the joins closed ( cause thats what I saw on the youtube ) but I dont know why ! ( also, when I say I, I meant my foreman did it ! )

    49855660862_d6192a84e3_b.jpg

    Next up polythene vapour barrier - and we are ready for flooring

    49855357746_0e2d8ab7b1_b.jpg


    Floor on - ready for more action !
    I made a stupid error here and tore into this without checking they were totally on square, dunno why! its no biggy really it just means the little trims at the ends where the plywood overhangs the frame will be odd shapes

    49855357806_a68337df2e_b.jpg

    Thats where I am as of Saturday - today I will build the fist wall frame.
    Whenever its socially acceptable to start making noise on a BH Monday morning !

    Hope this is useful or at least interesting for someone - I am happy to answer any questions I can - but as you can see, I am no expert !


«13456714

Comments

  • Registered Users Posts: 28,014 ✭✭✭✭looksee


    This promises to be interesting. Fair play to you!

    My only concern would be maintenance of the fence and the back/ side of the building. Without access to that triangle at the back it will eventually fill up with weeds and ivy, which will get into the building (bt,dt) and the water running off the roof will tend to be directed onto the fence. Is there space for guttering?


  • Registered Users Posts: 2,530 ✭✭✭Car99


    I'm only seeing one picture all the rest are just -


  • Registered Users Posts: 2,673 ✭✭✭Nigzcurran


    Only 1pic showing for me


  • Registered Users Posts: 1,134 ✭✭✭maxamillius


    No pictures showing at all


  • Registered Users Posts: 6,367 ✭✭✭iwillhtfu


    I can only see the one pic but perhaps due to boards ****ting the bed the last week or so. I'll follow along as considering similar myself.


  • Advertisement
  • Registered Users Posts: 5,862 ✭✭✭RobAMerc


    I am using google photos - maybe the issue is there ?


  • Registered Users Posts: 5,862 ✭✭✭RobAMerc


    looksee wrote: »
    This promises to be interesting. Fair play to you!

    My only concern would be maintenance of the fence and the back/ side of the building. Without access to that triangle at the back it will eventually fill up with weeds and ivy, which will get into the building (bt,dt) and the water running off the roof will tend to be directed onto the fence. Is there space for guttering?

    there is about 40cm between the back wall and the back of the building, similarly the corner closest the fence.

    Also I will fix it so nothing grows there - ever !


  • Registered Users Posts: 396 ✭✭M.T.D


    All the pictures were showing at 9.10am but they all seem to have gone now.


  • Registered Users Posts: 6,367 ✭✭✭iwillhtfu


    RobAMerc wrote: »
    I am using google photos - maybe the issue is there ?

    You have to put them into a shared public folder in google photos whihch i assume you did as they could be seen and then embed the address from the shared folder. Even doing that they tend to kill the links after a random amount of time some last hours some months I still haven't figured out what it is.


  • Registered Users Posts: 5,862 ✭✭✭RobAMerc


    I've moved to flicker as I couldnt get it to work !

    Did a butt load today - but it doesnt look too different to this !

    Upload photos later - I wont be able to walk tomorrow.


  • Advertisement
  • Registered Users Posts: 1,134 ✭✭✭maxamillius


    Been flat out watching Ali Dymock build for the last 2 weeks myself.

    Fair play to you for starting this, I’ve a bit of clearing to do before I can get started but hopefully get something done in the next couple of months.

    It’s crazy what you can actually save by doing this yourself, some of the off the shelf ones start upwards of 20k.

    At least doing it yourself you can increase the insulation sizes etc.

    Best of luck with it, will be following along


  • Registered Users Posts: 1,017 ✭✭✭Four Phucs Ache


    Well done, not many share the experience and learning curve, for many reasons.

    I have had an itch to do same for years after watching Tommy Walsh build a shed. Look it up, very detailed from ground up.


  • Registered Users Posts: 714 ✭✭✭charlesanto


    Question; what is keeping the insulation from dropping down ?


  • Registered Users Posts: 5,862 ✭✭✭RobAMerc


    Been flat out watching Ali Dymock build for the last 2 weeks myself.

    Fair play to you for starting this, I’ve a bit of clearing to do before I can get started but hopefully get something done in the next couple of months.

    It’s crazy what you can actually save by doing this yourself, some of the off the shelf ones start upwards of 20k.

    At least doing it yourself you can increase the insulation sizes etc.

    Best of luck with it, will be following along

    Thanks - I think he over engineers it a little and seems to have very deep pockets lol !

    I imagine I'll get plenty of "feedback" here -

    Here are some of todays shots :

    First up the header for the door.

    Cut:


    49855208983_656b093440_h.jpg

    And glued 3 150x44 boards together to make the header:

    49856051107_93691541af_h.jpg

    I used 150*44 for the jack studs on the insude and 100*44 for the king studs with a top plate above it.

    This is it upright ! We have a door.
    49856051047_7c55ede843_h.jpg


    Next up a wall

    I measured the top and bottom plate - then all studs. I screwed a simple stud to the deck at both ends to make it easy to drive the nails in.

    Ive not yet put in the noggins, although they are cut.

    49855745521_60a56672c2_h.jpg


    I used the "California corner" method here to make sure I have something to attach the platerboard to on the inside.

    49855208668_5c843dfddc_h.jpg

    Door took an age, wall took < 2 hrs

    I am knackered though, and my back .......


  • Registered Users Posts: 1,134 ✭✭✭maxamillius


    RobAMerc wrote: »
    Thanks - I think he over engineers it a little and seems to have very deep pockets lol !

    I imagine I'll get plenty of "feedback" here -

    Here are some of todays shots :

    First up the header for the door.

    Cut:


    49855208983_656b093440_h.jpg

    And glued 3 150x44 boards together to make the header:

    49856051107_93691541af_h.jpg

    I used 150*44 for the jack studs on the insude and 100*44 for the king studs with a top plate above it.

    This is it upright ! We have a door.
    49856051047_7c55ede843_h.jpg


    Next up a wall

    I measured the top and bottom plate - then all studs. I screwed a simple stud to the deck at both ends to make it easy to drive the nails in.

    Ive not yet put in the noggins, although they are cut.

    49855745521_60a56672c2_h.jpg


    I used the "California corner" method here to make sure I have something to attach the platerboard to on the inside.

    49855208668_5c843dfddc_h.jpg

    Door took an age, wall took < 2 hrs

    I am knackered though, and my back .......

    I agree I think he has definitely over engineered, obviously has a bit of cash and is not in a major rush to complete. Still very good videos to get the fundamentals.

    You look like you’re making good progress anyway keep up the good work!


  • Registered Users Posts: 5,862 ✭✭✭RobAMerc


    Question; what is keeping the insulation from dropping down ?

    They are mostly a very tight fit and had to be bet into the holes - so friction. Where they weren't that tights I drove a nail into the frame to stop them falling down. They are light.


  • Registered Users Posts: 2,360 ✭✭✭jack of all


    Interesting build, best of luck with it, looks like southern California there with the blue skies! Enjoy!


  • Registered Users Posts: 713 ✭✭✭Darando


    Great stuff, toying with it myself! I’m thinking to clad 3 sides with coloured corrugated metal and then cedar or shiplap on the front... what centres for walls? Interested to see the roof!


  • Registered Users Posts: 6,367 ✭✭✭iwillhtfu


    RobAMerc wrote: »

    49854820528_da0590412d_b.jpg

    So, moved on another bit. Put DPC around all the bottom of the outside frame, not sure why other than the little lady and I were looking for something to do together the other night and I was awaiting a delivery of stuff

    I've started watching that guy on youtube and it's very good. I predict a project in the near future. :

    I'm curious about he DPC being wrapped around the bottom of the joists, will that not create a trough for water/damp?

    I'm interested to see what you have in mind for the cedar cladding. I'm a big fan of cedar shingles on a roof.


  • Registered Users Posts: 31,008 ✭✭✭✭Lumen


    RobAMerc wrote: »
    They are mostly a very tight fit and had to be bet into the holes - so friction. Where they weren't that tights I drove a nail into the frame to stop them falling down. They are light.

    The frame will expand and contract over time, and the insulation may shrink. Also, the frame will probably shift a bit when loaded up.

    I would fix them somehow.


  • Advertisement
  • Registered Users Posts: 33,572 ✭✭✭✭listermint


    Nice work Rob,

    You are cheating however, you have 2 sub contractors on site :D


  • Registered Users Posts: 5,862 ✭✭✭RobAMerc


    Lumen wrote: »
    The frame will expand and contract over time, and the insulation may shrink. Also, the frame will probably shift a bit when loaded up.

    I would fix them somehow.

    Ok, thanks - I would still be able to get a strip of 2*1 across from side to side and a long nail driven into each them from the external side. Also I could probably get another length of the weed barrier and stretch it across - which may hold any that falls though in place.


  • Registered Users Posts: 5,862 ✭✭✭RobAMerc


    iwillhtfu wrote: »

    I'm curious about he DPC being wrapped around the bottom of the joists, will that not create a trough for water/damp?


    I did it to protect the bottom of the frame from splashes mainly - but in reality the external wrap of the building will come down over this, so no water should be hitting this from above - in theory
    iwillhtfu wrote: »


    I'm interested to see what you have in mind for the cedar cladding. I'm a big fan of cedar shingles on a roof.

    Yes, I am interested to see what I have planned too ! :D:D


  • Registered Users Posts: 5,862 ✭✭✭RobAMerc


    just looking this over and I realised I made a major omission, I forgot the joist hangers ! Holy carp !


  • Registered Users Posts: 5,862 ✭✭✭RobAMerc


    so I moved things on a bit since I last posted. we've gone vertical !

    I used the deck to build both walls and doorway.
    I noticed another small mistake in that I had intended to sweep the polythene back under the walls to join the vapor barrier inside the building, therefore increasing the air tightness - but I only remembered that about an hour ago. I will do it on the others for what its worth.

    The door is not at 45degrees, I realise that will be a pain in the but when it comes to cladding it, but given the angle the room is at it just didnt look right at any other angle than this.

    I had not planned another window in this, the front door is 2000mm wide, and I didnt feel it needed it.
    I am rethinking that now - I may have to add a window in the frame to the left of the door.

    I am going to order the slider tomorrow - its coming from the UK so will take 5 weeks, which will slow me down a bit ! But its a good thing as I am clearly rushing a bit and need to calm down.

    I will post a full bill of materials soon - which may help folks thinking of doing similar.


    49867622191_c6e0095b3a_b.jpg


  • Registered Users Posts: 2,563 ✭✭✭karlitob


    RobAMerc wrote: »
    so I moved things on a bit since I last posted. we've gone vertical !

    I used the deck to build both walls and doorway.
    I noticed another small mistake in that I had intended to sweep the polythene back under the walls to join the vapor barrier inside the building, therefore increasing the air tightness - but I only remembered that about an hour ago. I will do it on the others for what its worth.

    The door is not at 45degrees, I realise that will be a pain in the but when it comes to cladding it, but given the angle the room is at it just didnt look right at any other angle than this.

    I had not planned another window in this, the front door is 2000mm wide, and I didnt feel it needed it.
    I am rethinking that now - I may have to add a window in the frame to the left of the door.

    I am going to order the slider tomorrow - its coming from the UK so will take 5 weeks, which will slow me down a bit ! But its a good thing as I am clearly rushing a bit and need to calm down.

    I will post a full bill of materials soon - which may help folks thinking of doing similar.


    49867622191_c6e0095b3a_b.jpg

    Thanks for posting. Will be following along. It’s on my bucket list to do the same.


  • Registered Users Posts: 6,367 ✭✭✭iwillhtfu


    Are you planning on wrapping, cladding and painting the rear walls before installing? It looks like you'll be tight on space.


  • Registered Users Posts: 5,862 ✭✭✭RobAMerc


    I do plan to put the osb on it before I raise it, but its actually 40cm from the back wall, even though it doesnt look it. A skinny lad like me :D:D can get down there and stick a few screws or what have you into the exterior cladding no issues. Although judging by the path worn to my fridge door during covid19, I might be holding my breath to get in there ! :D


  • Registered Users Posts: 1,134 ✭✭✭maxamillius


    Are you ordering the door from the UPVC site Ali uses?


  • Advertisement
  • Registered Users Posts: 5,862 ✭✭✭RobAMerc


    Are you ordering the door from the UPVC site Ali uses?


    not that I know of, who does Ali use ?


Advertisement