Advertisement
If you have a new account but are having problems posting or verifying your account, please email us on hello@boards.ie for help. Thanks :)
Hello all! Please ensure that you are posting a new thread or question in the appropriate forum. The Feedback forum is overwhelmed with questions that are having to be moved elsewhere. If you need help to verify your account contact hello@boards.ie
Hi all,
Vanilla are planning an update to the site on April 24th (next Wednesday). It is a major PHP8 update which is expected to boost performance across the site. The site will be down from 7pm and it is expected to take about an hour to complete. We appreciate your patience during the update.
Thanks all.

How would experienced wood worker do this

Options
  • 15-12-2014 4:55pm
    #1
    Closed Accounts Posts: 164 ✭✭


    http://postimg.org/image/l5rdv1jaj

    Under my sink the space above the wooden partition is so small it is very difficult to get out plug and pipes of washing machine through. See pic

    I want to make a hole with a hole saw to make room. Or in some other way. What do you experienced guys think would be best. Could a hole saw be used horizontally


Comments

  • Registered Users Posts: 2,804 ✭✭✭recipio


    Nice graphics. :D A hole saw would do the job but they need plenty of power. If you have a mains powered drill I'd simply buy a right angle attachment and drill with the hole saw. Make sure the chuck will take the arbor on the holesaw.They are about 40 mm deep however and you would also need to check you have enough room with the attachment on the drill.
    If its still tight you could drill a few holes with a short bit and cut out the waste with a padsaw. ?


  • Registered Users Posts: 27,033 ✭✭✭✭GreeBo


    Hard to tell from the pic, but it looks like you would get a jigsaw in there.

    Other than that I think just removing the sink would be the quickest way and save a lot of cursing and cut fingers.


  • Closed Accounts Posts: 164 ✭✭Yorker


    recipio wrote: »
    Nice graphics. :D A hole saw would do the job but they need plenty of power. If you have a mains powered drill I'd simply buy a right angle attachment and drill with the hole saw. Make sure the chuck will take the arbor on the holesaw.They are about 40 mm deep however and you would also need to check you have enough room with the attachment on the drill.
    If its still tight you could drill a few holes with a short bit and cut out the waste with a padsaw. ?
    yep my graphics. biggrin.png
    i have a mains power drill.Why would i need a right angle attachment? Is that mdf wood that is in that?


  • Registered Users Posts: 2,361 ✭✭✭jack of all


    If the washing machine is directly to the right of the sink base unit you might have a problem using a holesaw or jigsaw there anyway as the pilot drill bit of the holesaw or the jig saw blade will foul on the side of your washing machine casing (unless you pull this out also- is it freestanding of built-in?). Neatest option would certainly be to remove the sink to give you free access. Also I would think it is preferable to have the drain hose for the machine lower so as to prevent problems with standing water in the hose, but this is just a hunch on my part. In my own kitchen and utility I cut out a slot nearest the bottom of the gable, as per photo.


  • Closed Accounts Posts: 164 ✭✭Yorker


    If the washing machine is directly to the right of the sink base unit you might have a problem using a holesaw or jigsaw there anyway as the pilot drill bit of the holesaw or the jig saw blade will foul on the side of your washing machine casing (unless you pull this out also- is it freestanding of built-in?). Neatest option would certainly be to remove the sink to give you free access. Also I would think it is preferable to have the drain hose for the machine lower so as to prevent problems with standing water in the hose, but this is just a hunch on my part. In my own kitchen and utility I cut out a slot nearest the bottom of the gable, as per photo.
    the machine is to the right of the sink as you look at the sink

    I can pull out the machine. And i could make the hole lower to have the hose drain lower as you say. but it is really the electric plug that will not fit through.

    I plan to cut towards the sink as i can get in there when the machine is moved back


  • Advertisement
  • Registered Users Posts: 1,386 ✭✭✭dathi


    cut the plug off and rewire a new plug on cable no cursing and swearing


  • Moderators, Motoring & Transport Moderators, Sports Moderators Posts: 6,320 Mod ✭✭✭✭fergal.b


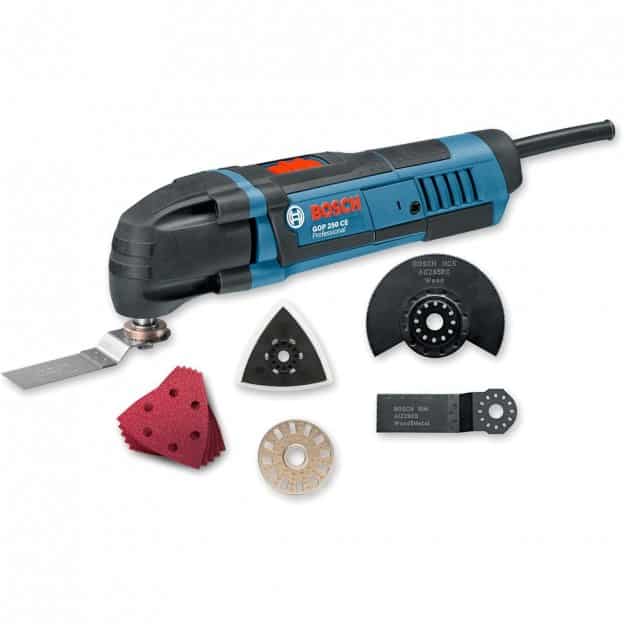
    A multi saw like this will cut it out for you no problem, if you are worried about cutting any of the pipes or wires you can wrap some tape around the blade so it will only cut as deep as the wood. The blades can be attached at any angle so it will be easy to get in at it, you can also pick up a cheeper make of saw if it's just going to be used for DIY.

    GOP-250-CE-Deal-624x624.jpg


  • Registered Users Posts: 2,361 ✭✭✭jack of all


    Here is another photo of my utility with washing machine (similar arrangement to yours). Pull out machine and work from that recess- holesaw to form the radiused cuts top and bottom and finish off with fine pad saw blade, or hacksaw blade in a pad handle would do a fine job for what your cutting.


  • Registered Users Posts: 27,033 ✭✭✭✭GreeBo


    Yorker wrote: »
    the machine is to the right of the sink as you look at the sink

    I can pull out the machine. And i could make the hole lower to have the hose drain lower as you say. but it is really the electric plug that will not fit through.

    I plan to cut towards the sink as i can get in there when the machine is moved back

    Remove the plug.
    Take out the washing machine.
    Cut a large hole with ease using a hole saw.
    Feed all pipes and cables through the new hole.

    Having a hole that a plug doesnt fit through will get old very quickly.


  • Closed Accounts Posts: 164 ✭✭Yorker


    GreeBo wrote: »
    Remove the plug.
    Take out the washing machine.
    Cut a large hole with ease using a hole saw.
    Feed all pipes and cables through the new hole.

    Having a hole that a plug doesnt fit through will get old very quickly.
    not sure what that means


  • Advertisement
  • Registered Users Posts: 2,804 ✭✭✭recipio


    Yorker wrote: »
    yep my graphics. biggrin.png
    i have a mains power drill.Why would i need a right angle attachment? Is that mdf wood that is in that?

    I had assumed you had to go at the problem from the sink side. It looks to me that you have about 6" of space so I can't see how you would get a drill in there in a horizontal position. If you can remove the washing machine on the other side then no worries. That partition is likely to be one 16mm melamine chipboard sheet or two held in a sandwich.


  • Registered Users Posts: 456 ✭✭peter bermingham


    Be careful the pipes might be squashed up their take out appliance either cut hole or bring up from underneath pipes should have not have being fitted like that make sure when putting the wast pipe into the wast pipe you push it in well as sometimes they pop out


  • Closed Accounts Posts: 164 ✭✭Yorker


    Be careful the pipes might be squashed up their take out appliance either cut hole or bring up from underneath pipes should have not have being fitted like that make sure when putting the wast pipe into the wast pipe you push it in well as sometimes they pop out
    ????


  • Registered Users Posts: 27,033 ✭✭✭✭GreeBo


    Yorker wrote: »
    not sure what that means

    If you dont make a hole big enough to pass a plug through you will have to keep rewiring the plug anytime you want to take the machine out or maybe even move it, depending on circumstances.

    It was mentioned that you can just cut off the old plug, I advise against this, cut a big enough hole.
    The best way to do that is detach everything, remove the machine and make a large enough hole in the middle of the panel, this will also be stronger than taking a section out of the top.


  • Closed Accounts Posts: 164 ✭✭Yorker


    GreeBo wrote: »
    If you dont make a hole big enough to pass a plug through you will have to keep rewiring the plug anytime you want to take the machine out or maybe even move it, depending on circumstances.

    It was mentioned that you can just cut off the old plug, I advise against this, cut a big enough hole.
    The best way to do that is detach everything, remove the machine and make a large enough hole in the middle of the panel, this will also be stronger than taking a section out of the top.
    i agree i am not cutting the plug. that was a silly idea


  • Closed Accounts Posts: 164 ✭✭Yorker


    I need a couple screws. The ones were like these
    http://www.woodiesdiy.com/category/Chipboard-Screws/1.5.0.2
    but have thread all the way up

    What is the difference between the one with a shank, is it? and thread all the way?


  • Registered Users Posts: 2,361 ✭✭✭jack of all


    Both screws are "chipboard screws" which are mostly what you'll find available in the providers these days, SPAX and Reisser being two of the better brands. The type with a partially unthreaded shank is referred to as a wood screw, often used to fit ironmongery and to allow wood to be screwed to wood (the unthreaded section means the wood being screwed into won't "ride" up the shank as you're driving the screw in, especially if the two pieces aren't firmly clamped together whilst screwing). These screws are very useful for fitting thicker boards to another substrate and they may be marginally stronger, also good when used to fix materials to walls using wall plugs.

    The full threaded variety are more common (more sizes and gauges are usually in stock) and as long as you drill a properly sized pilot hole in the wood and clamp both firmly while driving the screws in there is no problem using these instead.


  • Closed Accounts Posts: 164 ✭✭Yorker


    Both screws are "chipboard screws" which are mostly what you'll find available in the providers these days, SPAX and Reisser being two of the better brands. The type with a partially unthreaded shank is referred to as a wood screw, often used to fit ironmongery and to allow wood to be screwed to wood (the unthreaded section means the wood being screwed into won't "ride" up the shank as you're driving the screw in, especially if the two pieces aren't firmly clamped together whilst screwing). These screws are very useful for fitting thicker boards to another substrate and they may be marginally stronger, also good when used to fix materials to walls using wall plugs.

    The full threaded variety
    are more common (more sizes and gauges are usually in stock) and as long as you drill a properly sized pilot hole in the wood and clamp both firmly while driving the screws in there is no problem using these instead.
    used them job done thanks guys

    Here is a pic. Will it fray around the edges? Should I put something around the edges?
    I just brought the power cable through. The others will fit but mean the machine has to be a couple inches to the right and space is very tight. It is easy enough to take the plastic head* off the drain pipe under sink and it fits over easily. Was plug caused most problems

    *don't know what it is called


  • Registered Users Posts: 2,361 ✭✭✭jack of all


    Is there any reason why you didn't bore the hole closer to the rear edge of the gable panel, nearest the wall? The cable is now trapped between cabinet panel and side panel of machine which may cause the cable to wear over time as the machine vibrates, especially during spin cycles. All built-in and freestanding machines have a "service zone" at the back of the machine to allow you to route power cable and waste hoses without obstruction. There should be no reason to run hoses or cables over the top or around the side panels of the appliance.


  • Closed Accounts Posts: 164 ✭✭Yorker


    Is there any reason why you didn't bore the hole closer to the rear edge of the gable panel, nearest the wall? The cable is now trapped between cabinet panel and side panel of machine which may cause the cable to wear over time as the machine vibrates, especially during spin cycles. All built-in and freestanding machines have a "service zone" at the back of the machine to allow you to route power cable and waste hoses without obstruction. There should be no reason to run hoses or cables over the top or around the side panels of the appliance.
    the space is very tight.I have to work with the space given. I did not think of the cable wearing possibility. But i made sure there is some space between the cable and tyhe machine. I will bore a hole nearer back in January


  • Advertisement
  • Registered Users Posts: 27,033 ✭✭✭✭GreeBo


    Yorker wrote: »
    used them job done thanks guys

    Here is a pic. Will it fray around the edges? Should I put something around the edges?
    I just brought the power cable through. The others will fit but mean the machine has to be a couple inches to the right and space is very tight. It is easy enough to take the plastic head* off the drain pipe under sink and it fits over easily. Was plug caused most problems

    *don't know what it is called

    When boring holes (or cutting chipboard in general) if you cover the area in masking tape (and drill/cut through the tape) the wood wont chip.


Advertisement