Advertisement
If you have a new account but are having problems posting or verifying your account, please email us on hello@boards.ie for help. Thanks :)
Hello all! Please ensure that you are posting a new thread or question in the appropriate forum. The Feedback forum is overwhelmed with questions that are having to be moved elsewhere. If you need help to verify your account contact hello@boards.ie

So you want to JTAG your xbox360? (POST 248 FOR xeBuild/16197 TUT)

1356710

Comments

  • Registered Users Posts: 145 ✭✭EmmetF


    Cool thanks a mil!


  • Registered Users Posts: 285 ✭✭kevin-46


    i need the files for xenon as its wouldnt let me get them
    and the new up dates do i have to read or just write
    also have a zephyr what files do i need for that


  • Registered Users Posts: 8,584 ✭✭✭TouchingVirus


    Xenon Files: http://www.mediafire.com/?ozpawa32kr81994

    Read the full thread, specifically this post. You don't need them if you are upgrading. You just need Bestpig's freeboot toolbox and a copy of your NAND (Original nand or if you don't have the original take a dump of your nand and use that).

    Exact same process for the Zephyr.


  • Registered Users Posts: 285 ✭✭kevin-46


    cheers


  • Registered Users Posts: 285 ✭✭kevin-46


    how many numbers or letters should the xbox cpu have cause i have 30


  • Advertisement
  • Registered Users Posts: 8,584 ✭✭✭TouchingVirus


    It's a hex number with 32 digits


  • Registered Users Posts: 1,582 ✭✭✭docentore


    I didn't want to start new thread, but wanted to share something.

    I had exploitable Jasper with fecked mem chips / some voltage controller. Basically I wasted to much time on it.
    I ordered Sega Tennis deal recently on Amazon and imagine what: manufacture date was 23.06.2009. Damn it!

    Then I got idea, actually I was reading about this in X-H.org. CPU transplantation and flashing nand with exploitable cpu key.

    My mate, the guy who did the reball i put photo other day, say its possible to do in less than hour. Great! How much it will cost me - that was my concern. He showed to be a fan of old NES and SNES but not owning them. I asked them if he heard anything about Xbox softmodding etc.

    Well to keep it short I have jtaged jasper for a price of modding Xbox.

    But to see tears of joy on his face when he saw Contra on 42" plasma - priceless :D

    what I was talking about? oh yes, having borked mobo with good exploitable cpu and good mobo with not exploitable cpu might give one nice jtagged xbox when left in pro's hands ;)


  • Closed Accounts Posts: 33,733 ✭✭✭✭Myrddin


    And I thought getting an NTSC N64 was a good deal for an Xbox softmod :eek: Nice!


  • Registered Users Posts: 8,584 ✭✭✭TouchingVirus


    docentore wrote: »
    I didn't want to start new thread, but wanted to share something.

    I had exploitable Jasper with fecked mem chips / some voltage controller. Basically I wasted to much time on it.
    I ordered Sega Tennis deal recently on Amazon and imagine what: manufacture date was 23.06.2009. Damn it!

    Then I got idea, actually I was reading about this in X-H.org. CPU transplantation and flashing nand with exploitable cpu key.

    My mate, the guy who did the reball i put photo other day, say its possible to do in less than hour. Great! How much it will cost me - that was my concern. He showed to be a fan of old NES and SNES but not owning them. I asked them if he heard anything about Xbox softmodding etc.

    Well to keep it short I have jtaged jasper for a price of modding Xbox.

    But to see tears of joy on his face when he saw Contra on 42" plasma - priceless :D

    what I was talking about? oh yes, having borked mobo with good exploitable cpu and good mobo with not exploitable cpu might give one nice jtagged xbox when left in pro's hands ;)

    Some said it wouldn't work, I pondered that it might on here a few weeks ago and X-H.org folks knew it would work - docentore just proved it :D Fantastic news, especially for witnessmenow who has two Jaspers with issues on the motherboard. Now he just needs to find two unexploitable jaspers and strike up a deal to get them transplanted & reballed :cool:

    Nice work docentore, very nice


  • Registered Users Posts: 8,584 ✭✭✭TouchingVirus


    From witnessmenow's thread on his JTAGing adventures, here are the updated SMC files to use when building your freeBOOT image (when JTAGing a Jasper, Zephyr or Falcon only). Copy them to the freeboot 'data' folder when using Bestpig's tool.

    These were patched with v1.2 of the SMC Utility by Blackaddr and TMS is set to use the AUD_CLAMP wiring (the wiring from this thread). If you use another wiring scheme, change it to this one ;)


  • Advertisement
  • Registered Users Posts: 8,584 ✭✭✭TouchingVirus


    Preamble
    Right, so a lot of people are asking here how to update their JTAG consoles to the latest dashboard version. Previously I would simply have recommended using BestPig's FreeBOOT Toolbox to generate the latest dashboard with pretty much a one-click solution. Unfortunately it appears that Bestpig is no longer updating his tool for the latest dashboard versions so that option is gone. The other options for similar tools include Easy FreeBOOT or Coolshrimp's JTAG Tool. Personally, I have not had any success with either of these tools. I'm not alone here either, EnterNow and other users have reported issues. These issues are usually so catastrophic that they result in the user not being able to boot into the Dashboard or Xell. If you can't get into the Dashboard and can't get into Xell then to fix the problem will require soldering up a nand writer to the motherboard to get back up and running.

    These tools are just wrapping a nice interface around the core tool - fbBuild. You can use this tool via a command line, so with this tutorial I'll show you how to generate your own updated dashboard so you can get up and running with the latest version and with minimal messing about.


    Required Files
    TL;DR?
    If you want a very brief overview of the steps see here

    Use 360 Flash Tool
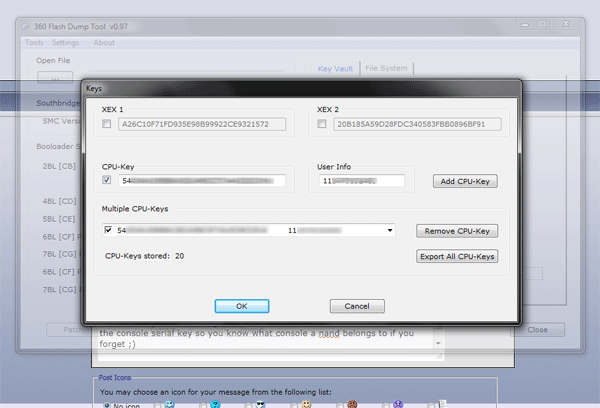
    Open 360 Flash Tool, click Settings and then Keys. Enter the CPU key for the console you're updating. Tip: You can use the "User Info" field to enter the console serial key so you know what console a nand belongs to if you forget ;)
    fbbuild01.png

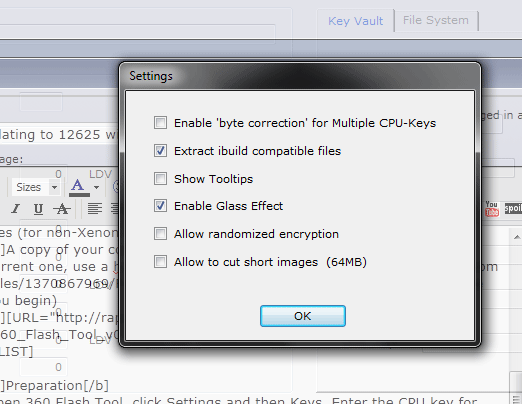
    Click Settings and then options, making sure to check the box beside "Extract ibuild compatible files".
    fbbuild02.png

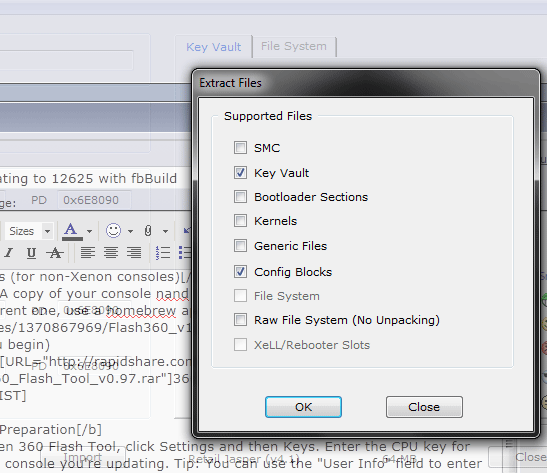
    Next, open your nand dump. If the CPU key for the nand dump is in the 360 Flash Tool database you should be able to view the DVD key and other information in the right hand side section (e.g. the console serial, console ID, MFR date etc). If the key isn't in the 360 flash tool database then it will say "Bad K/V". Once you can see the DVD key click Extract which is under the left hand side section. Check the boxes for Keyvault and Config Blocks and then click OK. Select a folder to extract the files to (e.g. E:\ExtractedFiles).
    fbbuild03.png

    Close 360 Flash Tool

    fbBuild

    Extract fbBuild to a directory (e.g. E:\fbBuild). Inside the extracted folder you will find a folder called mydata. Open it, and open cpukey.txt. Paste the CPU key of the console into the first line, replacing what is there. Save it and close it.

    Go to where you extracted the files from 360 Flash tool (e.g. E:\ExtractedFiles) and inside you will find a freeBOOT folder. In that folder is a folder called data. And finally, inside this folder should be two files - kv.bin and smc_config.bin. Copy or move these files to the mydata folder. And now to the SMC...

    Question: What are the SMC files and why should we use your ones? Non-Xenon consoles do not have enough inputs and outputs to run the JTAG exploit. So we piggyback on already in-use I/Os to run it. The SMC is responsible for controlling lots of stuff from fanspeed to Ring of Light colours, voltages for the console and many many more things. It's very important that you use the right SMC file for your console model. In addition to all of this, modified SMC files are used to let the console know where to look for the JTAG hack if a different wiring method is used. There are several wiring methods for non-Xenon consoles to enable the JTAG hack. One of the basic differences is the wire used for a thing called the TMS. The most common method involves using a point called AUD_CLAMP for TMS but there are others available (e.g. ARGON_DATA, which is on the wireless/ring of light board). The SMC files linked to above assume that TMS is wired to AUD_CLAMP, it is the way I do my JTAGs. They have been patched further to squash a few bugs from the JTAG exploit (e.g. if you left a play & charge kit connected to a controller and turned off the console it would restart itself). Please do not use them if this is not your wiring method or if you do not know your wiring method and cannot check. So now you have some needless background info, you've got two options:
    1. You're using AUD_CLAMP - Open the SMC zip file you downloaded from above, extract the appropriate SMC file for your console model to the mydata folder and rename it to smc.bin
    2. Xenon Console OR You're not using AUD_CLAMP or don't know for sure - Take a backup of your current nand (must be the current nand) using Flash360, open the nand dump in 360 flash tool and click Extract, check the box beside SMC and click OK. Extract it to a folder, open that folder and open the folder called SMC. There will be two files there, SMC_dec.bin and SMC_enc.bin. You want the SMC_dec.bin file. Copy it to the mydata folder and rename it to smc.bin

    So that's the hard work (:p) done, now there's just one step left.

    Open up a command prompt (Start->Run->cmd.exe or Windows Key + R). Go to the folder with fbBuild and type the following
    fbBuild -c <model> -d mydata -f <dash_version> <output file>
    
    Where <model> is xenon, zephyr, falcon, jasper, jaspersb, jasper256, jasper512
    Where <dash_version> is 9199, 12611 or 12625
    Where <output_file> is a filename (optional) [e.g. E:\updflash.bin].
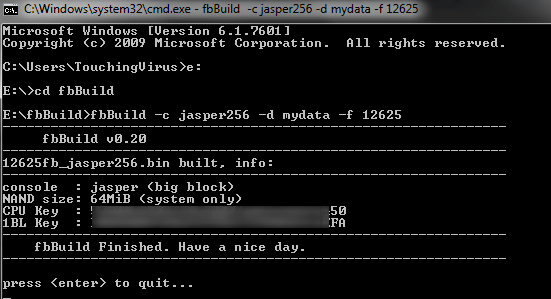
    fbBuild -c jasper256 -d mydata -f 12625 E:\updflash.bin
    
    fbbuild04.png

    The actual update...
    Take your newly generated bin file (rename it to updflash.bin if required) copy it to a USB drive that's FAT32 or FAT and plug it into the console. Power on the console with the eject button to boot into Xell and Xell should detect the USB drive and flash your nand. Once it is completed, turn off the console and unplug the power from the console for 30 seconds. If you don't want to unplug from the console and want to unplug from the wall instead then wait 3 minutes instead for all power to leave the power brick before plugging it back in. Then power on the console as normal.

    If you cannot get your USB drive to work with Xell then you can use the Flash360 homebrew app to write the updflash.bin file instead. Put the USB stick into the console and open Flash360. Press A (Write updflash.bin to nand). Press B (Raw flash without keeping current KV/config). Ignore the two warnings by pressing A (Warnings about "Keyvault encrypted data check mismatch" and "Your current nand is not ZeroPaired"). Press A and wait until the flash is done. Then power off the console for 30 seconds (or 3 minutes from the wall) and power it on normally.

    Remember: This is a bare dashboard, just enough to get you up and running. The first thing you should do once you get it up and running is download the full System Update for the dashboard version you updated to from Microsoft's Xbox site, copy it to a USB stick and plug it into the console and reboot. (Warning: Please be sure the full update you get from the Microsoft site is the same version of dashboard as you have on the console. If what you download is a newer dashboard it'll overwrite your entire nand, Xell and all and then you'll have to get a modder to solder up a nand writer and fix it :D)

    If anybody doesn't understand something, or wants to patch their own non-AUD_CLAMP SMC files for those bugfixes then post on here and we'll all help out :)


  • Moderators, Music Moderators, Recreation & Hobbies Moderators Posts: 9,389 Mod ✭✭✭✭Lenny


    Excellant post TV


  • Registered Users Posts: 8,584 ✭✭✭TouchingVirus


    Cheers Lenny.

    I imagine the process (which is really only 6 steps) will remain the same for future versions of fbBuild, all that'll change with new versions of fbBuild is the addition of a folder with the new dashboard version name and files which you then use with the -f argument. The basic build process has remained the same since 9199, and even before that with ibuild it was pretty much the same ;)


  • Closed Accounts Posts: 33,733 ✭✭✭✭Myrddin


    Cheers Lenny.

    I imagine the process (which is really only 6 steps) will remain the same for future versions of fbBuild, all that'll change with new versions of fbBuild is the addition of a folder with the new dashboard version name and files which you then use with the -f argument. The basic build process has remained the same since 9199, and even before that with ibuild it was pretty much the same ;)

    In light of that, anyone who just asks the same 'how do I do it' question (of which I was also guilty) shall be just forwarded to your post there TV. It looks like a lot of work, but its not at all & the end result is 100% correct assuming the instructions are followed :)


  • Registered Users Posts: 8,584 ✭✭✭TouchingVirus


    Yeah, it's longwinded writing which is my speciality. But in reality it can be condensed to 7 vague steps:

    1) Backup nand from JTAG using Flash360
    2) Extract files from nand dump using 360 Flash Tool (KV, Config Files and SMC if your console is not a Xenon and is not using AUD_CLAMP wiring)
    3) Extract fbBuild to folder
    4) Add cpu key to cpukey.txt file in fbBuild/mydata
    5) Copy extracted files from Step 2 into the fbBuild/mydata folder. If you didn't extract SMC file in step 2 then extract appropriate SMC file from the SMC Files zip archive to mydata
    6) Open command prompt, generate freeBOOT
    7) Copy updflash.bin to USB stick, update console.


  • Registered Users Posts: 14,309 ✭✭✭✭wotzgoingon


    Hey if somebody could help me with this problem im creating a Freeboot image with fbBuild v0.20 and im using a xenon console and its asking for an smc.bin file. TouchingVirus said it is not needed for xenon console but i keep getting an error askin for it so where will i get that file. thanks!


  • Registered Users Posts: 8,584 ✭✭✭TouchingVirus


    Your SMC file shouldn't be needed for a Xenon, not unless things have changed. It's been a while since I generated a freeBOOT image for a Xenon - I sold mine :D

    Open your nand dump in 360 Flash Tool, click Extract and tick the box beside SMC, just like you did for the Keyvault and Config Blocks. Then pick a folder to extract the files to. Inside that folder you'll find a folder called SMC, and inside that you'll find two files - SMC_dec.bin and SMC_enc.bin. Copy SMC_dec.bin to the mydata folder and rename it to smc.bin - that's your SMC File.

    If you do not have an SMC_dec.bin file this is most likely because you have not entered your CPU key into the 360 Flash Tool database :p

    As a matter of interest, could you use a -v flag when using fbBuild and PM me the log before you actually update your console (obviously removing CPU key/DVD key data if you prefer). I'd just like to see a verbose log file for a Xenon console to be sure everything is in order, I'd rather not brick somebody's console :P


  • Registered Users Posts: 8,584 ✭✭✭TouchingVirus


    As EnterNow pointed out, BestPig's tool v2.7c is now available and building dashboard 12625.

    Xenon console

    1) Download Bestpig Toolbox and open it
    2) Enter the CPU key of the console in the box
    3) Change the output to updflash.bin
    4) Click Generate and when prompted choose a copy of your nand
    5) Copy updflash.bin to a USB stick and update the console.

    Non-Xenon Consoles

    1) Download Bestpig Toolbox and open it
    2) Enter the CPU key of the console in the box
    3) Change the output to updflash.bin
    4) Check the box that says custom freeBOOT
    5) If you have a Jasper console, uncheck the autodetect motherboard box and choose the right Jasper model from the model selection box.
    6) Click Generate and when prompted choose a copy of your nand
    7) A windows explorer window will open, it's the fbBuild files just before freeBOOT is generated. You need to copy the right SMC.bin for your console file into the data folder (see Post 72 for how to find it)
    8) Close the window and click OK on the bestpig application prompt.
    9) Copy updflash.bin to a USB stick and update the console.


  • Closed Accounts Posts: 4 ars0n


    Thanks for the great help guys, I have a question on the NO DVD option that best pig has, but implementing it through FBuild.

    Is this possible? I like how I no longer have a blinking light on the box when my dvd drive is not plugged in using the bestpig option..but I also get a funky problem..

    Everytime I load a game, the first time i load a game and only the first time, about 15 minutes in, it kicks me back to the dash. No errors, no crash..the dvd drive is saying opening drive.. I can go back into my game and play for hours no problems...only on the first load and about 15 min into the game does it black screen suddenly and kick me back to the dash...everytime, on the first load of any game.. it does it in the regular dash, and freestyle dash 2.21265

    But, the important question is for now, how to disable the dvd (no dvd option in bestpig program) through fbbuild? Or is it even possible?


  • Registered Users Posts: 8,584 ✭✭✭TouchingVirus


    The hardware solution is to jump pins 4 & 6 on the motherboard's DVD drive power connector.

    The software solution is to use a patch, but I don't seem to be able to find a patch that disables the DVD drive check for fbBuild


  • Advertisement
  • Closed Accounts Posts: 4 ars0n


    Do I do bridge the pins with the dvd rom cable plugged with no dvd rom? Or doesnt really matter? Just bridge the pins directly on the board?

    And thank you for the reply!!


  • Closed Accounts Posts: 4 ars0n


    used a jumper nm.. will keep you updated.


  • Closed Accounts Posts: 4 ars0n


    THANK YOU! that worked! Played 2 games, 2 hours, not one "crash"

    Thanks again!


  • Registered Users Posts: 8,584 ✭✭✭TouchingVirus


    ars0n wrote: »
    THANK YOU! that worked! Played 2 games, 2 hours, not one "crash"

    Thanks again!

    You're welcome, sorry I wasn't about to confirm you can use a jumper or a piece of wire as long as it's joining the two pins :)


  • Closed Accounts Posts: 17,661 ✭✭✭✭Helix


    just bought a jtagged xenon (i know, i know, but jaspers are too expensive) for $100! should arrive soon so im sure ill be frequenting this thread and picking your brains quite a bit from here on in


  • Moderators, Music Moderators, Recreation & Hobbies Moderators Posts: 9,389 Mod ✭✭✭✭Lenny


    Helix wrote: »
    just bought a jtagged xenon (i know, i know, but jaspers are too expensive) for $100! should arrive soon so im sure ill be frequenting this thread and picking your brains quite a bit from here on in

    welcome aboard..


  • Closed Accounts Posts: 17,661 ✭✭✭✭Helix


    still havent had a chance to do anything with this jtag, are there any online resources to tell me what the hell im supposed to do to get everything running

    what i want:

    1) region free games so i can play my pal games over here in canada
    2) ability to play emulators
    3) ability to play games from external hard drive
    4) ability to keep dashboard up to date so that all games remain compatible

    no other swanky requests, just mainly to play snes games and pal games


  • Registered Users Posts: 807 ✭✭✭Jimbobjoeyman


    Helix wrote: »
    still havent had a chance to do anything with this jtag, are there any online resources to tell me what the hell im supposed to do to get everything running

    what i want:

    1) region free games so i can play my pal games over here in canada
    2) ability to play emulators
    3) ability to play games from external hard drive
    4) ability to keep dashboard up to date so that all games remain compatible

    no other swanky requests, just mainly to play snes games and pal games
    just google it and you will get step by step walkthroughs for example [URL="http://teamxex.com/showthread.php?
    tid=373"]http://teamxex.com/showthread.php?tid=373[/URL]
    You have to update freeboot manually using bestpigs freeboot tool box


  • Closed Accounts Posts: 17,661 ✭✭✭✭Helix


    top man! cheers! tried googling, but its tricky when youre not entirely sure what youre looking to do. everything i want to do is possible with jtag yeah?

    any other funky stuff you can do that i havent got included?


  • Advertisement
  • Registered Users Posts: 250 ✭✭Bruno Batista


    Right, found a brilliant guide on installing XeXmenu at http://www.se7ensins.com/forums/topic/197037-beginners-guide-to-using-a-jtag/
    which did the trick for me, so happy to finally be able to play games from my external hdd!

    Question is xexmenu the best or should I try something else?

    Also, to play multiple cd games (like I say LA Noire) that I have the ISOs for, does the method of wx360'ing them all into ONE disc folder (i.e. overwriting files with the same name) really works?

    Cheers!


Advertisement