Advertisement
If you have a new account but are having problems posting or verifying your account, please email us on hello@boards.ie for help. Thanks :)
Hello all! Please ensure that you are posting a new thread or question in the appropriate forum. The Feedback forum is overwhelmed with questions that are having to be moved elsewhere. If you need help to verify your account contact hello@boards.ie
Hi all,
Vanilla are planning an update to the site on April 24th (next Wednesday). It is a major PHP8 update which is expected to boost performance across the site. The site will be down from 7pm and it is expected to take about an hour to complete. We appreciate your patience during the update.
Thanks all.

What are you working on currently?

145791038

Comments

  • Moderators, Category Moderators, Music Moderators Posts: 14,308 CMod ✭✭✭✭The Master


    Laser engraved some wooden plectrums I made for a friend earlier today

    424093.jpg


  • Registered Users Posts: 1,259 ✭✭✭..Brian..


    kadman wrote: »
    Are you using the right chisels.

    Most of the turning there would get a good result from a skew.

    But the most difficult chisel to use in such a case. A wide skew of course.

    But as has been pointed out, timber choice is not great, last piece looks like

    white deal, which is a bitch anyway to get a good finish on.

    Try some fresh cut beech, ash, sycamore small logs if you can get some, would make things easy to

    sharpen your skills on, excuse the pun.

    tim

    Yea I was using a skew but probably too small, it's only 5/8. Must pick up another one. Yea the timber is just white deal off cuts I have lying around the shed, didn't want to waste any good hardwood until I was somewhat more proficient at it!


  • Moderators, Home & Garden Moderators Posts: 5,052 Mod ✭✭✭✭kadman


    Fresh cut holly is an excellent timber for the novice turner learning his craft.

    It turns like butter, and is very forgiving.

    White deal wont do your confidence any good, because its difficult to finish.

    Skew of 1 1/4" or bigger would be an easier choice, than trying to wrestle

    with a narrow skew. And practice, practice, practice.


  • Registered Users Posts: 5 mrmurphster


    Just finished my first woodwork project. 2 planters made from old shelving units that were salvaged.

    Tools used:
    Skill Saw and a drill

    Finished with some wood preservative.

    Happy with them but with some practice I can definitely do better as I had no idea what kerf was until after I'd cut a few boards slightly longer than others


  • Registered Users Posts: 751 ✭✭✭raspberrypi67


    Mind me asking how you engrave them? I'm in the middle of making my own cnc unit with laser to engrave my pens I make ...
    The Master wrote: »
    Laser engraved some wooden plectrums I made for a friend earlier today

    424093.jpg


  • Advertisement
  • Registered Users Posts: 431 ✭✭delaney001


    Anyone ever build a kiln? After getting 15 sheets of top quality insulation from work. 10'x4'. Just wondering would a couple of lamps, small dehumidifier and a fan be enough to have it working?


  • Registered Users Posts: 1,371 ✭✭✭MickeyShtyles


    delaney001 wrote: »
    Anyone ever build a kiln? After getting 15 sheets of top quality insulation from work. 10'x4'. Just wondering would a couple of lamps, small dehumidifier and a fan be enough to have it working?

    I've seen videos on youtube of solar kilns. I'd be fairly tempted to try out a small one. Woodworkers Guild of America did a section on it.

    Forgot the link!
    https://youtu.be/cTsDhCrE56U


  • Registered Users Posts: 1,259 ✭✭✭..Brian..


    Finally made some more progress one the bed! Only thing left now is to find a nice piece of spalted beech or sycamore or something with a live edge to cap the head and foot boards.

    IMG_20170724_174412.jpg

    IMG_20170825_202357.jpg


  • Moderators, Category Moderators, Music Moderators Posts: 14,308 CMod ✭✭✭✭The Master


    Mind me asking how you engrave them? I'm in the middle of making my own cnc unit with laser to engrave my pens I make ...

    Just using a cheap ~€80 Chinese laser engraver bought from AliExpress.
    Only has a work area of about 2" x 2" so couldn't really recommend it


  • Registered Users Posts: 212 ✭✭Magic ]=)


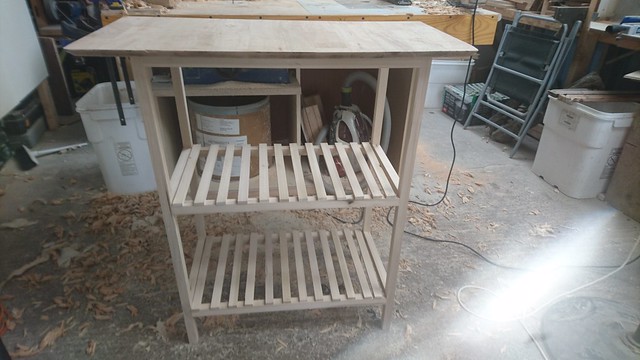
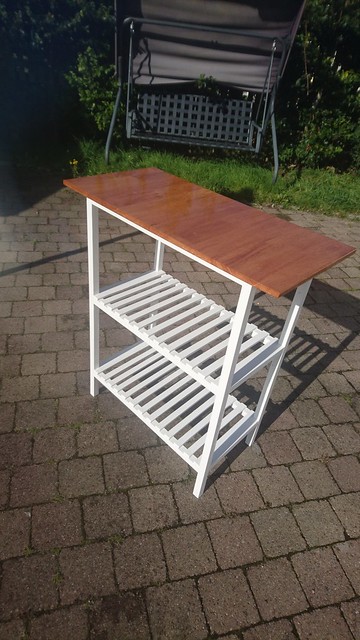
    Quick project from last week. Finished painting and staining this week.
    First time painting with paint on wood using brushes. Will have to learn more about this technique. I need to invest in better brushes.
    Legs and shelves made from Poplar and top not sure, could be oak or ash. Have an old dining table in not usable condition so just cut off piece and made a top from it.

    36417264103_2d5ab0cd68_z.jpg

    36417265523_89da34f55a_z.jpg

    37232284435_f0d3bc4ab9_z.jpg


  • Advertisement
  • Registered Users Posts: 1,711 ✭✭✭Gryzor


    Made this as part of an anniversary gift for my parents, turned out great. Made it from jaybates plans. Walnut and sepele.

    427928.jpg

    427929.jpg

    427930.jpg


  • Registered Users Posts: 1,259 ✭✭✭..Brian..


    Been making a wardrobe and bedside table for our guest room. Just doors and drawers to make tomorrow, then fill sand prime and paint. The mother in law is coming to stay next Wednesday for a while so under pressure to get it finished!

    IMG_20171021_165255.jpg

    IMG_20171021_213425.jpg


  • Registered Users Posts: 208 ✭✭Poloman


    Thanks Gryzor you have shown me an easy way to use clamps on corners with extra 2x2's and stuff good man! Some really nice stuff in there well done all.


  • Registered Users Posts: 1,595 ✭✭✭MathsManiac


    Coffee table - ash and walnut.
    Had this waney-edged leftover from another project for ages. Finally got around to using it.

    20170914_193709_resized.jpg

    20170914_193926_resized.jpg

    20170915_123044_resized.jpg


  • Moderators, Category Moderators, Arts Moderators, Sports Moderators Posts: 48,204 CMod ✭✭✭✭magicbastarder


    nice - any shots of how the underneath is put together?


  • Registered Users Posts: 1,595 ✭✭✭MathsManiac


    nice - any shots of how the underneath is put together?

    The top is so thick that it made it easy - the legs are just housed about 40mm deep in the top and don't need any other support. Likewise, the walnut strip is housed about 35mm deep in each of the two side pieces.


  • Registered Users Posts: 1,111 ✭✭✭rob w


    Coffee table - ash and walnut.
    Had this waney-edged leftover from another project for ages. Finally got around to using it.

    20170914_193709_resized.jpg

    20170914_193926_resized.jpg

    20170915_123044_resized.jpg

    Nice job, I have been thinking about doing a project like this for a while.
    Don't want to drag the thread off topic but do you know where to go about sourcing pieces of timber like these? I've started looking into it but finding it difficult to come across!

    Thanks!


  • Registered Users Posts: 1,595 ✭✭✭MathsManiac


    rob w wrote: »
    Nice job, I have been thinking about doing a project like this for a while.
    Don't want to drag the thread off topic but do you know where to go about sourcing pieces of timber like these? I've started looking into it but finding it difficult to come across!

    Thanks!

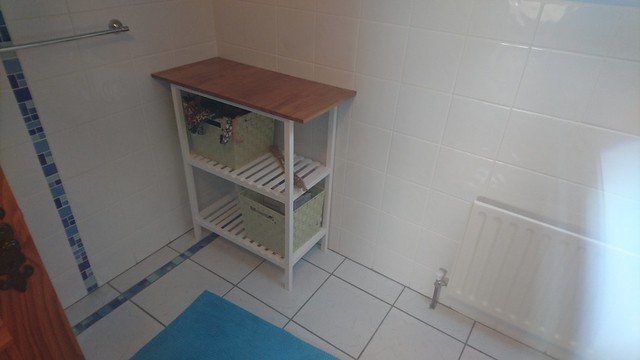
    I got two large through-and-through slabs (one ash and one sycamore) a few years ago from Lisnavagh timber project to make worktops for bathrooms, like this:
    20171031_132022-1_resized.jpg

    The off-cut from the back of the worktop, cut in half, made the two sides of the table, and there was enough in the off-cut from the end to make the legs.

    The original slabs cost me about €300 each, kiln-dried, planed and sanded.


  • Registered Users Posts: 1,111 ✭✭✭rob w


    I got two large through-and-through slabs (one ash and one sycamore) a few years ago from Lisnavagh timber project to make worktops for bathrooms, like this:
    20171031_132022-1_resized.jpg

    The off-cut from the back of the worktop, cut in half, made the two sides of the table, and there was enough in the off-cut from the end to make the legs.

    The original slabs cost me about €300 each, kiln-dried, planed and sanded.

    Great stuff, just had a look at their website there.
    Very interesting, will have to pay them a visit someday when I am in that neck of the woods to see their stock!

    Thanks!


  • Registered Users Posts: 751 ✭✭✭raspberrypi67


    How do I post pictures etc here as a new post, god i most be dense but do I just do a reply to the last post


  • Advertisement
  • Registered Users Posts: 1,259 ✭✭✭..Brian..


    Finished the wardrobe and bedside table I was working. The wardrobe is probably the most complex thing I've made so far getting all the reveals etc right. Some mistakes but overall happy with how it turned out!

    IMG_20171101_143745.jpg

    IMG_20171101_143815.jpg


  • Registered Users Posts: 456 ✭✭peter bermingham


    They came out really well nice job just one thing don't put the handles on the center panel next time, it can make them a little hard to grip.Now theirs nothing wrong with where they are.


  • Registered Users Posts: 1,259 ✭✭✭..Brian..


    Thanks and that's definitely one of the mistakes I mentioned! I drilled the holes and the minute I put the first one up I knew it was a mistake, they are very close to each other. Would you just attach them straight into the the panel?


  • Registered Users Posts: 456 ✭✭peter bermingham


    ..Brian.. wrote: »
    Thanks and that's definitely one of the mistakes I mentioned! I drilled the holes and the minute I put the first one up I knew it was a mistake, they are very close to each other. Would you just attach them straight into the the panel?
    Yes the top rail of each drawer is where they normally go. But look it came out really well


  • Registered Users Posts: 431 ✭✭delaney001


    ..Brian.. wrote: »
    Thanks and that's definitely one of the mistakes I mentioned! I drilled the holes and the minute I put the first one up I knew it was a mistake, they are very close to each other. Would you just attach them straight into the the panel?

    I presumed you were talking about the door handles? I wouldn't put them into the panel, I think they'd look funny and possibly weaken quicker. Would it be possible to have that trim wider so the two knobs could be farther apart?


  • Moderators, Category Moderators, Arts Moderators, Sports Moderators Posts: 48,204 CMod ✭✭✭✭magicbastarder


    just turned a small burl bowl the other night - still quite thick, it's full of voids and i wasn't sure how well it would hold together. i may stick it back on the lathe and turn the walls a bit thinner.

    the source of the burl was a little unusual - cycling home from work on griffith avenue about six months ago, i was passed by a high speed car chase where the chasee clipped another car at high speed, spun, and slammed backwards into one of the london planes lining the avenue. and promptly drove off at high speed, i think with both rear tyres blown out. he knocked the burl off the tree in the process, so i took it home.

    432351.jpg


  • Registered Users Posts: 1,259 ✭✭✭..Brian..


    delaney001 wrote: »
    I presumed you were talking about the door handles? I wouldn't put them into the panel, I think they'd look funny and possibly weaken quicker. Would it be possible to have that trim wider so the two knobs could be farther apart?

    I was! I think we got our wires crossed there. Anyway, smaller knobs or wider stiles (or both) would have been better there I think!


  • Registered Users Posts: 6,996 ✭✭✭Wossack


    just turned a small burl bowl the other night - still quite thick, it's full of voids and i wasn't sure how well it would hold together. i may stick it back on the lathe and turn the walls a bit thinner.

    the source of the burl was a little unusual - cycling home from work on griffith avenue about six months ago, i was passed by a high speed car chase where the chasee clipped another car at high speed, spun, and slammed backwards into one of the london planes lining the avenue. and promptly drove off at high speed, i think with both rear tyres blown out. he knocked the burl off the tree in the process, so i took it home.

    not sure I'd risk it..! looks great as is, with loads of character - and a cool story to boot :D


  • Registered Users Posts: 431 ✭✭delaney001


    just turned a small burl bowl the other night - still quite thick, it's full of voids and i wasn't sure how well it would hold together. i may stick it back on the lathe and turn the walls a bit thinner.

    the source of the burl was a little unusual - cycling home from work on griffith avenue about six months ago, i was passed by a high speed car chase where the chasee clipped another car at high speed, spun, and slammed backwards into one of the london planes lining the avenue. and promptly drove off at high speed, i think with both rear tyres blown out. he knocked the burl off the tree in the process, so i took it home.

    432351.jpg

    If it's going to risk breaking leave it as is. But I would definitely try to go thinner. Hard to judge dimensions in that pic but the rim looks too thick for the diameter of the bowl. In my opinion the rim shouldn't be much more than about 8% of the total diameter. But just my opinion or my eye.
    Nice piece though.


  • Advertisement
  • Registered Users Posts: 1,711 ✭✭✭Gryzor


    Another youtube inspired box. Last box for a while I think, all boxed out! This one was all about the joinery, took time but worth it.

    432907.jpg

    432904.jpg

    432905.jpg

    432906.jpg


Advertisement