Advertisement
If you have a new account but are having problems posting or verifying your account, please email us on hello@boards.ie for help. Thanks :)
Hello all! Please ensure that you are posting a new thread or question in the appropriate forum. The Feedback forum is overwhelmed with questions that are having to be moved elsewhere. If you need help to verify your account contact hello@boards.ie
Hi all,
Vanilla are planning an update to the site on April 24th (next Wednesday). It is a major PHP8 update which is expected to boost performance across the site. The site will be down from 7pm and it is expected to take about an hour to complete. We appreciate your patience during the update.
Thanks all.

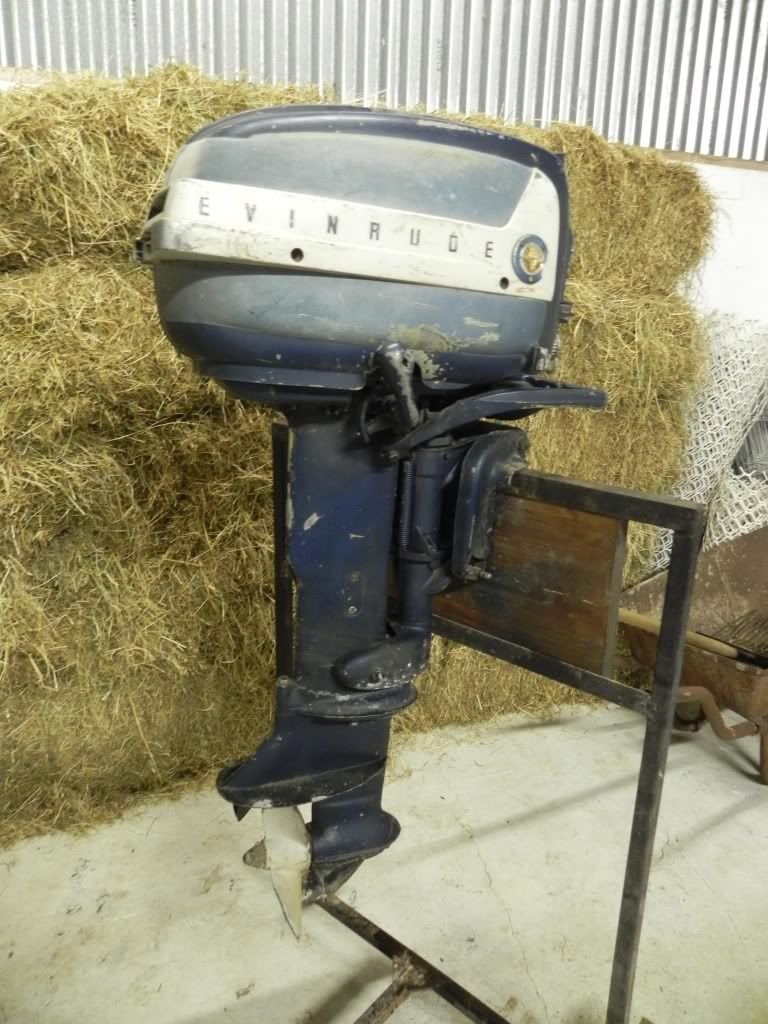
1958 evinrude fastwin restoration

  • 01-03-2012 1:05am
    #1
    Moderators, Motoring & Transport Moderators, Sports Moderators Posts: 6,320 Mod ✭✭✭✭


    As if I haven't enough on my plate I am going to restore this little baby :D

    DSCN9114.jpg

    I started off doing a compression test and one cylinder was very low not a good start As it had been sitting in a barn for the last 30 years I decided to put a bit of WD40 in and let it sit over night hoping it was just stuck rings. I did the test again and was getting 125 psi on each :)

    Bottom

    2012-02-28150445.jpg

    Top


    2012-02-28150559.jpg

    I had a look at the gear oil and of course it was half full of water:grrr: it had been sitting for so long it looked like you could drink the water if you held your nose :D

    2012-02-28121733.jpg


    Next I took off the air breather to have a look at the carb :eek: It looks like some sort of spider lived in here, what a mess.

    2012-02-28103737.jpg

    Even the carb was full of spider **** or what looks like sawdust.

    2012-02-28101953.jpg

    Can things get worse, O yes they can. I checked for a spark and guess what...........none so out with the harmonic balancer and off with the flywheel.

    2012-02-28154101.jpg

    think I found the problem.

    2012-02-28154137.jpg


    2012-02-28155922.jpg

    Parts ordered carb rebuild kit,coils,condensers and points I also want to change it to a standard fuel tank from a pressurised one so I ordered a mikuni pulse pump the plan is to get the engine to run before I decide to carry on with the rest of the rebuild.


«1

Comments

  • Registered Users Posts: 1,294 ✭✭✭Pigeon Reaper


    you really are a glutton for punishment.


  • Registered Users Posts: 311 ✭✭whacker1982


    hi again fergal b, where do you stick that hose for the compression test into on the outboard, im thinking of getting one from ebay just to have it in case i see a outboard for cheap.
    what would you get away with regards to the compression like 150, or 100, instead of 125?


  • Moderators, Motoring & Transport Moderators, Sports Moderators Posts: 6,320 Mod ✭✭✭✭fergal.b


    hi again fergal b, where do you stick that hose for the compression test into on the outboard, im thinking of getting one from ebay just to have it in case i see a outboard for cheap.
    what would you get away with regards to the compression like 150, or 100, instead of 125?

    It screws into the spark plug hole, you can also get them in any motor factors or halfords. The compression can change from engine to engine but the main thing to look for is that there is no more than 10% difference between each cylinder.


  • Registered Users Posts: 311 ✭✭whacker1982


    cool cool, thanks again fergal. b. nice outboard looking forward to seeing the progress.


  • Moderators, Motoring & Transport Moderators, Sports Moderators Posts: 6,320 Mod ✭✭✭✭fergal.b


    Well I think I found why this engine was put away, the two condenser wires were worn down from the flywheel making them earth out.

    2012-03-03130525.jpg

    After finding this I rebuilt the carb and put in the new electrics and then this happened " click the pic"

    th_video-2012-03-01-16-10-10.jpg

    Now time for some sanding.

    2012-03-02160702.jpg


  • Advertisement
  • Registered Users Posts: 118 ✭✭icedtea


    Looks good fergal!

    Any ideas what you're gonna run it on?


  • Moderators, Motoring & Transport Moderators, Sports Moderators Posts: 6,320 Mod ✭✭✭✭fergal.b


    icedtea wrote: »
    Looks good fergal!

    Any ideas what you're gonna run it on?

    Thanks, It will be going on a Pearly Miss http://mrlloydstebbings.hostinguk.org/brochure.aspx


    .


  • Registered Users Posts: 190 ✭✭Jim from Cork


    Nice job!


  • Registered Users Posts: 533 ✭✭✭Daibheid


    That 's a real nice find and an easy fix! Nice to see your punt on it paying off so fast.
    It really sounds very healthy


  • Closed Accounts Posts: 236 ✭✭davlacey


    whats the best way to get the fly wheel off mine is stuck solid


  • Advertisement
  • Moderators, Motoring & Transport Moderators, Sports Moderators Posts: 6,320 Mod ✭✭✭✭fergal.b


    davlacey wrote: »
    whats the best way to get the fly wheel off mine is stuck solid

    You need a harmonic balancer puller that bolts into the 3 holes on the flywheel they have to be kept level and only use high strength bolts as you tighten the main bolt give it a few taps with a hammer and tighten again and so on, they are a bit hard to get off but it should come. Remember when you put it back on that you have the right torque setting for the nut.


    You can pick up a set like this in Halfords just make sure you use OMC bolts to screw into the flywheel.
    13pc%20Harmonic%20Balancer%20Puller.jpg


  • Closed Accounts Posts: 236 ✭✭davlacey


    are they exspensive? i might just get a mechanic to do it hopefully it will be a once off


  • Moderators, Motoring & Transport Moderators, Sports Moderators Posts: 6,320 Mod ✭✭✭✭fergal.b


    davlacey wrote: »
    are they exspensive? i might just get a mechanic to do it hopefully it will be a once off

    They start from about €30 up to €100, if you are taking of the flywheel you might as well change the points,coils, and condensers, any mechanic should be able to take it off for you.


  • Closed Accounts Posts: 236 ✭✭davlacey


    i was just going to just clean the points. think getting all them parts would be tough its a chrysler engine


  • Moderators, Motoring & Transport Moderators, Sports Moderators Posts: 6,320 Mod ✭✭✭✭fergal.b


    davlacey wrote: »
    i was just going to just clean the points. think getting all them parts would be tough its a chrysler engine

    Sorry I thought you were talking about an evinrude the chrysler flywheel may not have the 3 bolt holes depending on what model and year it is. If you want to give me the engine number I might be able to find parts , see what it's like when you get the wheel off in the mean time spray some WD40 around the shaft and wheel.


  • Registered Users Posts: 533 ✭✭✭Daibheid


    fergal.b wrote: »
    You need a harmonic balancer puller

    You might also add Fergal that you may need a flywheel holder. And you may because some of the torques applied are very very high. For example a Yamaha F100 - 190NM. Any attempt to open that with something jammed against the starter ring is probably going to end up with a welding job on the engine block or a bent crank shaft. The good news is you can often fabricate something to do the job especially if the flywheel is a three bolt puller job like Fergals.
    The flywheels -often Merc/Mariner - that use a single large diameter threaded puller are more difficult and need the custom tools.

    BTW be prepared to jump a foot into the air when the flywheel does release! If you can, leave the loosened flywheel nut in place to ensure the flywheel doesn't come right off and crash onto coils, pick-ups, points, carbs, feet, etc


  • Moderators, Motoring & Transport Moderators, Sports Moderators Posts: 6,320 Mod ✭✭✭✭fergal.b


    Out with the old and in with the new, the new condensers are much lower than the old ones so they must have copped on to that problem .

    2012-03-12141902.jpg

    Here you can see the old float next to the new one it mush have been dying of thirst the new needle valve now comes with a little clip on spring to stop it from sticking as the last one just relayed on gravity.

    2012-03-13163848.jpg

    Rebuild kit fitted and a bit of a clean should be as good as new or even better.


    2012-03-13180606.jpg


  • Moderators, Motoring & Transport Moderators, Sports Moderators Posts: 6,320 Mod ✭✭✭✭fergal.b


    All the parts after been vapor blasted by http://www.tadltd.ie/ they also do antifouling removal and have a mobile unit. The finish is dull and etched so it can get a good hold on the primer.


    2012-03-15103517.jpg


  • Registered Users Posts: 533 ✭✭✭Daibheid


    Did they forget to give you back the flywheel? ;)


  • Moderators, Motoring & Transport Moderators, Sports Moderators Posts: 6,320 Mod ✭✭✭✭fergal.b


    Daibheid wrote: »
    Did they forget to give you back the flywheel? ;)

    Not at all the flywheel is aluminium so I will polish it up and make it nice and shiny :D


  • Advertisement
  • Registered Users Posts: 605 ✭✭✭breghall


    that is a fab looking little engine, can't wait to see it fully restored. What are you planning on using it on?


  • Moderators, Motoring & Transport Moderators, Sports Moderators Posts: 6,320 Mod ✭✭✭✭fergal.b


    breghall wrote: »
    What are you planning on using it on?

    See page 1 :D


  • Registered Users Posts: 605 ✭✭✭breghall


    fergal.b wrote: »
    See page 1 :D

    should read more and not just look at the pics :)


  • Moderators, Motoring & Transport Moderators, Sports Moderators Posts: 6,320 Mod ✭✭✭✭fergal.b


    Not that many of you will ever change an old outboard from a pressurised fuel tank to a standard one but if you do this is how to go about it.
    When you remove the intake manifold you will see two rubber check valve that go into the each crankcase chamber these send positive air down to the fuel tank.

    2012-03-20151003.jpg

    Remove the valves and block up one of the holes, I used a vacuum line cap and cut it long enough so that when I put the manifold back on it will be held in place.

    2012-03-20152149.jpg

    The other hole will give you the right amount of pulse pressure to work one of these a "pulse pump" so now instead of the hose going to the tank you connect it to the pump and that should now send the fuel to the carb.

    Evinru75.jpg


  • Registered Users Posts: 6,391 ✭✭✭Tow


    fergal.b wrote: »
    Not that many of you will ever change an old outboard from a pressurised fuel tank to a standard one but if you do this is how to go about it.

    Hi Fergal,

    What are the advantages of converting the fuel system? Would it not be better keep an engine of that vintage as original as possible, even if it is a little more troublesome to use/maintain?

    When is the money (including lost growth) Michael Noonan took in the Pension Levy going to be paid back?


  • Moderators, Motoring & Transport Moderators, Sports Moderators Posts: 6,320 Mod ✭✭✭✭fergal.b


    The danger with the pressurised tank and fuel lines are if you have even a very small leak it can pump out a very fine mist of fuel that is easy to ignite :eek:
    Also it's very hard to find the old tin fuel tanks in good nick in Ireland as they rusted away :D


  • Moderators, Motoring & Transport Moderators, Sports Moderators Posts: 6,320 Mod ✭✭✭✭fergal.b


    Would any of you nice guys have a hinge pin for the pull handle I can find a pack on ebay http://www.ebay.com/itm/OMC-Johnson-Evinrude-NOS-Hinge-Pin-Lot-Part-203468-/250755499016?pt=Boat_Parts_Accessories_Gear&vxp=mtr&hash=item3a62314408#ht_544wt_1115 but they won't post :confused:

    a20792912ffa800ce0c7e3_m.JPG
    It's the one that goes in this hole. Thanks
    $(KGrHqV,!k0E68MhP!F7BOy9bGy5jg~~60_1_6638_1.JPG


  • Moderators, Motoring & Transport Moderators, Sports Moderators Posts: 6,320 Mod ✭✭✭✭fergal.b


    Just some of the 27 different parts primed and painted. It will be getting new spark plugs:D
    2012-05-04135830.jpg

    2012-05-04135911.jpg


    2012-05-04140327.jpg


    2012-05-04140412.jpg

    The hood has 3 colours and each one has to be fully dry before it can be masked for the next one at the moment it has the dark and light blue so just the white left to do on it along with the prop and one of the latches I will then add the decals and lacquer over it.

    2012-05-04135931.jpg


  • Moderators, Motoring & Transport Moderators, Sports Moderators Posts: 6,320 Mod ✭✭✭✭fergal.b


    Time to put all the bits back together :D
    2012-05-08154805.jpg

    2012-05-08165733.jpg

    What it did look like.

    DSCN9138.jpg

    2012-05-08165649.jpg

    2012-05-09120123.jpg

    2012-05-11093421.jpg

    2012-05-11093347.jpg

    2012-05-11093413.jpg

    2012-05-11093809.jpg

    Still a bit more to do on the fuel system but this is more or less it :D

    2012-05-11093751.jpg

    DSCN9115.jpg


  • Advertisement
  • Registered Users Posts: 605 ✭✭✭breghall


    WOW ! Fergal take a bow , that turned out absolutely fabulous .... hope it runs ok for you now after all that work.

Advertisement