Advertisement
If you have a new account but are having problems posting or verifying your account, please email us on hello@boards.ie for help. Thanks :)
Hello all! Please ensure that you are posting a new thread or question in the appropriate forum. The Feedback forum is overwhelmed with questions that are having to be moved elsewhere. If you need help to verify your account contact hello@boards.ie

Classic wooden speedboat build , sink, search for, recovery and rebuild.

1235734

Comments

  • Technology & Internet Moderators Posts: 28,789 Mod ✭✭✭✭oscarBravo


    How does the speedo work? Pitot tube?


  • Moderators, Motoring & Transport Moderators, Sports Moderators Posts: 6,320 Mod ✭✭✭✭fergal.b


    oscarBravo wrote: »
    How does the speedo work? Pitot tube?

    Yep I will run the tube out trough the transom and down to the pickup.


  • Registered Users Posts: 533 ✭✭✭Daibheid


    fergal.b wrote: »
    Here is a little clip of what they can do :eek:

    What a lovely sound particularly when it's just loping along! Seems like areal problem with cavitation unless you build the revs gently but that's hardly a surprise. Looks proper good fun!


  • Registered Users Posts: 6,349 ✭✭✭Tow


    Are you sure that speedo goes up high enough or it is just to keep the wife happy?

    When is the money (including lost growth) Michael Noonan took in the Pension Levy going to be paid back?


  • Moderators, Motoring & Transport Moderators, Sports Moderators Posts: 6,320 Mod ✭✭✭✭fergal.b


    Tow wrote: »
    Are you sure that speedo goes up high enough or it is just to keep the wife happy?

    Spot on this boat will not do over 50 ever:rolleyes: :D


  • Advertisement
  • Closed Accounts Posts: 236 ✭✭davlacey


    fergal how much paint did u need for your hull?. i just want to give it one coat for now cause its upside down and its probably going to get scratched turning it over. i have a 1litre tin do u think that would be enough


  • Moderators, Motoring & Transport Moderators, Sports Moderators Posts: 6,320 Mod ✭✭✭✭fergal.b


    davlacey wrote: »
    fergal how much paint did u need for your hull?. i just want to give it one coat for now cause its upside down and its probably going to get scratched turning it over. i have a 1litre tin do u think that would be enough

    I used 3 750ml tins and did about 6 coats, you should get 2 coats if your boat is the same size as mine 15 foot. If you are putting on a primer first mix a bit of the paint into it and you should get away with less coats as the top coat can be a bit transparent.


  • Closed Accounts Posts: 236 ✭✭davlacey


    yea 2 coats would do me till i get it righted.im in 2 minds about a primer i might just spot prime the parts that ive filled the whole boat has had a good key with 500 grit or would i need it just to be on the safe side cheers


  • Moderators, Motoring & Transport Moderators, Sports Moderators Posts: 6,320 Mod ✭✭✭✭fergal.b


    davlacey wrote: »
    yea 2 coats would do me till i get it righted.im in 2 minds about a primer i might just spot prime the parts that ive filled the whole boat has had a good key with 500 grit or would i need it just to be on the safe side cheers

    If you want a good finish go with the primer,also check that your paint can be painted direct onto fiberglass some don't bond very well to it.


  • Closed Accounts Posts: 236 ✭✭davlacey


    cheers ill give it a prime first then pre kote or something cheap


  • Advertisement
  • Moderators, Motoring & Transport Moderators, Sports Moderators Posts: 6,320 Mod ✭✭✭✭fergal.b


    Trying to workout a good hatch design that will cover the manifolds and the carb.

    2012-07-131638282.jpg
    2012-07-13163857.jpg

    Using my hot wet jumper to help bend the ply "very handy tool":D

    2012-07-24155017.jpg

    It's a bit taller than I would like but there's not much I can do about it hopefully when I cover everything with the mahogany planks it will blend in a bit more.

    2012-07-25212617.jpg

    The sides of the hatch will be carved from a block of mahogany and I may also make them into air vents, not sure yet :confused:

    2012-07-25212719.jpg


  • Closed Accounts Posts: 236 ✭✭davlacey


    never heard of the hot wet jumper method how do u get it hot and keep it wet? what about covering the hatch with carbon fiber skin and an air scoop


  • Moderators, Motoring & Transport Moderators, Sports Moderators Posts: 6,320 Mod ✭✭✭✭fergal.b


    davlacey wrote: »
    never heard of the hot wet jumper method how do u get it hot and keep it wet? what about covering the hatch with carbon fiber skin and an air scoop

    With a kettle :D I had though of a scoop and might build one yet, I'll wait and see what it looks like when I plank it.


  • Closed Accounts Posts: 236 ✭✭davlacey


    ill give that a go ill be doing my foredeck in a few weeks. yea a scoop could give u nice cold air into the air filter


  • Moderators, Motoring & Transport Moderators, Sports Moderators Posts: 6,320 Mod ✭✭✭✭fergal.b


    I got an old block of 3"x 8" hardwood to cut out for the sides of the hatch, not the easiest thing to cut with hand tools :D

    2012-07-27125629.jpg

    I put the jigsaw at an angle and cut the side off then started sanding.

    2012-07-27152835.jpg

    2012-07-27152913.jpg

    2012-07-28123642.jpg

    I will leave the finish sanding till I have it planked to get the levels to match up but it will look something like this I may cut a slot along the front or drill holes for air intake.

    2012-07-28124026.jpg


  • Registered Users Posts: 605 ✭✭✭breghall


    you do some mighty fine work Fergal....


  • Closed Accounts Posts: 236 ✭✭davlacey


    u dont do things by half measures i wouldnt even attempt that.are the screws in your foredeck going to be fiberglassed over? ill be doing mine in plywood and putting woven mat over it but will the screws show through the mat


  • Moderators, Motoring & Transport Moderators, Sports Moderators Posts: 6,320 Mod ✭✭✭✭fergal.b


    Hi davlacey, The screws are only there to keep it in place for the moment I will be cutting the outer edge of the ply off and putting in a strip of mahogany in that way when I put the planks of mahogany on top of the ply I will be able to round the edges without showing the edge of the ply and it will look like one solid piece of mahogany.
    Screws will show through fiberglass cloth and even stainless steels ones can corrode under it as they need air to keep them stainless.
    If you are going to paint your deck you can use screws with big washers or scraps of ply to hold it down till the epoxy sets then remove them and fill the holes. If you want a wood look finish its best to have no screw holes so you will have to put some heavy weights on the ply or prop some timbers off the roof to hold it down :D

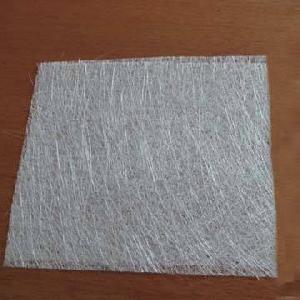
    When you say you are putting woven mat on your deck don't use this type.

    kitty_hair.jpg

    Go for the cloth 6 oz or 8 oz will be fine and should look like this.

    fiberglass_cloth%20copy.jpg


  • Closed Accounts Posts: 236 ✭✭davlacey


    yea its going to be painted so that would be the best thing use screws and washers then fill them.yea thats the stuff woven cloth would 2 layers be enough im going to have a stainless post on it and fairleads so i dont want it ripping off.


  • Moderators, Motoring & Transport Moderators, Sports Moderators Posts: 6,320 Mod ✭✭✭✭fergal.b


    davlacey wrote: »
    yea its going to be painted so that would be the best thing use screws and washers then fill them.yea thats the stuff woven cloth would 2 layers be enough im going to have a stainless post on it and fairleads so i dont want it ripping off.

    One layer should be fine, when you put on the first coat of resin wait about 3 hours before you do the next coat, if you let it set before the next coat you will have to wash it and sand it before you can add another coat 3-4 coats should be enough to fill the weave and give you a bit of sanding room.
    With any posts or fittings just double or treble up on the ply under the deck.


  • Advertisement
  • Closed Accounts Posts: 236 ✭✭davlacey


    cheers that will save me a bit of sanding. ive no fingerprints left anymore :D


  • Moderators, Motoring & Transport Moderators, Sports Moderators Posts: 6,320 Mod ✭✭✭✭fergal.b


    Just a little update but not much to show, I fitted the dash clocks and steering.

    20121016_155941.jpg

    I had to get a longer shaft for the rudder to make up for the 1"1/2" of the keel and the 1/2" of ply, when it was on the donor boat it only had to go through 10mm of fiberglass and then into the stuffing box.

    20121016_155919.jpg

    I also temporarily connected up the water intake "there is something not right about making holes in a boat:D" and I have the exhausts roughly in place ready for more holes :eek:

    20121016_160106.jpg


  • Registered Users Posts: 311 ✭✭whacker1982


    coming along nicely now, wont be long till she is ripping through the water.


  • Closed Accounts Posts: 236 ✭✭davlacey


    id put in a non return valve after ur strainer incase one of the hoses blow flooding her thats just me though


  • Registered Users Posts: 605 ✭✭✭breghall


    looking nice Fergal.


  • Moderators, Motoring & Transport Moderators, Sports Moderators Posts: 6,320 Mod ✭✭✭✭fergal.b


    davlacey wrote: »
    id put in a non return valve after ur strainer incase one of the hoses blow flooding her thats just me though

    I don't think a non return valve would work here, there is only water coming in from the seacock and that goes out through the exhaust ,the hose from the seacock will be under suction from the raw water pump when the engine is running so if a pipe does burst it's more likely to suck in air than leak. I built up the seacock so that where the hose connects is higher than the water level outside the boat so the worst that can happen is when the engine is stopped the water in the hose between the seacock and the engine could leak into the boat but that's not a lot.
    I hope I have this figured out right :eek:


  • Moderators, Motoring & Transport Moderators, Sports Moderators Posts: 6,320 Mod ✭✭✭✭fergal.b


    As funds are tight I had to set up a boat fund for Christmas :) I told santa I didn't want any more hats,scarfs,socks,jumpers or slippers:rolleyes: instead to donate to this worthy cause :D Well it looks like I'm back in business for another little while :pac:


    2013-01-04151511.jpg


  • Registered Users Posts: 495 ✭✭Hifive


    Wow! Santa has been VERY good!
    And judging by all the Goldenship stuff, Marine Parts Direct roll out the red carpet whenever they see you coming.


  • Closed Accounts Posts: 342 ✭✭martin46585


    lookin good fergal, crikey i thought i stumble on a boat jumble,
    can i ask why the leisure battery, wouldnt a regular battery be more suited to a starter motor,


  • Advertisement
  • Moderators, Motoring & Transport Moderators, Sports Moderators Posts: 6,320 Mod ✭✭✭✭fergal.b


    The guys in MPD look after me well as I'm putting their kids through college :D

    The leisure battery is for the electric trolling motor on my other boat as the old merc has no charging system I want to keep its battery just for starting.


Advertisement