Advertisement
If you have a new account but are having problems posting or verifying your account, please email us on hello@boards.ie for help. Thanks :)
Hello all! Please ensure that you are posting a new thread or question in the appropriate forum. The Feedback forum is overwhelmed with questions that are having to be moved elsewhere. If you need help to verify your account contact hello@boards.ie
Hi there,
There is an issue with role permissions that is being worked on at the moment.
If you are having trouble with access or permissions on regional forums please post here to get access: https://www.boards.ie/discussion/2058365403/you-do-not-have-permission-for-that#latest

First-timer building from frameset - questions!

  • 28-05-2013 10:27am
    #1
    Registered Users, Registered Users 2 Posts: 197 ✭✭


    I'm attempting a build up from a frameset for the first time, no doubt these will only be the first of a large number of questions :o

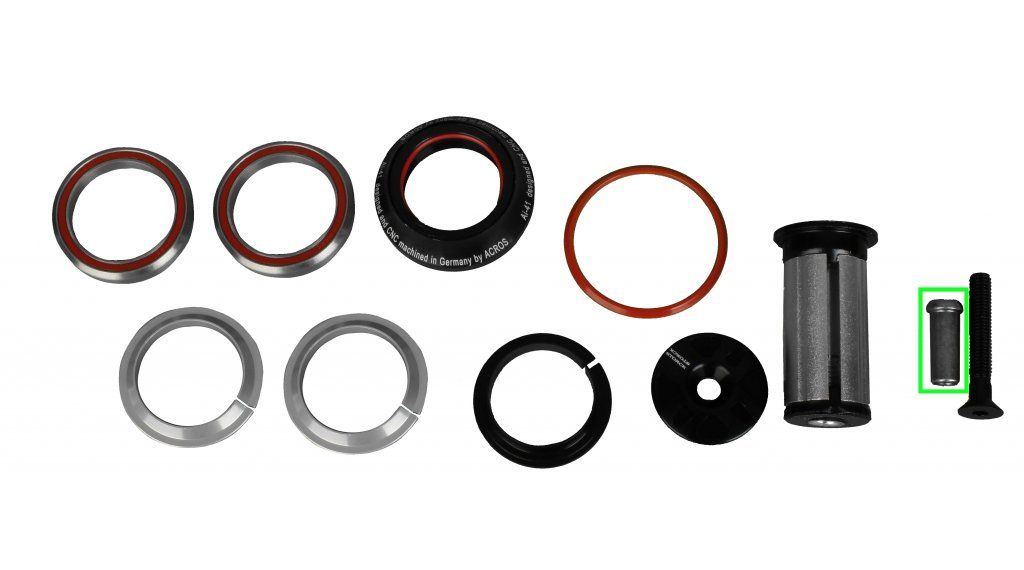
    The frameset came with a headset & steerer bung, but I can't work out what the item highlighted in green is for:
    headset_zpsa0cfb920.jpg
    It has an internal M6 thread - is it a spare part for the bung in case you want to use a headset cap with an M6 bolt (the cap that came with it uses a smaller diameter bolt)

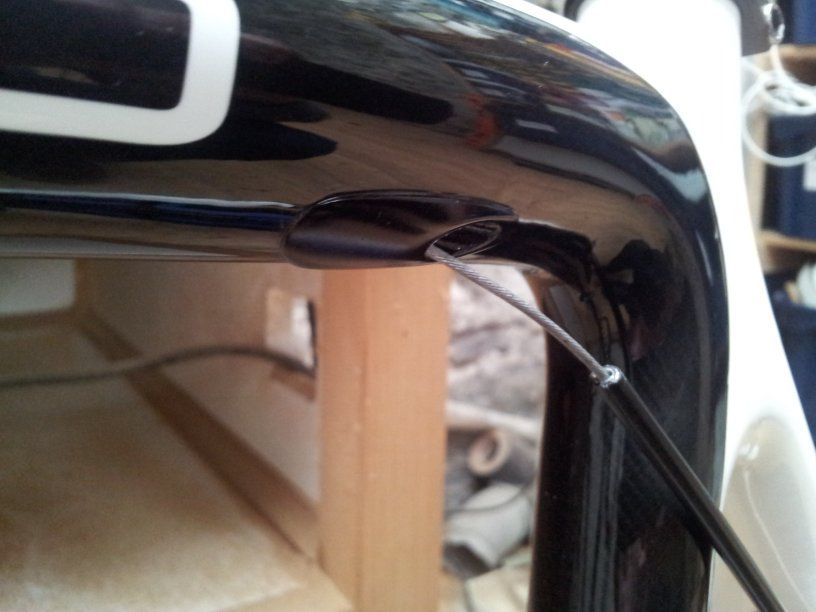
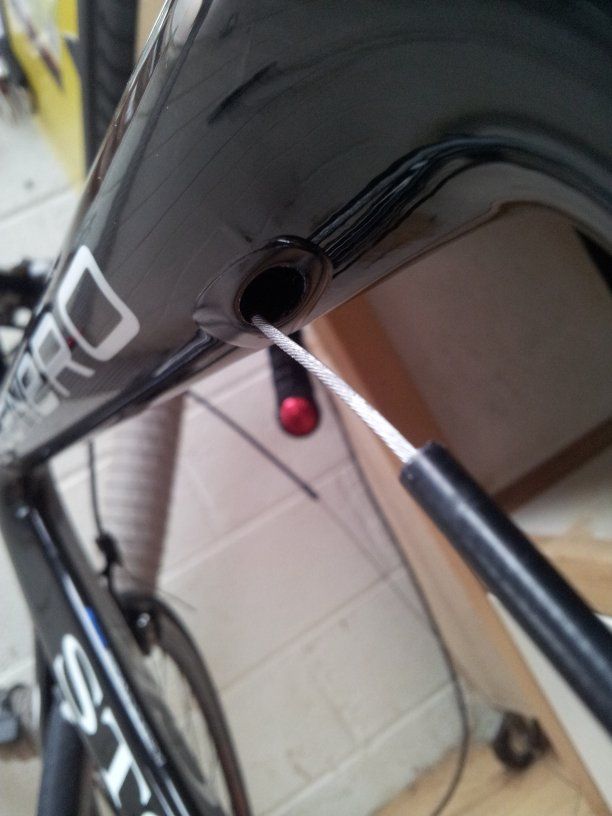
    Also the cable for the rear brake runs internally, but there are no stops for the cable housing (donor bike had cable running externally)

    toptube2_zpsdf4cbd26.jpg

    toptube_zpsa56f5f87.jpg

    Do I just have one piece of cable housing running all the way from the lever to the brake caliper? Could I get away in the short term with just adding another piece of housing to whats there already, with electrical tape over the joint, as this would save having to unwrap & rewrap the bars on that side (which are double-wrapped as well). I'm not quite as lazy as I sound, as I'm planning to replace all of the cabling once I get hold of the right colour cable housing, but its out of stock with a long wait time and I would like to have use of the bike in the meantime.

    All advice welcome!

    Ronan


Comments

  • Registered Users, Registered Users 2 Posts: 2,005 ✭✭✭ashleey


    The screw in the picture is the one that tightens the bung in the steerer. The thinner screw then fixes the head cap down by screwing into the first screw


  • Registered Users, Registered Users 2 Posts: 2,005 ✭✭✭ashleey


    With internal cabling, use the full length housing to thread the cable through the frame. After that you only use the housing for external exposed cable runs. Thus from shifter to frame around head tube and from rear of frame to brake or derailleur. The housing should come with 'end plugs' that effectively create a seal where the housing goes into the frame. Obviously you need to get all this in the right order! Cut the correct housing from shifter to frame first. Then use long housing lengths for threading. Then withdraw housing. Then cut finishing lengths.


  • Registered Users, Registered Users 2 Posts: 2,005 ✭✭✭ashleey


    By the way you can buy stops. I use jag wire racer cables which come with all the end pieces you will need.


  • Registered Users, Registered Users 2 Posts: 2,005 ✭✭✭ashleey


    By the way, the cable action works by tensioning against the housing. If you ran housing from shifter to brake you would have no force and reaction!


  • Registered Users, Registered Users 2 Posts: 197 ✭✭RonanCFD


    ashleey wrote: »
    The screw in the picture is the one that tightens the bung in the steerer. The thinner screw then fixes the head cap down by screwing into the first screw
    Ah, OK - it must be a spare for M6 bolts as there was already a screw in the bung to tighten it into the steerer. Thanks, just wanted to make sure I hadn't missed a bit out!

    Re: the cabling, I just assumed last night that it would work the way you described, but found that my end caps just got pulled into the frame! There doesn't seem to be any 'ledge' inside the fittings on the top tube for an end cap to butt up against, just a smooth transition into what looks like another tube inside the top tube.

    Thanks,
    Neil


  • Advertisement
  • Registered Users, Registered Users 2 Posts: 1,966 ✭✭✭Mefistofelino


    Its probably not a headset part - I think it may be a front calliper nut. Certain frame makes have deeper (front-to-back) than normal fork crowns and the standard brake nut that comes with the calliper may not be long enough to reach the calliper bolt. For that reason, you may be supplied with a longer sunken brake nut (I was supplied one with my frame - wasn't a Storck, though).


  • Registered Users, Registered Users 2 Posts: 197 ✭✭RonanCFD


    That makes sense - the fork is very deep front to back and when I attached the calliper with the original part I was a bit worried that the nut didn't take many turns. Thank you!


  • Registered Users, Registered Users 2 Posts: 2,005 ✭✭✭ashleey


    Good luck with the build. It's surprisingly good fun. You will have to unwrap the bar tape and redo though to get your cabling right. Also looks like you need to buy some cable ends


  • Registered Users, Registered Users 2 Posts: 197 ✭✭RonanCFD


    I made a start on the gear cabling at lunchtime, and it turns out that the existing housings are too short so I'll have to redo everything anyway. I've just ordered new cabling, another wait but at least I found something in stock...

    That housing in the photo did have a cap on - it disappeared into the top tube! From my digging around this morning, it looks like I just run a single long housing right through the top tube.

    Build has been good fun so far - cutting the steerer down tested my nerves a bit, but turned out to be straightforward. Really just the cabling to do now. Have also discovered that Storck forks are not really designed to take 25mm tyres - the clearance is pretty minimal!

    Thanks for help & advice :)


  • Registered Users, Registered Users 2 Posts: 2,005 ✭✭✭ashleey


    RonanCFD wrote: »
    I made a start on the gear cabling at lunchtime, and it turns out that the existing housings are too short so I'll have to redo everything anyway. I've just ordered new cabling, another wait but at least I found something in stock...

    That housing in the photo did have a cap on - it disappeared into the top tube! From my digging around this morning, it looks like I just run a single long housing right through the top tube.

    Build has been good fun so far - cutting the steerer down tested my nerves a bit, but turned out to be straightforward. Really just the cabling to do now. Have also discovered that Storck forks are not really designed to take 25mm tyres - the clearance is pretty minimal!

    Thanks for help & advice :)

    There should be rubber grommets in the frame to slot the housing in as when I did my Focus, I didn't run the housing all the way through?


  • Advertisement
  • Registered Users, Registered Users 2 Posts: 1,100 ✭✭✭clog


    The Brake cable is a straight run through on that bike (built one up for a friend last year). There is a tube within the toptube for the housing and it is curved so there is no option for a straight exposed cable run inside it.


  • Registered Users, Registered Users 2 Posts: 197 ✭✭RonanCFD


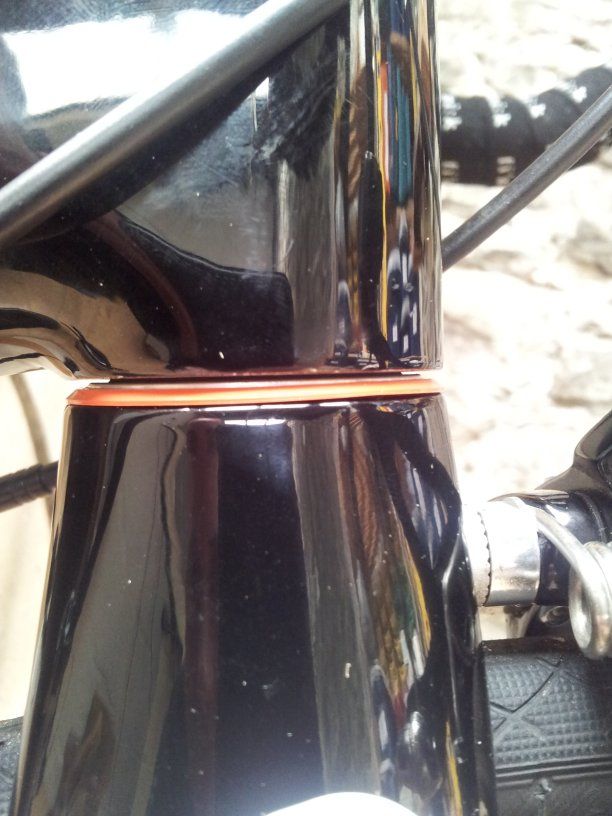
    Thanks, that clears that one up. Seeing as you've build one up, can I ask you something else? For the headset, do you remember whether you put the red plastic ring above or below the head tube? At the moment I've got it below, so you can actually see it in the gap between fork & head tube, but I'm not sure if this is right, and I'm also not sure if the crown race used for the fork end is the one with the larger or smaller bevel (used the larger one at the moment). Even looking at the instructions for this headset its clear as mud!


  • Registered Users, Registered Users 2 Posts: 1,100 ✭✭✭clog


    I'm not sure that I used the same headset as that but I would say that the red plastic ring sits below the crown race on the fork to provide a bit of Clearance and protection to the lower bearings (cane creek 110 headsets do this).
    Try and assemble it up with everything in place and see how you go


  • Registered Users, Registered Users 2 Posts: 197 ✭✭RonanCFD


    Here's a photo of it in place:
    headset_washer_zpsfe1a8984.jpg
    Seems to look sensible in that position. Not so sure about the slight gap between washer & headtube which has me questioning whether the smaller crown race should be on the fork end, but the steering feels smooth & solid so hopefully I've got everything in the right place!


  • Registered Users, Registered Users 2 Posts: 1,100 ✭✭✭clog


    the ring looks in the right position but can you flip it over so that it dishes up to cover gap.
    The gap looks normal and if it works and feels ok then job done. Pack in some grease on final assembly to keep things smooth


  • Registered Users, Registered Users 2 Posts: 197 ✭✭RonanCFD


    Thanks, I'll do as you suggest. Thanks for the help :)


  • Registered Users, Registered Users 2 Posts: 1,966 ✭✭✭Mefistofelino


    The manual for your particular headset should be in here somewhere (hopefully)


    http://www.acros.de/SERVICE/DOWNLOADS/MANUALS:::6_79_172.html


  • Registered Users, Registered Users 2 Posts: 197 ✭✭RonanCFD


    Thanks, they don't make it easy but I think it confirms that the red washer does go on the fork end, but inverted from how I had it in the picture as clog said.


Advertisement