Advertisement
If you have a new account but are having problems posting or verifying your account, please email us on hello@boards.ie for help. Thanks :)
Hello all! Please ensure that you are posting a new thread or question in the appropriate forum. The Feedback forum is overwhelmed with questions that are having to be moved elsewhere. If you need help to verify your account contact hello@boards.ie
Hi there,
There is an issue with role permissions that is being worked on at the moment.
If you are having trouble with access or permissions on regional forums please post here to get access: https://www.boards.ie/discussion/2058365403/you-do-not-have-permission-for-that#latest

Sako 75 pillar bedding results.

  • 06-08-2011 10:32pm
    #1
    Registered Users, Registered Users 2 Posts: 7,072 ✭✭✭


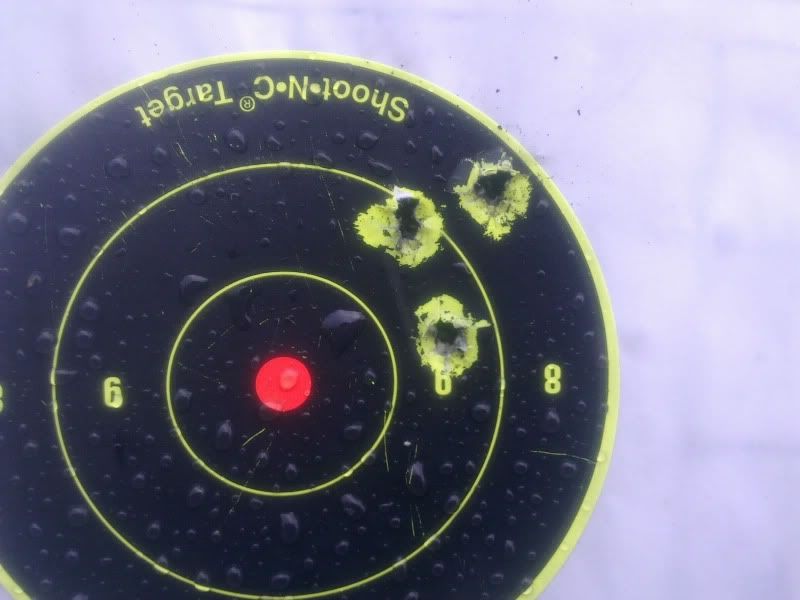
    Image0098.jpg?t=1312646743

    After a glass and pillar bedding job by Clive J. It's just a bit tighter than previously and a bit more consistent. Groups will tighten up a bit too. I added some weight to the trigger to have better feel when it's cold, so there's about 3.25lb on it now. Once I'm more used to that, groups will shrink.

    Range: 120 yards
    Wind: none
    Conditions: Cold and wet. Shot off bipod with no rear rest.
    Rifle: Newly bedded Sako 75 Hunter in .25-06
    Ammunition: Federal Powershok 117 gr soft point


    IWM ...... Glad to see it came together for you after all the hard work over a weekend. :):)

    Again sorry there's not any photos of the bedding job as there was just to much to do and keep in mind when doing the bedding.:o

    IWM it's up to you now to give a quick write-up of what you/we did ;)


Comments

  • Closed Accounts Posts: 8,590 ✭✭✭Tackleberrywho


    What were the groups before and after?


  • Registered Users, Registered Users 2 Posts: 13,034 ✭✭✭✭It wasn't me!


    What were the groups before and after?

    Hard to give any major evaluation yet as I've only shot it today to zero it since we did the work and it was minging, so wasn't hanging around to shoot more groups than necessary to get the rifle on. It's not the freshest barrel in the world, so any results will show much better if I ever rebarrel it, but to my mind, all adjustments were just cleaner. Hard to express this properly I'll be honest, but I used to take longer and more shots to zero, as I'd have an idea, and it'd go a little too far, or not far enough, and another adjustment wasn't quite right, while today, fired a group, moved, fired another (too far over, that's the one you're looking at above), made another adjustment, fired two to confirm that just bracket the red dot, about 3/4" apart (and one that I bollocksed the shot on and wrote off). I'll know more the next time I get a nice day to relax and fire a few groups with proper cooling time on a series of targets and see how uniform they are, but I'm really happy with the job. If nothing else, it's left me supremely confident in the rifle.

    Now, on to the work we did, and I apologise if I'm about to omit anything, but like Clive said, it's seriously involving work and hours just disappear as you're at it. Took us a couple of days (though we did fit in some good hunting as well at least :)) and it was a lot of work, but I'll see what I can do by breaking it down into the individual sessions of work.

    The Bottom metal and the pillars


    Arrived down to Clive's place in the afternoon and set up. The first thing to be done was to make the pillars. Using a micrometer, we measured the thickness of the stock where the action screws go through, having removed both the action and the bottom metal from the woodwork. We cut the pillars from a piece of 8mm aluminium pipe, slightly oversize. Then we drilled out the action screw holes to 8mm and checked the pillars in them, then filed them until they were flush with the stock on both sides. The pillars we ran a 6mm drill bit through to open them up for the action screws we intended to use.

    Having confirmed this, we removed the pillars and began the dremelling. We removed about a quarter inch of depth from the flat surfaces the action screws come through on the underside of the stock only for the time being.Make sure not to underdo this part as you need to have a big lump of the solid compound around the pillar to support it and it needs to be deep enough.

    Next step was to tape up all the woodwork around the opening and inside where you don't want the compound to go. Apply the release agent (In our case, dubbin wax) and rub it into the tape around where you'll be pouring compound and then rub it into the bottom metal liberally. There can't be any of the metal not coated in the release agent or it'll stick and you're screwed trying to get it out.

    Mix up the bedding compound (We used Devcon), mixing enough to fill the holes you've dremelled out and a bit more to secure the bottom medal solidly. Put the pillars back in until they're flush with the top part of the stock (This is why you file slowly to flush when making them, so you can be sure flush at the top means flush at the bottom even without the wood you've removed as a reference point). Fill it in slowly and carefully, making sure to keep it free of air pockets and bubbles which will reduce its strength after its set. Put in enough that some will squeeze out to support the bottom metal. Then, double checking (seriously) that the metalwork (including the screws you intend to use) is thoroughly coated in the release agent, put it back in the stock, put the action in top and screw down tight and leave overnight to set. In our case, we went for a few hours of foxing and got three. Fill the time as you like. :)


    Bedding the Action


    The next morning, after at least twelve hours, undo the screws and remove the action. Now, with bated breath, remove the bottom metal. It'll probably be a little sticky at first. This is good; it illustrates how tightly the bedding compound is holding it now. It should come out with a snap, and go back in the same way. You should now be looking at a refined mould of what your stock used to look like, with grey compound replacing the wood at the contact points. If this is what you're now seeing, great. You may need to run a drill bit through the pillars to get the compound out if any has gotten in.

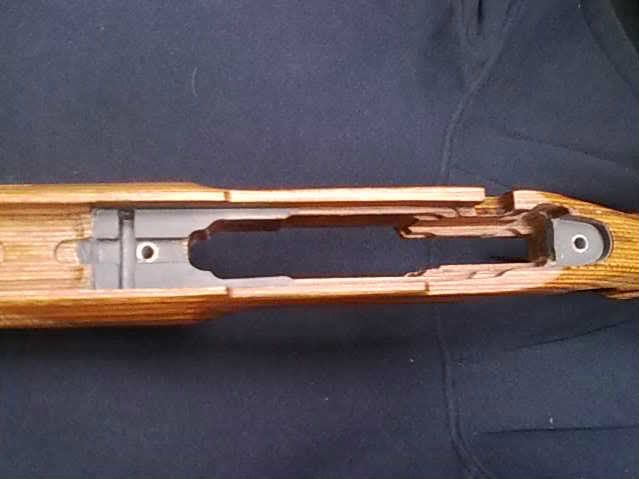
    Now you can start working on the top of the stock. Go nuts with the dremel, take at least a quarter inch out of the woodwork around the pillars, being careful not to hit them with it and damage them (I buggered up one of the pillars, it split and we had to drill it out and replace it, so save yourself the trouble). Take out plenty of wood at the rear action screw but leaving a sliver of wood at the front to act as the side of a bowl for the compound. At the front screw, you're going to want to take out a huge amount up to the front of the barrel channel, which you'll dam up with plasticine in a half circle, cut flush with a scalpel. Again, at the rear, leave a sliver of wood and dam it with plasticine to hold in the compound. Dremel out all the wood down to the depth of the recoil lug slot, and the dremel that a bit deeper, as you want compound in there and the thickness of a few layers of tape.

    Now, the preparation work. Add tape around the barrel in front of its taper to support it in the barrel channel and to centre it. Add tape around the barrel in front of the action to keep it free of compound. Remove the trigger from the action and plug up all the holes and slots with plasticine. Tape up the magazine release mechanism, plugging any gaps with plasticine. Put a few layers of tape on the front and edges of the recoil lug (not the back). Tape up around the stock again to keep it clear of compound. Again, apply the release agent liberally to all the metalwork and the stock where you've taped up and to all the plasticine. It's vitally important to have the metalwork completely coated again or it'll be stuck in the stock for good. Once you're doubly sure, you're ready to go. Apply plenty of the compound again around the pillars, leaving enough to squeeze out. Bolt the action into the stock, tighten up and leave it to set again overnight. Take any squeeze out off with the scalpel or nail polish remover and a cloth

    Last Few Bits


    Next morning, slowly and carefully rock the action out of the stock and view your handiwork. It should look like a mirror image of your stock prior to routing out all the wood with the pillars flush with the surface. Remove all the tape from stock, barrel and action, wipe everything down thoroughly with nail polish remover and remove all the plasticine.

    At this point, we made up replacement hex head action screws for my rifle, modeled on the original flat head screws, cut to size and with the heads re-profiled on a grinder.

    It's a great job, I really enjoyed it and thanks very much to Clive for the beers, the work and a few evenings of good company and shooting. I'm quite certain I've left out parts in that account, so maybe Clive can fill in any he remembers that I've forgotten and between us we can make some sort of coherent account. It's not so hard that you couldn't do it yourself and it's well worth it for the additional consistency and stability.


  • Registered Users, Registered Users 2 Posts: 571 ✭✭✭stick shooter


    Interesting read , well done .


  • Registered Users, Registered Users 2 Posts: 13,034 ✭✭✭✭It wasn't me!


    Cheers. I'm still fairly sure there's stuff I've skimmed over or not gone into enough and probably stuff I've forgotten, but I'll answer any questions as best I can. If I do it again, I'll take a load of photos at various stages to try show off the process graphically.


  • Registered Users, Registered Users 2 Posts: 220 ✭✭Hondata92


    Any pics of the finished job??


  • Advertisement
  • Registered Users, Registered Users 2 Posts: 7,072 ✭✭✭clivej


    Cheers. I'm still fairly sure there's stuff I've skimmed over or not gone into enough and probably stuff I've forgotten, but I'll answer any questions as best I can. If I do it again, I'll take a load of photos at various stages to try show off the process graphically.
    Hondata92 wrote: »
    Any pics of the finished job??


    Bedding job on my Sako 75 laminated varmint .308

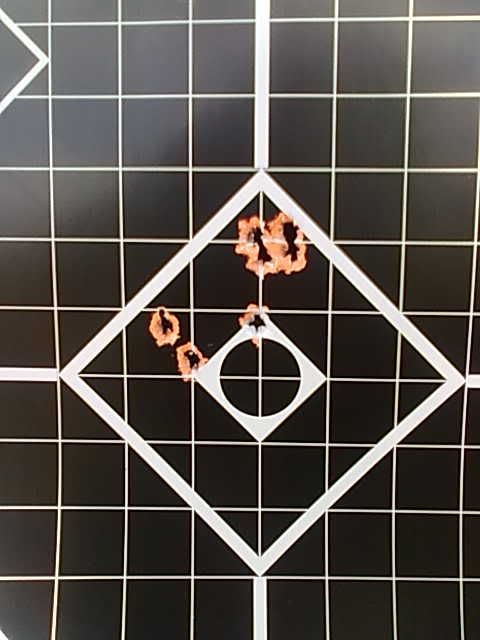
    Not IWM's Sako 75 rifle but one I did to my rifle last year. Plenty of photo's here to view. And a 5 shot group that more than made up for all the time that it took to complete the bedding job.

    Full write up and more photo's click here:-
    http://www.boards.ie/vbulletin/showpost.php?p=66882815&postcount=62

    First 5 shot group after the bedding. Prone @100y off a bi-pod laying in a field, Hornaday 155gr @2800 f/sec. I'm happy enough as that is what I was getting off a bench at the range with front rest and rear sand bag.

    The 3 lower shots are aimimg in and the top is the 5 shot group. Measured @ 1/2" centre to centre.

    12mmgroupafterbedding.jpg


    Action Bedding
    Actionbedding1.jpg


  • Registered Users, Registered Users 2 Posts: 16 remi243


    Great job Clive , that tight group made it worth all the time and effort;-)


Advertisement