Advertisement
If you have a new account but are having problems posting or verifying your account, please email us on hello@boards.ie for help. Thanks :)
Hello all! Please ensure that you are posting a new thread or question in the appropriate forum. The Feedback forum is overwhelmed with questions that are having to be moved elsewhere. If you need help to verify your account contact hello@boards.ie
Hi there,
There is an issue with role permissions that is being worked on at the moment.
If you are having trouble with access or permissions on regional forums please post here to get access: https://www.boards.ie/discussion/2058365403/you-do-not-have-permission-for-that#latest

Cat6 Cable Outside House

  • 16-05-2011 12:09pm
    #1
    Registered Users, Registered Users 2 Posts: 949 ✭✭✭


    Hi Guys,

    Im planning on running a Cat6 cable, from inside my living room, out the wall, around the house and into an upstairs bedroom.

    I just have a few questions,

    -Is there such a thing as Outdoor Cat6 cable, or is regular cable fine?
    -Can anyone suggest some kind of trunking I should put the cable in, if any?
    -I presume I'm going to use expanding foam to fill up the holes where the cable enters / leaves the building correct?

    Any other tips or things I should look out for, I read one:
    "have the access holes at an angle to prevent water ingress (angle up if drilling outside-> in, angle down if drilling inside-> out)"

    Thanks


Comments

  • Moderators, Sports Moderators Posts: 8,679 Mod ✭✭✭✭Rew


    M.J.M.C wrote: »
    Hi Guys,

    Im planning on running a Cat6 cable, from inside my living room, out the wall, around the house and into an upstairs bedroom.

    I just have a few questions,

    -Is there such a thing as Outdoor Cat6 cable, or is regular cable fine?
    -Can anyone suggest some kind of trunking I should put the cable in, if any?
    -I presume I'm going to use expanding foam to fill up the holes where the cable enters / leaves the building correct?

    Thanks

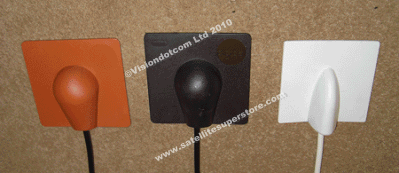
    There is outdoor Cat6, the sheath is thicker and wont degrade with UV/sunlight over time. I wouldn't worry about it for a home install TBH nor would I use trunking except for aesthetics. I would drill the holes though the wall at an angle sloping outward and use those little covers you can get for satellite coax. They bring the cable down first so water will run off, then you can go up with it.

    Holes should only be slightly larger then the cable so expanding foam may be be OTT, bit of silicone might be enough.


  • Registered Users, Registered Users 2 Posts: 1,130 ✭✭✭Pimp Ninja


    I'm in the process of something similar at home. Just to add as a suggestion. Instead of drilling 2 holes in the wall just drill out the living room and bring the cable up the external wall then in through the soffit and enter the attic.

    There are usually vents in the soffit and you should be able to bring the cable up there.

    Once you have it in the attic you can do what you like. My plan is to add a switch here and drop cables through the ceiling into the bedrooms for computer points.


  • Registered Users, Registered Users 2 Posts: 949 ✭✭✭M.J.M.C


    Thanks for the replies.

    I think if I go trying to put it through the soffit i'll mess it up and make a bags of it. Im worried enough as it is. Great idea though I can see why you'd do it.

    @Rew

    So you would just use a normal Cat6 cable and what nail them to the wall with cable clips? I dont really get what you mean about the satellite covers?


  • Registered Users, Registered Users 2 Posts: 3,036 ✭✭✭BailMeOut


    someone suggested to me a while back to use Ethernet over Power devices instead of messing about with running cables through my house. It was great advice as they work brilliantly. Have not run any cables since!


  • Closed Accounts Posts: 1,307 ✭✭✭stephendevlin


  • Advertisement
  • Registered Users, Registered Users 2 Posts: 949 ✭✭✭M.J.M.C


    Thanks for the replies

    I currently used those until they recently blew, Ive just got UPC 100Mb install in the house, and prefer to run a cable directly to the router.

    Thanks


  • Moderators, Sports Moderators Posts: 8,679 Mod ✭✭✭✭Rew


    M.J.M.C wrote: »
    Thanks for the replies.

    I think if I go trying to put it through the soffit i'll mess it up and make a bags of it. Im worried enough as it is. Great idea though I can see why you'd do it.

    @Rew

    So you would just use a normal Cat6 cable and what nail them to the wall with cable clips? I dont really get what you mean about the satellite covers?

    This is what they look like, should be in B&Q and the likes:
    wallcovers.gif

    Your job sounds quite straight forward so I wouldn't worry about going in to attics etc. Use trunking if cosmetically you dont want a cable and clips coming down the wall otherwise just nail on the cable clips either way paint the lot the same colour as the wall.


  • Registered Users, Registered Users 2 Posts: 949 ✭✭✭M.J.M.C


    Rew wrote: »
    This is what they look like, should be in B&Q and the likes:
    wallcovers.gif

    Your job sounds quite straight forward so I wouldn't worry about going in to attics etc. Use trunking if cosmetically you dont want a cable and clips coming down the wall otherwise just nail on the cable clips either way paint the lot the same colour as the wall.

    Thanks mate - appreciate that

    You got me thinking there, Would I be able to fit one of these inside? Do you know does the cable just connect into the back of these?
    http://cgi.ebay.ie/Single-RJ45-Wall-Face-Plate-Faceplate-Network-LAN-Cat5e-/190480307305?pt=UK_Computing_NetworkingTools_Accessories_SM&hash=item2c5982d469#ht_881wt_989

    EDIT:
    Just read a guide on how to install them here:
    http://homepage.ntlworld.com/pete.long007/wallsocket.htm

    I'll give that part a miss :D


  • Moderators, Sports Moderators Posts: 8,679 Mod ✭✭✭✭Rew


    its not as hard as they make it sound there. The face plates are normally colour coded so you just use the punch down tool to fix the wires in the correct slots and screw the faceplate onto a back box on the wall, job done. Only snag is you will need a punchdown tool but there about 5 quid on eaby


  • Registered Users, Registered Users 2 Posts: 949 ✭✭✭M.J.M.C


    Thanks Rew

    Since you posted the Cable Entry Cover ive been looking here on the net for something simiar but for inside the house. (failing that I might actually give this network wall point a shot)

    I dont want to just have a cable coming through the bedroom wall, looking for something to make it look a bit tidy.
    I guess I could get another one of those covers you posted below but they are for more outside am I correct?


  • Advertisement
  • Moderators, Sports Moderators Posts: 8,679 Mod ✭✭✭✭Rew


    You could use it inside but if I were you I would do the the proper network point will be really neat.

    Bring the cable in though the wall. Get a low profile white plastic electrical back box (about 2.50 in any hardware shop). Put a hole in the back (they have built in weak spots you can break to make a hole). Bring the cable though the whole and fix the box to the wall over the hole (simple enough drill, screws and plugs job). Cut the slack off the cable leave about 5-10 cm from the wall. Strip the sheath expose the 8 wires. Use a punchdown tool to punch the wires onto the blocks. Its all coloured coded so easy to do and im sure there are online tutorials. Only mistake you can make is using the punch tool backwards and thats hard to do! Screw the faceplate to the box and your done.


  • Registered Users, Registered Users 2 Posts: 2,367 ✭✭✭fionny


    I have a set of Gigabit Powerline adaptors... they were great up until the point that I got my 100meg Broadband connected... then they showed their true colours... they couldnt pull down more the 50meg of the connection... They are now on Ebay... cabling really is the only proper solution.


  • Registered Users, Registered Users 2 Posts: 949 ✭✭✭M.J.M.C


    Rew wrote: »
    You could use it inside but if I were you I would do the the proper network point will be really neat.

    Bring the cable in though the wall. Get a low profile white plastic electrical back box (about 2.50 in any hardware shop). Put a hole in the back (they have built in weak spots you can break to make a hole). Bring the cable though the whole and fix the box to the wall over the hole (simple enough drill, screws and plugs job). Cut the slack off the cable leave about 5-10 cm from the wall. Strip the sheath expose the 8 wires. Use a punchdown tool to punch the wires onto the blocks. Its all coloured coded so easy to do and im sure there are online tutorials. Only mistake you can make is using the punch tool backwards and thats hard to do! Screw the faceplate to the box and your done.

    Thanks (yet again)

    Yeah I think i'll go for this, give it a try!
    I'll do it one step at a time, get the cable in first then try and do the faceplate
    fionny wrote: »
    I have a set of Gigabit Powerline adaptors... they were great up until the point that I got my 100meg Broadband connected... then they showed their true colours... they couldnt pull down more the 50meg of the connection... They are now on Ebay... cabling really is the only proper solution.

    Yep my thoughts exactly fionny :)
    Hope saturday went alright for you and you got it installed ok.


  • Moderators, Regional North West Moderators Posts: 19,158 Mod ✭✭✭✭byte
    byte


    I found myself, that the Homeplug devices (I've a Netgear 200mbit set) only work best if the two plugs are on the same circuit.

    Mine has at least trebled in speed since I moved it from upstairs to downstairs (Homeplug connects PC room to the media player in the sitting room and was absolutely useless for streaming when the PC room was upstairs on a different circuit).

    Of course though, proper cabling beats them all!


  • Registered Users, Registered Users 2 Posts: 966 ✭✭✭heffo500


    Personally if it was my house I would do a nice neat job and use some 20mm steel conduit and 2 1 way boxes fix them one on each end and drill a hole in the back run your cable up through and away you go. Your cable will be much more protected and no chance of anyone hitting something of the cable and damaging it. From experience I find cat 5 cable isn't as durable therefore I wouldn't leave it exposed. I've uploaded a picture of it.As I'm sure you will see the method with the plastic cover which others are recommending and this is the aerial going to my house ever since this was done, I was never happy with the way it look and I intend to put this in 20mm steel conduit. I'm a firm believer in "If your going to do a job do it right."


  • Registered Users, Registered Users 2 Posts: 949 ✭✭✭M.J.M.C


    Thanks for sharing and posting the picture

    If it were the same distance as that picture I actually would do that. However Ive to run it around the side of the house and then up the side.

    If they cable begins to get damaged i'll just pop in a new one


  • Registered Users, Registered Users 2 Posts: 27 zathan


    If it's for outdoor use, I would recommend 6 pair poly poly cable - it's basically cat6 cable but is for outdoor use. You can get it armoured also.


  • Banned (with Prison Access) Posts: 15,858 ✭✭✭✭paddy147


    I have 120 meters of belden cat 5E outdoor cable here in my house,on a large wooden drum.:)

    Normal cat5e or cat 6 will not survice outdoor as the sheating is not waterproof or suitable for the elements.

    The normal cable CANNOT get wet as the water and moisture eats away the sheating and then corodes the pairs inside resulting in failures and breakages.


  • Registered Users, Registered Users 2 Posts: 3,341 ✭✭✭Fallschirmjager


    I did exactly this about 4 years ago. I bought wall plates ran the cable behind theplasterbord up to a vent they outside ran it up to the attic. I drilled a hole exactly the size of the cable to get into the attic. I ran it down to my router. It's cat6. I terminated the cables myself. I got the termination kit and tester on eBay.

    I didn't use any weatherproof stuff. I always meant to cover it. Never got around to it. I still have gigabit performance and no issues. Will it go. Yes it will but to be honest I will just run some more cable then. I will give you one piece of advice. Terminating cables is just annoying and time consuming especially if you do it now and again so if you have a few to do, do them at the same time.


  • Registered Users, Registered Users 2 Posts: 949 ✭✭✭M.J.M.C


    Thanks for all the extra replies

    I dont think im gonna bother to cover the cable, I can replace it as Fallschirmjager says.

    Fallschirmjager - what's Terminating the cable??

    EDIT - actually looking out the window at the minute, maybe I should cover the cable :)


  • Advertisement
  • Banned (with Prison Access) Posts: 15,858 ✭✭✭✭paddy147


    M.J.M.C wrote: »
    Thanks for all the extra replies

    I dont think im gonna bother to cover the cable, I can replace it as Fallschirmjager says.

    Fallschirmjager - what's Terminating the cable??

    EDIT - actually looking out the window at the minute, maybe I should cover the cable :)


    Terminating means making off the cable ends.Connecting it to a RJ45 patch panel with a krone tool or punch down tool,or else fitting an RJ45 glass plug and crimping it down to make the connection.

    Thats what terminating means.:)

    For fitting an RJ45 glass plug the colour code is as follows.

    You will have 4 colour/pairs indise the cable,blue,orange,green and brown

    You seperate the and then arrange/line up the wires as follows........

    White orange
    Orange
    White green
    Blue
    White blue
    Green
    White Brown
    Brown

    You then snip the end down to syuit the size of the glass plug.

    Then slide the glass plug over the cabkle end,and then use an RJ45 crimper to crimp down and secure the glass plug to the cable.

    Job done.


  • Banned (with Prison Access) Posts: 15,858 ✭✭✭✭paddy147


    M.J.M.C wrote: »
    Thanks for all the extra replies

    I dont think im gonna bother to cover the cable, I can replace it as Fallschirmjager says.

    Fallschirmjager - what's Terminating the cable??

    EDIT - actually looking out the window at the minute, maybe I should cover the cable :)


    A standard non outdoor Cat5 or Cat 6 cable cannot be allowed to have water fall on it or be submerged in any amount of water as it will destroy the cable over time and the cable will fail.


  • Registered Users, Registered Users 2 Posts: 949 ✭✭✭M.J.M.C


    paddy147 wrote: »
    A standard non outdoor Cat5 or Cat 6 cable cannot be allowed to have water fall on it or be submerged in any amount of water as it will destroy the cable over time and the cable will fail.

    What would you suggest covering this with? I dont want it to look too bad outside the house, that steal covering linked about wouldn't be ideal.

    Do you think I should just buy outdoor cat6 cable?
    I was getting a load of it free here from work :( but only indoor one

    EDIT:
    See your other post above
    I bought a punch down tool and a network faceplate so i'll be giving this a try also.


  • Registered Users, Registered Users 2 Posts: 5,401 ✭✭✭DublinDilbert


    M.J.M.C wrote: »
    What would you suggest covering this with?

    What colour/finish is the side of your house?

    You could just slip it inside some plastic conduit. Its very cheap protection and worth the extra 20 or 30 mins to put it up. If the cable is already installed you can get plastic / galvanised channel that can be screwed to the wall over the top of the cable, this stuff is about €2 / length in B&Q.


  • Registered Users, Registered Users 2 Posts: 949 ✭✭✭M.J.M.C


    House is white, and the cables not up yet.

    Im thinking rather than running the cable around the side of the house, I might run it up to the very top, and around the house so its under the roof and guttering
    I think its called the roof fascia - under neath that. That will protect is somewhat.

    Just did a quick search for 150feet of outdoor cat6 and the prices are nuts. I dont have that to spare atm.


  • Registered Users, Registered Users 2 Posts: 5,401 ✭✭✭DublinDilbert


    If the house is white, I'd run it up the outside wall, drill the sofit, into the attic and drop the cable down close to where you need it. Some of that white plastic "u" channel over it would be fine. From memory you were going to an upstairs bed room, so you should be able to drop it down inside one of the partition walls from the attic.

    I would probably spend the time and run it internally anyway, before getting out the SDS drill going outside, beside many fire places there's often a void left to run pipe up / down the wall. I used robbie's trick of using the lid off mini trunking for getting cable up behind a plaster board wall the other day, worked a treat.


  • Registered Users, Registered Users 2 Posts: 949 ✭✭✭M.J.M.C


    Cheers for the advice DublinDilbert

    Wish I knew as much as you with regards this. I would love to do all this internally but I know id just make a balls of it somewhere :(

    Completely lost now as to what to do after reading that ha!

    Router is in my living room, beside a fireplace (gas fire - house is just plasterboard walls)
    I would imagine anyone else would be able to run the cable up that into the attic then across the house drop it down into the spare room, but I wouldn't know where to begin with that :(

    EDIT:
    The more of think about doing it internally the more I'm worried about stuff going wrong
    There's vents in the soffit I could use that to run the cable around the house, then just drop it down outside the bedroom and drill a whole through??


  • Registered Users, Registered Users 2 Posts: 3,341 ✭✭✭Fallschirmjager


    Apologies I forgot I posted here...oops

    I drilled a hole and pushed the cable thru into the attic and into the hot press

    You need. Cat6 cable a big reel of it. Nylon string or strong string (a roll of that), Sellotape, drill, sensor for electricity cable/wall studs, rj45 connectors,walplate for cat6,some instant plaster mix, some paint for your wall

    The steps

    1. Locate the wall plate where you plug the cable into near an air vent
    You can be far or near but the further you are the more threading you have to do of e cat6 cable. Don't believe all the bs about maximum runs lengths, unless you are Michael flatly or maybe Ben dunne, you house isn't big enough. The only real issue with cat6 that I found, again my opinion, is that be careful bending it harshly. Now if you feel up to it you could remove your skirting board if you need the wall plate further from the vent. I used my vent as I don't like drilling from inside to outside, it's a personal thing for me. If you break the skirting board, it's cheap to replace, I have done it and it's not difficult to replace. With the wall stud/power cable scanner thing, scan the wall for both. It will beep if it finds either. Stay away from power, pipes etc. You don't want to be near that. If you are pick another spot. The studs are the wooden battens they hammer the plaster board to. They are from memory about half a meter in parallel runs the length of your wall. Sometimes they do a cross beam, they are a pain in the tits quite frankly. If you can avoid do so. Remember it's only plasterboard, so you can fix it really easily. I did 7.1 speakers in our house and it looked like fecken Iraq for a few weeks but I digress. So let's assume you have identified your spot for your wall plate, I would recommend about half a meter from the floor but to be honest you can put it where you like. Its getting close to that time...drill baby drill!!


    2. Drill a hole And cut a gap SMALER then the face plate

    Okay decide where the wall plate is. Now look at the size of the wall plate, don't fecken cut a hole bigger then it! So you need a hole the width of about 3 fingers width (assuming you dont have fingers like shovels). If you have one of those circular cutting attachments for your drill, use that but you dont need a big hole. Cut. Now remember you do not need a hammer action, it papered chalk you are cutting thro that is only about 1cm thick. I use my electric screwdriver. Now sit back and realise you can only go forward. If you used a cutting disk thing, keep the circular piece. If you make a mistake it's easy to fix.

    3. Run the cable into the hole

    Patience is the key here. I used a cable that is firm. I take the nylon string and Sellotape it to the inflexible cable, remember to make the selotape streamlined you are trying to sneak down the wall. I used a very old speaker cable that was inflexible so it could take some pressure and squeeze behind the plasterboard but in front of the insulation. Now you can take the internal vent cover off and i would recommend pushing the cable from the small hole upwards to the vent as you have more space to play with at the vent and a bigger chance of bumping into the cable. Long deep breaths and cups of tea and patience. Finally after 10 minutes or 3 hours you will see the tip of the cable. Now remove the string and pull out about 2 metres spare...trust me the number of times I managed to pull the sting back out by accident is not funny. You learn a whole new level of bad language! Holding the string remove the Sellotape and draw back out the cable. tie the cat6 to the string and draw it back down to the hole you cut for the wall plate. Pull thru about a meter, trust me you will need it, you do not want anything tight with network cables. Congrats you are 30% finished.

    Feed the cable outside

    I have a metal exterior vent. I gently put a screwdriver to separate the vent fins. Gentle does it, don't break the fins. Now comes the hard bit. How much cable do you need as you will have to cut. The average height at least toe me is let's say 8 meters, the run across your attic is say 5 meters, so you are saying aha, I need 13 meters...no...round way up...make it 18 or 20. Cable is cheap especially with this type or work, you can always use the smaller pieces for internal cables later. So give your self plenty of room for routing your cable. Now take the new cut piece and push it from inside the house thru the gently separated outer vent and spend 10 minutes on gods earth doing boring work. Again leave a meter or so inside the vent hole. This give you flexibility later if you want to move the cable.

    Go outside with a ladder

    Now you should have a big load of cable outside the vent. Find the end and safely get up the ladder. With a drill and drill piece that is the same size as the cable. If you want to put that metal trunking to hide the cable, now is the time to feed it thru. Anyways maybe you are wild like me and like to live life on the edge with cat6. It's all strippers n drugs with cat 6! S drill a hole about 4cm from the wall into the soffit, that would be the flat out hang where your attic is...I think it's called soffit? Always drill a hole and feed all of the cable thru...all of it...yes all of it. Do not pull tightly. Loose let it ebe loose dude.

    Get into your attic

    Remember where you drilled that hole, okay get a long stick with a nail, anything with a hook and go look see for your cable. Thank me later for pushing it all thru, as if you are luckly you will see it, if not it's easy to find.

    Almost home

    You should now have the cable in your hand sitting among all the crap in your attic.

    Were to go

    I drilled from our hot press where I hid our wireless router. I drilled a hole, actually pushed a screwdriver thru, it's plasterboard. Careful for pipes and ceiling joists. Stick a big cable thru as this will be hidden by the insulation. When you find it feed the cat6 cable down the new gap.

    Congratulations

    You now have a cable from downstairs to upstairs. Prepare they self for speed. I will hunt out the cat6 connector stuff and post next...sorry I have a 6 year old screaming for ebed be right back....


  • Registered Users, Registered Users 2 Posts: 3,341 ✭✭✭Fallschirmjager


    Christ browser just crashed as. Finished so here is v2.

    Search for fish tape. That is a cable for pulling and pushing behind Walls. I have not used it but if I was starting again I would use it. That replaced the speaker cable I have to get behind the plasterboard.

    For wiring cat6, half way down the page
    http://www.lanshack.com/make_cat_6_cable.aspx


    The other item is a cat6 kit for networking kit

    http://www.broadbandutopia.com/cat6kit.html

    For finding the pipes, power cables and wood parts behind plasterboard
    http://www.tooled-up.com/Product.asp?PID=121295


    If you need anything else just let me know. Trust me it sounds and looks scarier than it actually is. Starting is the hard part. Just treat the cat6 with a little care, it won't break but don't beat the crap out of it.

    Best of luck....

    Ps I just searched the web for pictures...not recommending any of the above asites s where to buy...so go for the price you can afford. Get good cable and good connectors and half decent crimper tools. You don't need full professional stuff if you are only going to do half a dozen cables...again just my opinion....


  • Advertisement
  • Registered Users, Registered Users 2 Posts: 949 ✭✭✭M.J.M.C


    Holy S**T!

    That is probably thee single most helpful and funny post here on boards....

    Thanks so much for taking the time to write such an in depth reply

    Very helpful, thanks

    You're a star


Advertisement