Advertisement
If you have a new account but are having problems posting or verifying your account, please email us on hello@boards.ie for help. Thanks :)
Hello all! Please ensure that you are posting a new thread or question in the appropriate forum. The Feedback forum is overwhelmed with questions that are having to be moved elsewhere. If you need help to verify your account contact hello@boards.ie
Please note that it is not permitted to have referral links posted in your signature. Keep these links contained in the appropriate forum. Thank you.

https://www.boards.ie/discussion/2055940817/signature-rules
Hi there,
There is an issue with role permissions that is being worked on at the moment.
If you are having trouble with access or permissions on regional forums please post here to get access: https://www.boards.ie/discussion/2058365403/you-do-not-have-permission-for-that#latest

DIY alloy wheel repair

  • 24-04-2011 7:09pm
    #1
    Registered Users, Registered Users 2 Posts: 3,220 ✭✭✭


    Ok so I have done a lot of research, and feel confident enough to give it a go.

    Only problem is my alloys have a diamond cut face.

    Option 1: wash and sand down wheel, apply filler, sand again, apply primer, paint and clear coat . Problem here is I'd lose the factory finish, and have painted rather than diamond cut wheels.

    Option 2: wash , sand off clear coat with rough sandpaper . Keep sanding ,using progressively finer sandpaper until scuffs are gone. Polish up using 2000 grit paper, rubbing compound and then polish. Apply clear coat ..

    Id rather option 2, not fussy if the finish doesn't last for ever, as I don't mind doing this procedure once a year..but will option 2 actually work?

    Opinions welcome.


Comments

  • Registered Users, Registered Users 2 Posts: 3,220 ✭✭✭cojomo2


    Anyone?:)


  • Registered Users, Registered Users 2 Posts: 8,718 ✭✭✭Matt Simis


    I just bought a cheap used Replica set of wheels that originally had a diamond cut type finish. It would take (apparently) 6hrs a wheel to sand down with the various grits to the shiny metal type finish. If you have that much time on your hands and more importantly can maintain a quality job for like 2 days of constant work, sure Option 2 will work as is nicer.

    So I sprayed them Rusto-leum Elegant Metalic Silver instead (still required quite a lot of paint stripper to pull the ruined lacquer off and then some sanding).

    This is them before:
    brabusoriginalphoto.jpg

    I didnt take the after photo yet as I was waiting to get them on the car which took a bit of a setback as despite the Seller's claims the 2 fronts are buckled.


  • Registered Users, Registered Users 2 Posts: 20,470 ✭✭✭✭Cyrus


    cojomo2 wrote: »
    Ok so I have done a lot of research, and feel confident enough to give it a go.

    Only problem is my alloys have a diamond cut face.

    Option 1: wash and sand down wheel, apply filler, sand again, apply primer, paint and clear coat . Problem here is I'd lose the factory finish, and have painted rather than diamond cut wheels.

    Option 2: wash , sand off clear coat with rough sandpaper . Keep sanding ,using progressively finer sandpaper until scuffs are gone. Polish up using 2000 grit paper, rubbing compound and then polish. Apply clear coat ..

    Id rather option 2, not fussy if the finish doesn't last for ever, as I don't mind doing this procedure once a year..but will option 2 actually work?

    Opinions welcome.

    if go with 2, but dont bother clear coating them, it wont take anyway, just keep them polished and wash them down if they get salt on or anything like that

    you'll need power tools mind


  • Registered Users, Registered Users 2 Posts: 7,401 ✭✭✭Nonoperational


    I think if I was you I'd chance Collins engineering. They say they can do them so don't accept them until they are right. Getting the finish right yourself could be tricky.


  • Registered Users, Registered Users 2 Posts: 20,470 ✭✭✭✭Cyrus


    gpf101 wrote: »
    I think if I was you I'd chance Collins engineering. They say they can do them so don't accept them until they are right. Getting the finish right yourself could be tricky.

    i wouldnt


  • Advertisement
  • Registered Users, Registered Users 2 Posts: 3,220 ✭✭✭cojomo2


    Just an update, went with option 2..

    Amazing results, really surprised myself.

    Just completed 1 wheel, 6 odd hours work. I sanded the crap out of them( until my fingers started to bleed !), starting with a rough grit, working my way up to very fine ( about 1600 grit wet and dry)..used plenty of water with the wet and dry fine sandpaper.

    Then I applied an alloy/ metal polish..they looked great. Then I applied 3 layers of clear coat ..finished them nicely. I'll post pics soon.

    As mentioned..I don't think the clear coat will stick, will prob flake off soon..if this happens, I'll just remove the clear coat ..but If I just leave them bare, wil they not start to turn White in no time?I was led to believe moisture causes this, so even if I wash them down regularly, will the water, rain etc cause them to go White?

    Cheers


  • Registered Users, Registered Users 2 Posts: 20,470 ✭✭✭✭Cyrus


    good man

    we need pics :)

    not sure about how long before they discolour but it will be easy enough to polish the bits that have started to discolour when you have no clear coat on

    a lot of lads are doing it with the bmw m3 19" diamond cut wheels now aswell


  • Registered Users, Registered Users 2 Posts: 3,220 ✭✭✭cojomo2


    Just took pics, will be up in 5 min or so..


  • Registered Users, Registered Users 2 Posts: 3,220 ✭✭✭cojomo2


    ok lets hope this works..

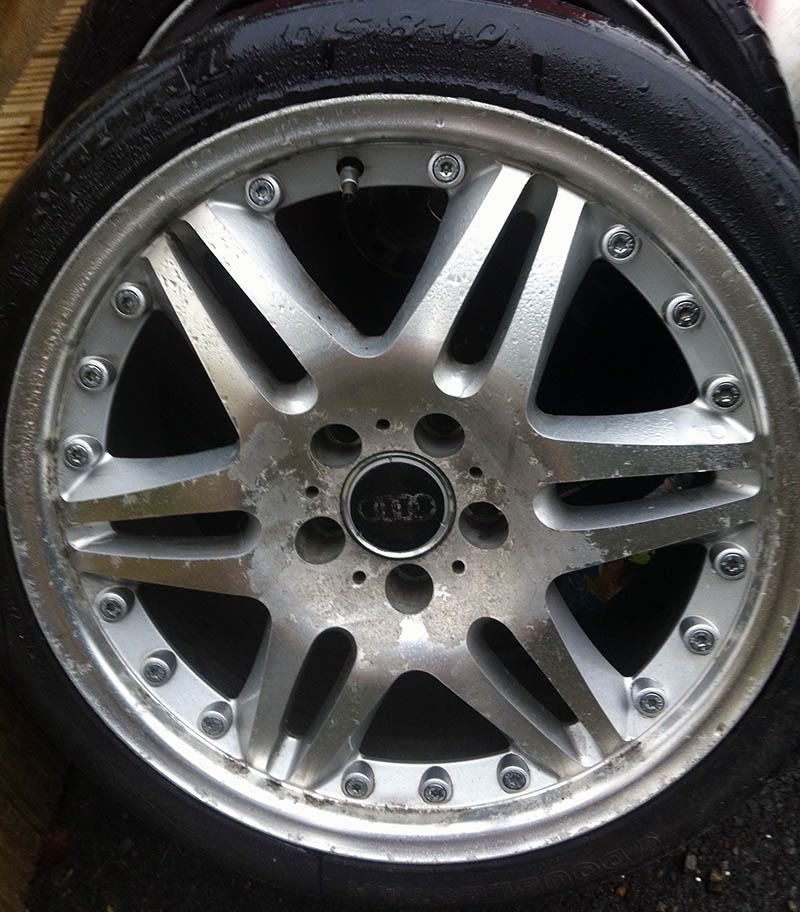
    i didn't actually take a before pic, but all the wheels on the car are in bits..thie first pic is one of the wheels as it is, in bits:
    http://img862.imageshack.us/i/imag0211s.jpg/


    the next is a pic of one I just refurbished, looks more shiny in real life, for some reason looks a bit dull in the pic:
    http://img232.imageshack.us/i/imag0213c.jpg/


  • Registered Users, Registered Users 2 Posts: 9,661 ✭✭✭Voodoomelon


    I can only see the before pic, you have a link to the after?


  • Advertisement
  • Registered Users, Registered Users 2 Posts: 3,220 ✭✭✭cojomo2


    I can only see the before pic, you have a link to the after?

    Should be working now..


  • Registered Users, Registered Users 2 Posts: 9,593 ✭✭✭tossy


    looks like good work! i would invest in a good wheel sealant from the likes of poor boys etc to keep that good work protected.


  • Posts: 23,339 ✭✭✭✭ [Deleted User]


    Very nice :cool:
    I'd never have the patience to spend hours doing that, fair play.


  • Registered Users, Registered Users 2 Posts: 3,220 ✭✭✭cojomo2


    RoverJames wrote: »
    Very nice :cool:
    I'd never have the patience to spend hours doing that, fair play.
    Yeah, normally I wouldn't either, but sure if it saves me 500 quid I can justify it..let's hope my enthusiasm doesn't slowly begin to dwindle before wheel number 4..:)


  • Registered Users, Registered Users 2 Posts: 7,470 ✭✭✭JoeA3


    Wow, looks like you did a fantastic job, well done! You had nothing to lose by giving it a go, looks like it really was in bad shape before you started. Was the missus happy to let you use the hairdryer? :)


  • Registered Users, Registered Users 2 Posts: 8,718 ✭✭✭Matt Simis


    RoverJames wrote: »
    Very nice :cool:
    I'd never have the patience to spend hours doing that, fair play.

    Looks great, but 4x 6hrs!


  • Registered Users, Registered Users 2 Posts: 7,401 ✭✭✭Nonoperational


    Good job!


Advertisement