Advertisement
If you have a new account but are having problems posting or verifying your account, please email us on hello@boards.ie for help. Thanks :)
Hello all! Please ensure that you are posting a new thread or question in the appropriate forum. The Feedback forum is overwhelmed with questions that are having to be moved elsewhere. If you need help to verify your account contact hello@boards.ie
Hi all,
Vanilla are planning an update to the site on April 24th (next Wednesday). It is a major PHP8 update which is expected to boost performance across the site. The site will be down from 7pm and it is expected to take about an hour to complete. We appreciate your patience during the update.
Thanks all.

chance of a lifetime "King's Ametyst"

191012141521

Comments

  • Registered Users Posts: 680 ✭✭✭copper12


    Evening all
    Finally myself and Damien are on talking terms; best of friends so to speak.:p
    He now sounds like a new engine; and so he should’ after all the time, and parts, that has gone into him.
    In the end I had to get a diesel teck to sort out the pumps.
    No mater what I tried, I could not get all cylinders to fire.
    I believe the pumps; were not the original pumps’ for this engine.
    In a last ditch attempt to get him working; before I gave up, I used the spill method, to time the pumps’ and injection, so I made up a jig and started on cylinder one.
    This is where the fun started. :eek:
    The timing was so far out; that I thought I had to have missed something’ when rebuilding the engine, so I spent a couple of days’ checking everything’ I removed the injectors, and with a piece of wire, rotated the engine, until I had TDC. I done this to the four cylinders’ I found nothing wrong there. I removed the gear cover’ and checked the pinion, that I had replaced, maybe I missed a cog, I found nothing wrong there either.
    Removed the tappet assembly and trust cup for each pump’ they all checked out ok.
    Re read everything I could find on using the spill method; to time the fuel injection, and started again same result. :o
    At this stage I had to make a decision, as to weather I had fait; in my ability to time the pumps, or weather to get a mechanic to do it for me.
    So I with a few Chios words;:mad: I went ahead and timed the four pumps.
    Luckily; I had ordered a new set of shims’ for each pump’ and had hung onto the old ones, I used nearly all the shims’ before I had finished’ and the injection started 20 degrees before TDC.
    Put everything back together; started the engine, there was some improvement’ but I was still not satisfied, so I had a chat with a injection specialist; that I know, I explained what I had done so far;
    I dropped the engine off at his place; and for 350€ he removed all the pumps, serviced and reinstalled and checked the timing for me; while he had to replace some parts in the pumps, he was satisfied that the timing was right. So provided I don’t go anywhere near the pumps; he will stand over them for two years, provided I change the filter at least once a year.:P
    The result; Damien now starts from cold, without using any heat’ after the third turn, runs smoothly, and is firing on all cylinders; he even checked out the alternator, as I burnt out the one that came with the engine, 30€ for a KKK 65 amp alternator from the local scapyard how bad.:D
    So the next step is to try and get Damien, into Coe Na Marra; the adventure continues.
    I will give him a lick of paint first :cool:


  • Registered Users Posts: 680 ✭✭✭copper12


    Evening all
    I had hoped to have Damien onboard by now.
    I spent the weekend looking for a problem that did not exist.:mad:
    While giving Damien the finishing touches, I noticed that the oil pressure had dropped’ to almost zero after half an hour running.
    So checked the engine over from top to bottom’ and found a slight leak where the lift pump attached to the crankcase door; although I had fitted a new gasket when refitting it previously, so I had to make up another two very thin gaskets, doubled up before I sorted it out’ I did not think this caused the low oil pressure’ so between the net, and some books, I had; I was about to start stripping Damien down again’ because low oil pressure, means I had made a mistake fitting the bearings, or the pump, or the pressure relief valve was knackered.
    So bright and early Monday morning, just before I was about to start with the tear down, I searched the garage’ I new I had another gauge somewhere, and sure enough the twins came to the rescue.
    I found one on an old tyre kit
    So I fitted the gauge’ I had to make up a bit of a jig as the tread was to big; so started Damien up 40psi roughly the same as the other clock; the older clock read from 1 to 50 bar’ so 2 ½ bar cold’ after ten minuets’ 30psi.
    After half an hour 20psi, after 1 hour 20psi, starting and stopping the engine just to make sure the clock worked, that’s about 5psi above the recommended pressure in the manual.
    So I spent the rest of the day cursing myself; and removing the scaffold around Ceo Na Marra.
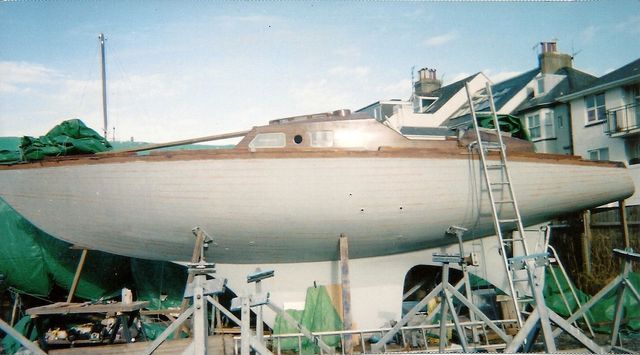
    As I will have to pull her out in order to have room to fit Damien.
    I have made a video staring myself;:cool: I try and get one of the grandchildren to put it on you tube. And post a link,
    I have almost finished the wiring of the mast
    Tinned copper cable. and the cable for the vhf and the wind vane.
    I intend to fit two LED spot lights at the first set of spreaders, the running light I am not to sure about fitting a running light’ as the mast head light is a LED tri colour light with an anchor light would the anchor light do if running with the engine any advice appreciated
    I will try and pull the ropes for the internal halyards as well as soon as I get some.


  • Closed Accounts Posts: 5,108 ✭✭✭pedroeibar1


    Hi Copper,
    I'm not sure that you can have a "three in one" unit on the masthead? IMO it is safer and far easier to identify a yacht when there are port & starboard on the bow and a white masthead/steaming light. There also are rules about visibility /degrees of arc ….
    As you have the cap off the masthead, think of using two magnets, one attached to a fishing line inside the mast as a mouse to pull through the halyards. She’s nearly ready to get wet!!:)


  • Registered Users Posts: 26 tinski07


    The masthead tricolor is for use under sail, Once motoring you are a motor vessel and should use nav lights on either side of the boat. A stern mounted running light just makes sense, I have yet to fit one but out at night last year I realised that I really should have and the Anchor light on top of the mast is aceptable as it is part of the forward triangle but appartently people disagree as it is not where you are looking coming into a dark anchorage. Thats what they say, I have no mast lights at all.


  • Registered Users Posts: 680 ✭✭✭copper12


    https://www.youtube.com/watch?v=Acwd87PN_a8&feature=em-upload_owner
    My first time ever making a video
    Trying how to figure out how to get it from the camera to the net took a while
    Above is the result
    While the mast is in my back garden I can pit in or take out what ever it needs
    So far I have wired it for the attached photo
    I will also fit lights forward and aft
    I have Coe Na Mara almost out on the footpath waiting for a fellow with a long arm :pac:


  • Advertisement
  • Moderators, Motoring & Transport Moderators, Sports Moderators Posts: 6,320 Mod ✭✭✭✭fergal.b


    Great job he sounds happy now :)


    .


  • Registered Users Posts: 680 ✭✭✭copper12


    Evening all
    At last Damien is on board.:)
    I came across a fellow with a long highabb
    It took all of 10 minuets’ to get him from the garage; to taking off the hoist sling.
    This was last Friday’ when the weather was so bad’ you wouldn’t put a milk bottle out in it.:P
    All the preparation paid off. ;)
    I did have to raise the front of the engine’ and remove some washers’ from the rear’ to align the prop shaft
    I fitted a R&D coupling’ it took a while before I got it right’ also checked the packing gland.
    So I can now get along with building a frame’ around the engine’ and try and make the centre cockpit some what weather resistant. I also found a few pictures of when I used the spill method to do the timing.


  • Registered Users Posts: 680 ✭✭✭copper12


    Evening all
    Just to let you know I am still tipping away
    I had to waited until the engine was installed to make a start on the bulk heads
    I reused quite a lot of the original timber; oak.
    The rest came in handy for templates
    I was surprised by the amount of fifty year old oak I was able to use
    Where I had to replace the oak’ I used teak as that is what fell off the back of the truck.
    I been tedious and slow work
    I doubt if I would even make a bad carpenter
    You know’ measure twice cut once; in my case it’s measure half a dozen times cut once and still make a hames of it; there will be a lot of hidden joints in Ceo Na Marra.


  • Registered Users Posts: 680 ✭✭✭copper12


    Evening all
    I started to restore both the diesel and water tank’ and the original bilge pump.
    I had been keeping a look out for some new tanks’ but when the time came to fit them; I had not come across anything that would work better than what I had already had.
    I had to fit two Yorkshire fitting’s one to each; water and diesel, one was already installed; this I had to do again’ as it was not done properly first time, and had a lot of mastic used trying to make a seal.
    The other I had to use for the water tank, as the original outlet had rusted and fell off’ as soon as I touched it.
    I cleaned back to bear metal’ the tank is made up of stainless steel’ covered with fibreglass’ the outlet was black iron; they are all working and tested’ so I refitted them; there’s another fifty years left in them. They are fairly heavy’ so to secure them’ I seated them on plywood; on either side and the back’ I used expanding foam’ put inside plastic bags’ allowing the foam to expand; taking up and forming’ the shape of the hull’ while not sticking to either the hull or the tank; the verdict is still out on this yet’ as I will have to give the tanks a good shaking about; before I secure the top section.
    The bilge pump’ and associated fittings, these are made up of brass’ bronze’ and copper fittings.
    While taking it out of the boat’ I didn’t think I would be putting it back; as it looked like it had not worked for a long time.
    But as it is an original part; I said I might as well have a look’ before I made a decision.
    Anyway to make a long storey even longer; I took it apart’ it is made up of two bronze flanges’ that holds a copper barrel that holds the pump.
    The pump fits inside the barrel’ it contains two balls’ one fits inside a cradle’ attached to the handle, the other one is lose; they are separated by a leather flap’ squeezed between another two flanges.
    The balls act as two way valves; allowing for suction on the upstroke’ and flow on the down stroke.
    I might have to replace the balls’ as they are made up of natural rubber’ and after fifty years they look worse for wear, other than that’ I think it should work as intended.
    Simple design; with bit grease to help with the leather seal; it will go back into Coe Na Marra.


  • Registered Users Posts: 680 ✭✭✭copper12


    a few more


  • Advertisement
  • Registered Users Posts: 680 ✭✭✭copper12


    Evening all
    The cockpit is almost finished bar the shouting.
    It has taken a lot longer than I expected.
    Since I had no drawings to work from; only photos, and the old timbers to work with.
    It was like putting a jigsaw puzzle together; I’m happy with the outcome so far.
    All in all, I have lost about 3” inches’ because of the size of the engine, in the cabin, I thought I would lose more.
    The new engine is longer and wider than the old Volvo MD2.
    I fitted the old hatch sliding doors; while they fit, it turns out the entrance is not quite squire.
    So I will have to slightly modify them; to make them slide up the track’ I had intended to rebuild them anyway.
    So over the next couple of days I might tackle this.
    While it is recommended that the battery box should be fibreglasses; in this case, the original battery compartment, is directly over the engine’ and since I could not find a better place
    I intend to place the new batteries in the same place; so the box needs to be able to be dismantled; along with the steps’ leading into the cabin, in order to allow any work that might need to be done in the future; without having to dismantle half the cabin, and cockpit,
    Directly under the battery box, there are the injectors and the fuel filter.
    Under the steps’ there’s the timing belt’ water pump’ I should be able to access them’ should I need to.
    Other than the ply’ everything has been made up with hardwood, oak’ and teak’ mostly with some recycled mahogany’ and oak’ thrown in here and there.
    By the way, that trick I used with the expanding foam, and the plastic bag’s seems to have worked, I have given them a good shaking about, and there was no movement, so once I secure them on top, they should stay put.


  • Registered Users Posts: 680 ✭✭✭copper12


    Evening all
    Well I’m still working on the cockpit; like everything else plan’ A ’ B and C went out the window, and I’m working on plan D; and a little bit of F, I’m all right with the rough stuff, but when it get down to the intricate cuts, I just cant seem to get them right .
    Anyway I’m getting there slowly but surly


  • Closed Accounts Posts: 5,108 ✭✭✭pedroeibar1


    The old 'foam in a bag' trick is also used in producing personalized carseats for Formula 1 car drivers. Great to see the continuing progress.:)


  • Registered Users Posts: 680 ✭✭✭copper12


    Almost finished the cockpit hatches I thought this would take a couple of days it’s been almost a week and I’m still not finished
    Keeping waste to a minimum it still took over 7 meters of 4x4 teak


  • Registered Users Posts: 20,031 ✭✭✭✭neris


    does that package/box/bag in the back of the last pic say Illbruck on it?


  • Registered Users Posts: 680 ✭✭✭copper12


    Evening all
    Yes it dose Neris
    This is the stuff I used for the caulking the seams on deck
    It worked out at a fiver a tube’ and worked just as well as the other well known brand; that’s three times the price.
    I must have used about five boxes
    There is one or two places where the seam’ opened up’ and I will have to re, caulk.
    This is down to the time of year, that I caulked the decking, the moisture content of the wood’ was it high.
    I should have waited until the middle of summer


  • Registered Users Posts: 20,031 ✭✭✭✭neris


    Mr illbruk was a very keen sailor and big in the German sailing scene and admirals cup teams used to call all his boats Pinta or Illbruk Pinta


  • Registered Users Posts: 680 ✭✭✭copper12


    Evening all
    I have done a trial fit of the hatches today
    While I am happy with the locker covers, and think they tuned out well
    The door hatches I was not pleased with and I will have to start again :o


  • Registered Users Posts: 680 ✭✭✭copper12


    Evening all
    The second attempt turned much better than the first
    The bottom washboard is oak ply
    The top section is oak and mahogany
    I’m happy enough with this result
    A few coats of varnish and they should all blend in


  • Closed Accounts Posts: 5,108 ✭✭✭pedroeibar1


    copper12 wrote: »
    Evening all
    The second attempt turned much better than the first
    The bottom washboard is oak ply
    The top section is oak and mahogany
    I’m happy enough with this result
    A few coats of varnish and they should all blend in

    looking nice.:) I'd put teak integrated drip cills on those washboards and seal the ply with resin - the cut edges of ply are very porous, I've found it delaminates very quickly.


  • Advertisement
  • Registered Users Posts: 680 ✭✭✭copper12


    Evening all
    What with the fine weather I am making the most of it and will continue working on the cockpit and the decking and leave the work that needs to be done on the inside for when the weather turns
    Since I would not be known for wasting anything I hung onto just about any good wood that has come off Ceo Na Marra and try and put it back into it’s original position or fins another use for it.
    I needed to find some mahogany to finish the cockpits’ the forward section would have needed a board that would measure at least 10” across since I didn’t have any I made use of one of the lath holders that had the shape of the hull and an old mantle pies between the both of them I managed to get the trim finished.
    As is normal for me I made use of some old mahogany for where the cleats lead off the winches the originals were made of ply, and promptly routed the wrong side of one so I routed both sides in order to make them some what presentable
    Here are a few pictures as they say a picture paints a thousand words


  • Registered Users Posts: 680 ✭✭✭copper12


    a few more


  • Registered Users Posts: 680 ✭✭✭copper12


    Evening all
    I have almost finished the cockpit t area
    I am reasonable pleased with the outcome some panels I might have to give a lick of paint
    I'l wait and see; so next job is to fit the cockpit portholes and window panels


  • Registered Users Posts: 680 ✭✭✭copper12


    Evening all
    I have made a start on the side panel’s windows
    I managed to save five of the original glass pains’ however on inspection’ two had water ingress, between the laminate, so opted to replace them’ so I am left with tree of the original laminated glass panels’
    I have gone with bronze’ toughened laminated 6mm glass’ I increased there size by 5mm all-round.
    I felt the original rebate was to small’ this increase in size’ dose not effect the original screw holes;
    it is awkward work’ as there is a rebate on the outside’ and a bevel on the inside’ the router will do about half of each’ the rest by hand’ and lots of sandpaper ‘
    I will use tec7 to bed them in, and polish up the brass surrounds, I will have to give the rebate’s a couple of coats of varnish, to seal them first; well that’s the plan.


  • Registered Users Posts: 680 ✭✭✭copper12


  • Moderators, Motoring & Transport Moderators, Sports Moderators Posts: 6,320 Mod ✭✭✭✭fergal.b


    Looking very smart :) The links work fine, almost time to get her wet,wet, wet.


    .


  • Registered Users Posts: 680 ✭✭✭copper12


    Evening all
    I have fitted the port holes
    They turned out ok
    The chrome had come off them’ in a lot of places, so I tried to remove as much as I could; and will leave them as they are.
    the glass seal’ had to be refitted to one of them’ as the bronze screws had corroded’ and the flange had come off, so I had to drill out the old screws’ and re tap the treads’ and used old brass screws from electrical fittings’ the ones used to screw the socket to the wall’ they are usually brass screws’ remove the chrome’ cut to size’ sand off the dome’ and bobs your uncle.
    If the weather stays the way it is I will make a start on the galley area


  • Closed Accounts Posts: 5,108 ✭✭✭pedroeibar1


    They look great!


  • Registered Users Posts: 495 ✭✭Hifive


    I always look forward to your updates, keep them coming.

    Your not the only one at it, I found one for sale on ebay.

    http://www.ebay.co.uk/itm/321801146312?_trksid=p2060353.m1438.l2648&ssPageName=STRK%3AMEBIDX%3AIT

    _57.jpg

    It says it was substantially rebuild a few years ago but stalled due to ill health. Lots of photos and info on the boats in the links. It seems they are a very well built boat.


  • Advertisement
  • Registered Users Posts: 680 ✭✭✭copper12


    It looks to me to be a bargain :eek:
    It has given me a few ideas ;)
    I hope my wok reaches his standard ;)


Advertisement